
 Products
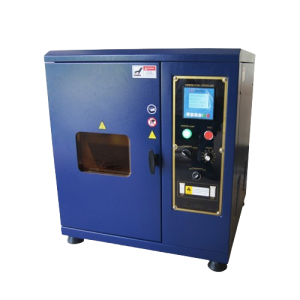
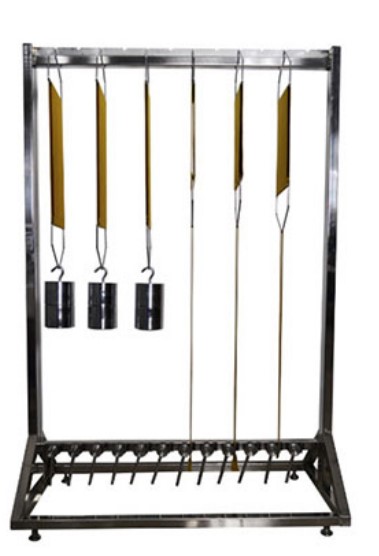
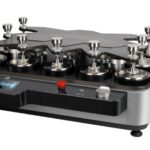 Martindale abrasion tester Updated

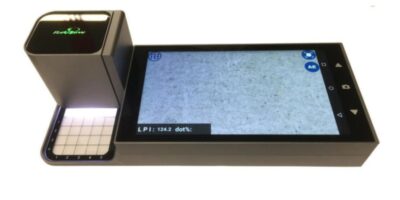
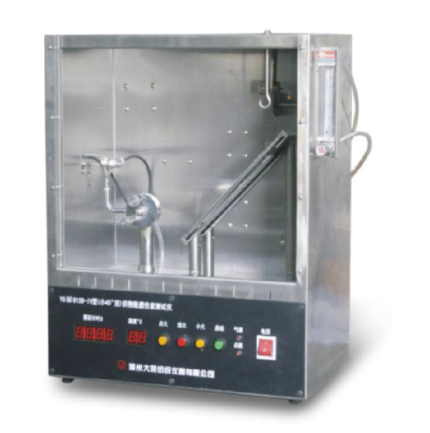
Digital Ink Rubbing Tester
Digital Ink Rubbing Tester
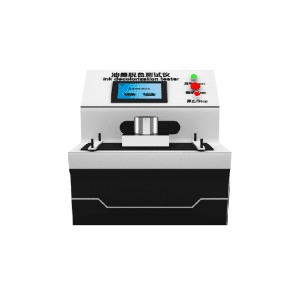
Digital Ink Rubbing Tester
Digital Ink Rubbing Tester
Digital Paper Dot Meter Densitometer
Digital Paper Dot Meter Densitometer
Digital Paper Dot Meter Densitometer
- Calibration: Performing white and black calibration using provided standards to ensure measurement accuracy.
- Sample Placement: Positioning the printed sample under the measurement aperture.
- Measurement: Initiating the measurement process via the touch screen or connected software.
- Data Analysis: Reviewing the displayed results and, if necessary, transferring data to a computer for further analysis.Regular calibration and maintenance are recommended to maintain the device's accuracy and longevity.
- Accurate Dot Analysis - Precisely measures dot gain, dot area, and enlargement for high-quality printing.
- Consistent Print Quality - Helps maintain uniform color density and contrast across print runs.
- Time-Saving - Quick digital readings eliminate the need for manual inspection and reduce errors.
- Multi-Parameter Testing - Measures density, color difference (ΔE), tone error, and gray balance in one device.
- Supports Industry Standards - Complies with ISO and other standards for print quality control.
- User-Friendly Interface - Touchscreen and onboard storage make it easy to operate and manage test data.
- Portable and Rechargeable - Battery-powered with thousands of readings per charge—ideal for field and lab use.
- Enhances Process Control - Enables precise adjustments during printing to reduce waste and reprints.
- High-Resolution CMOS Sensor - Ensures precise optical density and color measurements.
- Measurement Geometry: 45°/0° - Ideal for accurate reflection density readings on printed materials.
- Multiple Light Sources - Includes visible and UV LEDs for versatile testing conditions.
- Touchscreen Display - 3.5-inch color LCD with intuitive controls for easy operation.
- Multi-Function Measurement - Measures dot area, dot gain, density difference, tone error, and gray balance.
- Large Data Storage - Stores over 10,000 measurements for tracking and reporting.
- Rechargeable Battery - Long-lasting lithium battery supports up to 5,000 readings per charge.
- USB and Bluetooth Connectivity - Allows data transfer and remote operation via PC or mobile apps.
- Standard Compliance - Supports ISO Status A, E, I, T and CIE color spaces like LAB, LCh, XYZ.
- Multiple Observer Angles - Select between 2° and 10° for different visual perception simulations.
- Power On - Turn on the device using the power button.
- Calibrate - Perform black and white calibration using the provided standard tiles to ensure accuracy.
- Select Measurement Mode - Choose desired mode: density, dot area, dot gain, ΔE, contrast, or gray balance.
- Place Sample - Position the printed paper sample under the measurement aperture.
- Take Measurement - Press the measure button or tap the screen. The device will scan and display results instantly.
- Analyze Results - View data on the touchscreen. You can switch between values like density, dot area, and color difference.
- Save or Export Data - Store results in internal memory or transfer via USB/Bluetooth if needed.
- Power Off and Store - Turn off after use. Keep in a dust-free area to protect sensors.
Digital Paper Dot Meter Densitometer
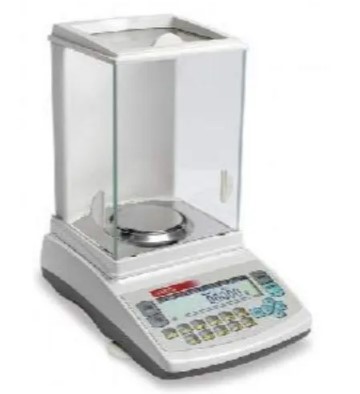
Digital precision balance
digital precision balance
2/3/4/5 Digit Digital precision Balance
digital precision balance is a weight balance machine. It’s used to Low capacity balance. digital precision balance play an important role to accurate measurement. Digital precision balance is used to check weight paper, jewelry etc. It shows accurate result. We have the best collection of digital precision balance. MAAM TEX IS the best supplier of Precision Balance in Bangladesh
A Digital Precision Balance is a high-accuracy electronic weighing device used in laboratories, industries, and educational institutions for measuring mass with a high degree of precision. It is essential for tasks that require meticulous weight measurements, such as chemical analysis, formulation, and quality control. Key Features:- High Accuracy & Precision: - Typically offers readability from 0.1 g to 0.001 g (or even finer). - Ideal for weighing small amounts of material where accuracy is crucial.
- Digital Display: - Large, backlit LCD or LED display for easy reading. - Some models include touch screen interfaces.
- Tarring Function: - Allows you to subtract the weight of a container or packaging to get the net weight.
- Calibration: - Internal or external calibration to maintain accuracy over time. - Some advanced models have auto-calibration features.
- Weighing Units: - Supports multiple units like grams (g), milligrams (mg), carats (ct), and ounces (oz). Stable Platform: - Includes a draft shield to protect against air currents and vibrations, which can affect measurement accuracy.
- High Accuracy and Precision- Delivers extremely accurate weight measurements, often down to 0.001 g or better.- Crucial for experiments and applications where even slight variations can affect outcomes.
- User-Friendly Interface- Digital display makes readings easy to read and interpret.- Most models include intuitive controls for functions like tarring, unit conversion, and calibration.3. Speed and Efficiency- Provides instant, stable readings, saving time compared to manual or mechanical balances.- Streamlines lab workflows and enhances productivity.
- Versatile Applications- Suitable for various fields including chemistry, biology, pharmacology, food testing, and gemology.- Can handle diverse weighing tasks from solids to liquids and powders.
- Advanced Features- Tare Function: Subtracts the weight of containers automatically.- Multiple Weighing Units: Supports various measurement units.- Data Connectivity: Many models allow connection to computers or printers for data logging.
- Portability and Space Efficiency- Compact design fits easily in most laboratory setups.- Lightweight models are easy to move and store.
- Enhanced Safety and Reliability- Stable platform and draft shields reduce environmental interference.- Built-in calibration ensures ongoing accuracy.
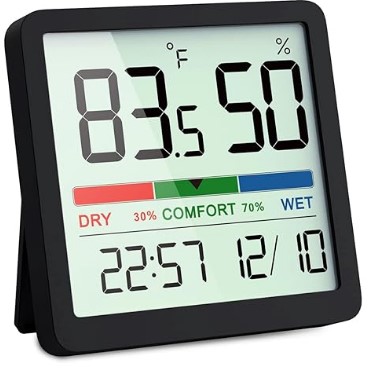
Digital Temperature Humidity Meter
Digital Temperature Humidity Meter
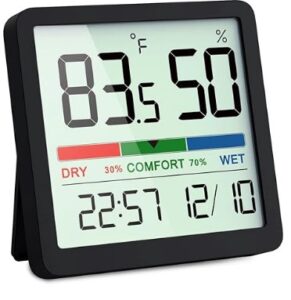
Digital Temperature Humidity Meter
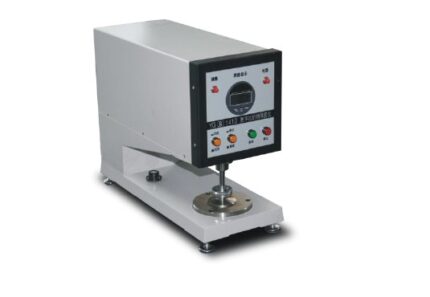
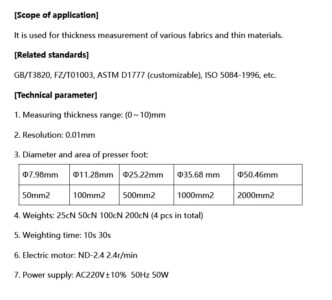
Digital thickness gauge
Digital Thickness Gauge

Digital Thickness Gauge
- High Accuracy - Offers precise measurements, often up to ±0.01 mm, reducing human error.
- Quick Readout - Instant digital display of results speeds up testing and data collection.
- Easy to Use - Simple operation with one-button zeroing and unit conversion.
- Consistent Pressure Application - Spring-loaded foot ensures uniform pressure for repeatable results.
- Multi-Material Testing - Suitable for textiles, paper, film, rubber, leather, and nonwovens.
- Portable and Lightweight- Ideal for both lab and field use with battery-powered operation.
- Data Hold Function - Locks the measurement on-screen for easy recording.
- Improves Quality Control - Helps manufacturers maintain product thickness standards.
- Digital LCD Display - Provides clear, instant thickness readings in mm or inches.
- High Resolution & Accuracy - Typically measures with 0.01 mm precision.
- Spring-Loaded Presser Foot - Applies consistent pressure on samples for reliable results.
- Zero Setting Function- Allows quick reset before each measurement.
- Unit Conversion Button - Easily switch between metric (mm) and imperial (inch) units.
- Data Hold Function - Freezes the displayed value for easy recording.
- Portable Design - Compact and battery-operated for on-site or lab use.
- Durable Construction - Made from stainless steel or hardened materials for long life.
- Auto Power-Off - Saves battery by shutting off when idle.
- Variety of Anvil & Foot Sizes - Customizable based on testing standards or material types.
- Power On the Device - Press the power button to turn on the gauge.
- Zero the Gauge - Close the anvil and presser foot fully. Press the "ZERO" button to reset the display to 0.00 mm.
- Select Unit (if needed) - Use the unit button to toggle between mm and inches.
- Place the Sample - Open the presser foot and insert the material between the foot and anvil.
- Apply Pressure - Gently release the presser foot to let it rest on the sample using its spring force.
- Read the Measurement- Read the thickness displayed on the LCD screen.
- Hold or Record the Data - Use the "HOLD" button (if available) to lock the reading for recording.
- Remove the Sample- Lift the presser foot and take out the material.
- Power Off - Turn off the device or let it auto shut-off.
- Features of Digital Thickness Gauge:
- Digital LCD Display - Provides clear, instant thickness readings in mm or inches.
- High Resolution & Accuracy - Typically measures with 0.01 mm precision.
- Spring-Loaded Presser Foot - Applies consistent pressure on samples for reliable results.
- Zero Setting Function- Allows quick reset before each measurement.
- Unit Conversion Button - Easily switch between metric (mm) and imperial (inch) units.
- Data Hold Function - Freezes the displayed value for easy recording.
- Portable Design - Compact and battery-operated for on-site or lab use.
- Durable Construction - Made from stainless steel or hardened materials for long life.
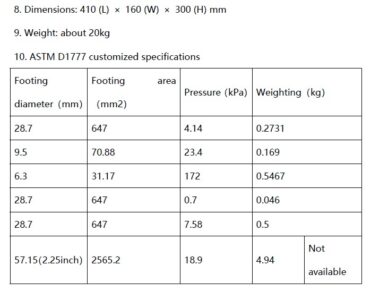

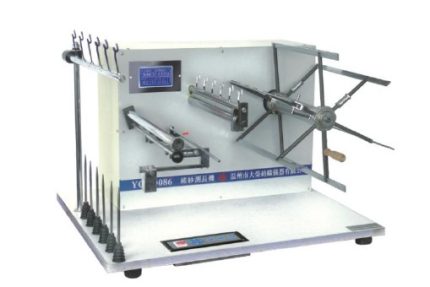
Digital Yarn Twist Tester
Digital Yarn Twist Tester

Digital Yarn Twist Tester
Digital Yarn Twist Tester
Electronic wrap reel
Electronic Wrap Reel

Electronic Wrap Reel
Electronic Wrap Reel

Fabric air permeability tester
Fabric Air Permeability Tester

Fabric air permeability tester
- Accurate Breathability Measurement - Precisely measures how breathable a fabric is, essential for comfort and performance.
- Supports Quality Control - Ensures consistent air permeability in fabric batches, critical for products like PPE, sportswear, and filters.
- Enhances Product Design - Helps in selecting or engineering fabrics with the right airflow properties for specific uses.
- Standard Compliance - Conforms to international testing standards (e.g., ASTM D737, ISO 9237), ensuring global credibility.
- Quick and Reliable Testing - Provides rapid results, increasing lab efficiency and production decision-making speed.
- Wide Material Compatibility - Suitable for woven, nonwoven, knitted fabrics, and even paper or coated materials.
- Improves Functional Performance - Helps optimize products for ventilation, moisture control, and thermal comfort.
- Reduces Product Failure - Identifies underperforming fabrics early, minimizing risks in high-performance applications.
- Digital Display - Shows air permeability readings clearly in units like L/m²/s or cm³/cm²/s.
- Precise Test Head/Clamp - Provides an airtight seal to prevent air leakage and ensure accurate results.
- Adjustable Pressure Settings - Allows testing under various pressure drops (e.g., 10–2500 Pa), depending on fabric type.
- Automatic Airflow Measurement - Built-in sensors or flow meters capture airflow rate automatically for quick analysis.
- Multiple Test Area Sizes - Interchangeable test plates to match different sample sizes and standard requirements.
- Data Logging and Export - Some models include USB or software connectivity for storing and exporting test results.
- Standard Compliance - Conforms to ASTM D737, ISO 9237, BS 5636, DIN 53887, etc.
- Robust Construction - Built with corrosion-resistant materials and durable components for long-term lab use.
- Low Maintenance - Simple cleaning and calibration process for reliable performance.
- Compact and User-Friendly Design - Ideal for lab benches and easy operation with minimal training.
- Prepare the Sample - Cut the fabric sample to the required size (usually circular, e.g., 20 cm²).
- Mount the Sample - Place the fabric securely in the test clamp or holder, ensuring no wrinkles or gaps.
- Set Test Parameters - Adjust the air pressure drop according to the fabric type or standard (e.g., 100 Pa).
- Start the Test - Turn on the air supply and start the airflow through the fabric.
- Read the Measurement - The digital display will show the air permeability value in the selected units.
- Record the Results - Note the readings or export data if the device supports it.
- Repeat if needed - Test multiple samples or areas for accuracy and average the results.
- Clean and Maintain - After testing, clean the clamp and ensure the device is calibrated regularly.
 r Permeability Tester
Appliance Range
It is used to TEST the air permeability of various textile fabrics, including industrial fabrics, nonwoven fabrics and other textile products and other breathable materials.
Related Standards
GB / T 5453, GB / T 13764, ISO 9237, ISO 5636, ASTM D737, etc.
Instrument characteristics
1. Automatic sample clamping, automatic nozzle replacement, and quick test.
2. Microcomputer processing, the test results are displayed directly, without manual table calculation;
3. Built-in continuous test mode, the test unit can be switched as needed.
4. Chinese LCD menu operation, configure computer interface.
Technical parameter
1. Range of sample pressure difference: 1 ~ 4000Pa
2. Measurable air permeability: 1 ~ 40,000mm / s
3. Measurement error: ≤ ± 2%
4. Measurable fabric thickness: ≤8mm
5. Test area: 5cm2; 20cm2; 50cm2; 100cm2
Ф50mm (≈19.6cm2)
Ф70mm (≈38.5cm2)
6. Nozzles: 11 in total (automatic replacement of digital setting)
CODE 00 01 02 03 04 05 06 07 08 09 10
DIAφ(mm)
0.8 1.2 2 3 4 6 8 10 12 16 20
7.Data Capacity:≤200 times tests
8.Power Supply:AC220V 50Hz 2KW
9.Weight:80Kg
10.Shape:1250×700×1250mm
r Permeability Tester
Appliance Range
It is used to TEST the air permeability of various textile fabrics, including industrial fabrics, nonwoven fabrics and other textile products and other breathable materials.
Related Standards
GB / T 5453, GB / T 13764, ISO 9237, ISO 5636, ASTM D737, etc.
Instrument characteristics
1. Automatic sample clamping, automatic nozzle replacement, and quick test.
2. Microcomputer processing, the test results are displayed directly, without manual table calculation;
3. Built-in continuous test mode, the test unit can be switched as needed.
4. Chinese LCD menu operation, configure computer interface.
Technical parameter
1. Range of sample pressure difference: 1 ~ 4000Pa
2. Measurable air permeability: 1 ~ 40,000mm / s
3. Measurement error: ≤ ± 2%
4. Measurable fabric thickness: ≤8mm
5. Test area: 5cm2; 20cm2; 50cm2; 100cm2
Ф50mm (≈19.6cm2)
Ф70mm (≈38.5cm2)
6. Nozzles: 11 in total (automatic replacement of digital setting)
CODE 00 01 02 03 04 05 06 07 08 09 10
DIAφ(mm)
0.8 1.2 2 3 4 6 8 10 12 16 20
7.Data Capacity:≤200 times tests
8.Power Supply:AC220V 50Hz 2KW
9.Weight:80Kg
10.Shape:1250×700×1250mm 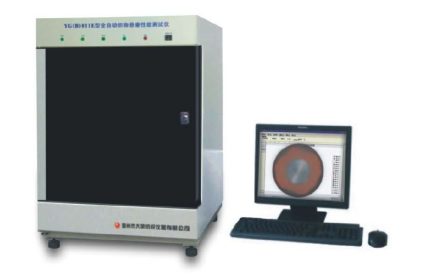
Fabric drape tester
Fabric Drape Tester
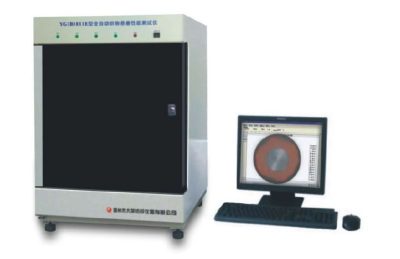
Fabric Drape Tester
- Quantifies Fabric Flow - Measures drape behavior accurately, crucial for garments and furnishings.
- Supports Design Decisions - Helps designers select fabrics that match the intended look and movement of a product.
- Improves Garment Fit and Comfort - Ensures fabrics behave naturally on the body, enhancing wear ability.
- Enhances Product Aesthetics - Prevents stiff or limp fabric choices in fashion, interior, or technical textiles.
- Standardized Evaluation - Enables comparison across fabrics using drape coefficient, based on standards (e.g., BS 5058).
- Supports R&D - Useful in developing new fabrics or finishes to improve drape quality.
- Non-Destructive Testing - Tests fabric without damaging it, allowing for further analysis.
- Boosts Quality Control - Identifies batch inconsistencies or performance issues early in production.
- Rotating Support Disc - Holds the fabric sample over a smaller disc to create natural drape.
- Standard Sample Size Support - Designed for circular fabric samples, usually 30 cm in diameter.
- Light Projection System - Projects the draped fabric’s shadow onto a screen or recording surface.
- Drape Coefficient Calculation - Measures the shadow area to compute the drape coefficient (percentage of unsupported area covered by the shadow).
- Digital or Manual Options - Available in models with digital image processing or manual plan meter tracing.
- Stable Base and Structure - Ensures consistent and vibration-free testing conditions.
- Sample Templates Provided - For cutting precise, standard-sized fabric specimens.
- User-Friendly Interface - Simple controls for rotation and light alignment.
- Compact and Lab-Ready Design - Fits easily on lab benches and in testing environments.
- Compliance with Testing Standards - Supports BS 5058 and other relevant drape measurement methods.
- Prepare the Fabric Sample - Cut a circular fabric sample, typically 30 cm in diameter, using the provided template.
- Place the Fabric - Center the fabric sample over the smaller support disc (usually 18 cm diameter) on the tester.
- Turn on the Light Source - Illuminate the fabric from above so it casts a shadow onto the recording surface or paper below.
- Capture the Shadow Outline - Trace the shadow manually on paper or capture it digitally, depending on the model.
- Measure the Shadow Area - Use a plan meter (manual) or software (digital) to determine the shadow’s area.
- Calculate Drape Coefficient (DC) - Use the formula:
- Record the Result - Log the drape coefficient to evaluate how stiff or flexible the fabric is.
- Repeat for Accuracy - Test multiple samples and average the results for consistency.
 It is used for testing dynamic and static drape properties
(drape coefficient, shape change rate, surface ripple and drape uniformity, etc.)
of various fabrics.
Related standards GB/T23329 FZ/01045 BS5058 etc.
Instrument characteristics
1. CCD imaging, dynamic and static image processing.
2. A variety of charts and data statistics, analysis, storage, output
3. No need to replace background color, can test all kinds of color samples.
4. Work mode:Microcomputer control, CCD imaging, automatic processing of images and data automatically.
Technical parameters
1. Communication interface: RS232, USB
2. Image sensor: CCD sensor.
3. Static (dynamic) state draping coefficient: 0 ~ 100% + 2
4. Drapability uniformity: 0 ~ 100% + 2
5. The rate of morphological change is 0 to 100% + 2.
6. Surface waviness error: + 1
It is used for testing dynamic and static drape properties
(drape coefficient, shape change rate, surface ripple and drape uniformity, etc.)
of various fabrics.
Related standards GB/T23329 FZ/01045 BS5058 etc.
Instrument characteristics
1. CCD imaging, dynamic and static image processing.
2. A variety of charts and data statistics, analysis, storage, output
3. No need to replace background color, can test all kinds of color samples.
4. Work mode:Microcomputer control, CCD imaging, automatic processing of images and data automatically.
Technical parameters
1. Communication interface: RS232, USB
2. Image sensor: CCD sensor.
3. Static (dynamic) state draping coefficient: 0 ~ 100% + 2
4. Drapability uniformity: 0 ~ 100% + 2
5. The rate of morphological change is 0 to 100% + 2.
6. Surface waviness error: + 1 
Fabric flame retardant tester
Fabric Flame Retardant Tester

Fabric Flame Retardant Tester
- Sample Preparation: A fabric specimen is cut to specified dimensions and conditioned as per standard requirements.
- Mounting: The sample is mounted vertically or at a specified angle in the testing chamber.
- Ignition: A controlled flame is applied to the fabric for a predetermined time.
- Observation: The tester records ignition time, flame spread, after-flame time, and afterglow time.
- Evaluation: Results are compared against standard criteria to determine compliance.
- Prepare the Sample
- Mount the Sample
- Set Up the Burner Position the burner at the required angle (usually 90° for vertical tests).
- Ignite the Flame - Apply the flame to the bottom edge of the fabric for 12 seconds.
- Observe and Measure - Start timing when flame is applied.
- Record the Results
- Compare with Standards
 burning of flammable textile materials after ignition.
(specific ignition nozzles and sample holders can be customized to meet multiple criteria).
Related standards
GB/T14644 ASTM D1230 CFR1610 etc.
Technical parameters
1. The spread of time:0 ~ 999.9S resolution 0.1S
2. The temperature inside the box shows:Room temperature -99 degrees C resolution 1 c
3. Igniting time:1S
4. Type of igniter:4 1/2 syringe
5. Sample clip size:Outer frame:204mm * 78mm inner frame:152mm×38mm
6. Distance from the top of the igniter to the sample surface:8mm
7. Studio size and outline size
Studio size:370mm×220mm×350mm
Outline size:375mm×245mm×478mm
8. Power supply:AC220V 50Hz 20W
9. Weight:18Kg
burning of flammable textile materials after ignition.
(specific ignition nozzles and sample holders can be customized to meet multiple criteria).
Related standards
GB/T14644 ASTM D1230 CFR1610 etc.
Technical parameters
1. The spread of time:0 ~ 999.9S resolution 0.1S
2. The temperature inside the box shows:Room temperature -99 degrees C resolution 1 c
3. Igniting time:1S
4. Type of igniter:4 1/2 syringe
5. Sample clip size:Outer frame:204mm * 78mm inner frame:152mm×38mm
6. Distance from the top of the igniter to the sample surface:8mm
7. Studio size and outline size
Studio size:370mm×220mm×350mm
Outline size:375mm×245mm×478mm
8. Power supply:AC220V 50Hz 20W
9. Weight:18Kg

fabric moisture permeability tester
Fabric Moisture Permeability Tester
Fabric Moisture Permeability Tester
- Upright Cup Method: The fabric covers a cup containing water, and the assembly is placed upright in a controlled environment. After a set duration, the weight loss is measured to determine the WVTR.
- Inverted Cup Method: The fabric is sealed over a cup, which is then inverted and exposed to a controlled environment. The amount of water vapor absorbed by the fabric is measured over time.
- Sweating Hot Plate Test: Simulates human perspiration by measuring the energy required to maintain a constant temperature on a heated plate covered with the fabric, providing insights into the fabric's breathability.
- Multi-Cup Design - Typically includes 6 or more test cups for simultaneous testing of multiple samples.
- Rotating Turntable - Ensures uniform air exposure and consistent vapor transmission across all samples.
- Precision Weighing System- Accurate measurement of weight loss to calculate water vapor transmission rate (WVTR).
- Temperature & Humidity Control - Maintains stable environmental conditions (e.g., 23°C, 50% RH) for reliable results.
- Digital Display or Software Interface - Displays real-time data and test status; advanced models offer data logging and export.
- Compliance with Standards - Supports ASTM E96, ISO 15496, BS 7209, JIS L1099 testing methods.
- Sealed Test Chambers- Prevents external air interference, improving accuracy.
- Corrosion-Resistant Construction - Durable materials suitable for long-term use in lab environments.
- Easy Sample Mounting - Quick and secure fabric placement on test cups with sealing rings.
- Low Maintenance Design- Simplified components for easy cleaning and upkeep.
- Prepare the Test Solution - Fill each test cup with a set amount of water (e.g., 50 ml), or a desiccant if using inverted method.
- Mount the Fabric - Cut the fabric into circular pieces matching the cup size.
- Weigh the Cups - Record the initial weight of each cup with the fabric mounted.
- Place on Turntable - Position all cups on the rotating tray inside the controlled chamber.
- Set Conditions - Close the chamber and maintain temperature (e.g., 23°C) and relative humidity (e.g., 50%) as per test standard.
- Start the Test - Begin rotation (usually ~2 RPM) and let it run for the specified time (often 24 hours).
- Weigh the Cups Again- After the test duration, reweigh the cups to determine weight loss due to moisture vapor passing through the fabric.
- Calculate WVTR - Use the formula: WVTR = (Weight Loss in grams × 24) / (Test Area in m² × Time in hours) Expressed in g/m²/24h.
- Clean and Store - Clean cups and components for future use.
 Scope of application
It is used to determine the moisture permeability of various fabrics
(including moisture permeable coated fabrics)
and nonwovens such as batting cotton and space cotton.
[Related standards] GB/T12704 ASTM E90 JIS L1099A BS 7209 JIS L1099B (custom) etc.
Instrument characteristics
1. Integrated structure of baking oven and constant temperature and humidity box.
2. Microcomputer control, color touch screen Chinese menu operation.
3. Circulating air velocity 0.2-3m/s digital setting.
4. Imported high-precision temperature and humidity sensor, imported motor drive, ceramic
heating tube heating.
Technical parameters
1.Work mode: Microcomputer control, color touch screen Chinese menu operation, test environment monitoring.
2. Sample box control temperature:15 ~ 40 C, accuracy 0.1 + C, resolution 0.01 C
3. Heat dissipation mode:Air cooling
4. Sample box control humidity:30 ~ 95%, precision + 2%, resolution 0.01%
5. Test chamber humidification:≥300ml/h
6. Accompany oven control temperature: Room temperature to 200 c
7. Test time:1min~999h59min
8. The rate of circulating steam flow:0. 2-3m/s digital setting resolution 0.01m/s
9. Moisture permeability area:2827㎜2(∮60㎜GB)
Optional 3848, 2 (70 70 ASTM)
10. The number of moisture permeable cups.6 (GB) can be replaced by 6 (US standard).
11. Internal dimensions of drying oven:490×400×215mm
12. Power supply:Ac220V 50Hz 6kw
13. Size:930×820×1700mm
14. Weight:350kg
Scope of application
It is used to determine the moisture permeability of various fabrics
(including moisture permeable coated fabrics)
and nonwovens such as batting cotton and space cotton.
[Related standards] GB/T12704 ASTM E90 JIS L1099A BS 7209 JIS L1099B (custom) etc.
Instrument characteristics
1. Integrated structure of baking oven and constant temperature and humidity box.
2. Microcomputer control, color touch screen Chinese menu operation.
3. Circulating air velocity 0.2-3m/s digital setting.
4. Imported high-precision temperature and humidity sensor, imported motor drive, ceramic
heating tube heating.
Technical parameters
1.Work mode: Microcomputer control, color touch screen Chinese menu operation, test environment monitoring.
2. Sample box control temperature:15 ~ 40 C, accuracy 0.1 + C, resolution 0.01 C
3. Heat dissipation mode:Air cooling
4. Sample box control humidity:30 ~ 95%, precision + 2%, resolution 0.01%
5. Test chamber humidification:≥300ml/h
6. Accompany oven control temperature: Room temperature to 200 c
7. Test time:1min~999h59min
8. The rate of circulating steam flow:0. 2-3m/s digital setting resolution 0.01m/s
9. Moisture permeability area:2827㎜2(∮60㎜GB)
Optional 3848, 2 (70 70 ASTM)
10. The number of moisture permeable cups.6 (GB) can be replaced by 6 (US standard).
11. Internal dimensions of drying oven:490×400×215mm
12. Power supply:Ac220V 50Hz 6kw
13. Size:930×820×1700mm
14. Weight:350kg 
Fabric Stiffness Tester
Fabric Stiffness Tester

Fabric Stiffness Tester
- Accurate Measurement of Flexibility - Provides reliable data on fabric stiffness, essential for quality control and product development.
- Improves Product Comfort - Helps assess how soft or rigid a fabric will feel in clothing or furnishings.
- Supports Material Selection - Aids designers and engineers in choosing the right fabric for specific applications based on stiffness.
- Quality Assurance - Detects fabric inconsistencies or defects that affect handling or drape.
- Standards Compliance - Enables testing as per international standards like ASTM D1388 and ISO 9073-7 for global product approval.
- Quick and Simple Operation - Delivers fast results with minimal operator training or preparation.
- Applicable to Multiple Materials - Suitable for woven, nonwoven, knitted fabrics, paper, and films.
- Enhances R&D Accuracy - Supports consistent material testing during product innovation and textile finishing.
- Graduated Measurement Scale - Precise scale to measure overhang length for accurate stiffness calculation.
- Flat Test Platform - Smooth, level surface ensures consistent and reliable fabric movement.
- Standard Deflection Angle Guide - Built-in 41.5° angle reference for consistent stiffness testing (per ASTM/ISO).
- Manual or Motorized Models - Available in both types for simple or automated operation depending on lab needs.
- Compact Design - Space-saving unit ideal for textile labs and quality control rooms.
- Sample Holder or Clamp - Ensures correct alignment and smooth feeding of fabric strips during testing.
- Durable Construction - Made of corrosion-resistant materials like stainless steel or aluminum for long-term use.
- Compliance with Standards - Supports methods like ASTM D1388, ISO 9073-7 for stiffness testing of fabrics.
- Lightweight and Portable - Easy to move and use in various lab settings.
- Low Maintenance - Simple mechanical parts require minimal servicing.
- Prepare the Sample - Cut the fabric into a rectangular strip (e.g., 25 mm × 200 mm), as per standard.
- Place the Sample - Lay the fabric strip flat on the test platform with one end aligned at the zero mark.
- Slide the Fabric - Gently push the fabric forward so it slowly overhangs the platform.
- Watch for Deflection - Stop sliding when the free end of the fabric bends down to the reference angle (typically 41.5°).
- Read the Bending Length - Measure the overhang distance from the scale. This is the bending length (C).
- Calculate Flexural Rigidity
- Repeat for Accuracy - Test both warp and weft directions and average the results for better accuracy.
 Scope of application
It is used to measure the stiffness of cotton,
wool, silk, linen, chemical fibers and other woven fabrics,
knitted fabrics, general nonwovens, coated fabrics, etc.
It is also suitable for measuring the stiffness of paper,
leather, film and other flexible materials.
Relevant Standards
GB/T 18318, ASTM D 1388, IS09073-7, BS EN22313 etc.
[Instrument Characteristics]
1. Infrared photoelectric invisible inclined plane
detection system replaces the traditional tangible inclined plane,
realizes non-contact detection, and overcomes the problem that
the measurement accuracy is affected by
the sample torsion lifted by the inclined plane.
2. The inclination adjustable mechanism of instrument
measurement to meet different test requirements.
3. Stepping motor drive, accurate measurement, smooth operation;
4. The color touch screen display can show the extended length,
bending length, bending stiffness of the sample, the warp average,
the weft average and the total average of the above values respectively.
5. Printing of Chinese report forms for thermal printers.
Technical parameters
1. Test methods: The two method (A method: Weft test, B method: Forward and backward test)
2. Measurement angle:41.5 degree, 43 degree and 45 degree adjustable
3. Extend the length range:5-220 mm (special requirements can be made at the time of ordering)
4. Length resolution:0.01mm
5. Measurement accuracy:±0.1mm
6. Specimen specifications:250×25mm
7. Work platform specifications:250×50mm
8. Specification of sample pressing plate:250×25mm
9. Pushing speed of press plate:3 mm/s; 4 mm/s; 5 mm/s
10. Display output: Touch screen display
11. Print Output: Chinese Report
12. Data Processing Volume: A total of 15 groups, each group less than 20 trials
13. Printer: Thermal printer
14, power supply:AC220V 50Hz
15. Host volume:570mm×360mm×490mm
16. Host weight:20kg
Scope of application
It is used to measure the stiffness of cotton,
wool, silk, linen, chemical fibers and other woven fabrics,
knitted fabrics, general nonwovens, coated fabrics, etc.
It is also suitable for measuring the stiffness of paper,
leather, film and other flexible materials.
Relevant Standards
GB/T 18318, ASTM D 1388, IS09073-7, BS EN22313 etc.
[Instrument Characteristics]
1. Infrared photoelectric invisible inclined plane
detection system replaces the traditional tangible inclined plane,
realizes non-contact detection, and overcomes the problem that
the measurement accuracy is affected by
the sample torsion lifted by the inclined plane.
2. The inclination adjustable mechanism of instrument
measurement to meet different test requirements.
3. Stepping motor drive, accurate measurement, smooth operation;
4. The color touch screen display can show the extended length,
bending length, bending stiffness of the sample, the warp average,
the weft average and the total average of the above values respectively.
5. Printing of Chinese report forms for thermal printers.
Technical parameters
1. Test methods: The two method (A method: Weft test, B method: Forward and backward test)
2. Measurement angle:41.5 degree, 43 degree and 45 degree adjustable
3. Extend the length range:5-220 mm (special requirements can be made at the time of ordering)
4. Length resolution:0.01mm
5. Measurement accuracy:±0.1mm
6. Specimen specifications:250×25mm
7. Work platform specifications:250×50mm
8. Specification of sample pressing plate:250×25mm
9. Pushing speed of press plate:3 mm/s; 4 mm/s; 5 mm/s
10. Display output: Touch screen display
11. Print Output: Chinese Report
12. Data Processing Volume: A total of 15 groups, each group less than 20 trials
13. Printer: Thermal printer
14, power supply:AC220V 50Hz
15. Host volume:570mm×360mm×490mm
16. Host weight:20kg