
 Products
 Martindale abrasion tester Updated


0%
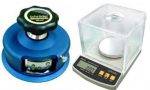


GSM Cutter with Balance
$0.00
GSM Cutter with Balance

GSM Cutter with Balance
A GSM Cutter with Balance is a lab toolset used to determine the GSM (Grams per Square Meter) of fabrics, which indicates the fabric’s weight and density. The kit includes a GSM round cutter and a precision weighing balance.
Purpose GSM Cutter with Balance:
To accurately measure the weight per unit area of textile, paper, or nonwoven samples for quality control and product classification.
How It Works:
GSM Cutter: – A circular blade cuts a fixed area (usually 100 cm²) from the fabric.
Weighing Balance: – The cut piece is weighed, and the result is multiplied by 100 to get GSM.
GSM = Weight (in grams) × 100
Applications of GSM Cutter with Balance:
Textile and garment industry
Nonwovens and paper manufacturing
QC labs and R&D
Benefits of GSM Cutter with Balance:
Accurate GSM Measurement – Ensures precise fabric weight analysis for quality control.
Quick and Simple Operation – Allows fast sampling and GSM calculation in minutes.
No Need for Area Calculation – Cutter gives a fixed area (usually 100 cm²), simplifying the formula.
Improves Product Consistency – Helps maintain uniform fabric weight across batches.
Portable and User-Friendly – Compact design makes it ideal for labs and production floors.
Cost-Effective Tool – Offers high accuracy without the need for expensive equipment.
Versatile Use – Suitable for fabrics, paper, leather, films, and more.
Features of GSM Cutter with Balance:
Rotary Blade Cutter – Stainless steel blades for clean and accurate circular cuts.
Fixed Sample Area – Typically 100 cm², eliminating the need for area measurement.
Precision Digital Balance – Measures in grams with high resolution (0.01 g or better).
Rubber Cutting Pad – Protects blade and provides a smooth surface for cutting.
Safety Lock – Prevents accidental blade exposure.
Compact & Durable Design- Long-lasting, lab-friendly construction.
How to Use GSM Cutter with Balance:
Prepare the Fabric Sample- Place the fabric on the rubber cutting pad.
Cut the Sample – Hold the GSM cutter firmly and rotate it to cut a 100 cm² circular sample.
Turn on the Balance – Power up the digital weighing scale and tare it to zero.
Weigh the Sample – Place the cut fabric piece on the balance and note the weight in grams.
Calculate GSM – Multiply the weight by 100 to get GSM. – GSM = Sample weight (g) × 100
Record the Result- Log the GSM value for quality control or analysis.
Clean and Store – Wipe the cutter and balance, and store them safely after use.
GSM Calculation Formula:
GSM (g/m²) = (Weight of Sample in grams) × 100
When using a GSM cutter (100 cm²):
The cutter gives a fixed area of 100 cm², which is 1/100th of a square meter.
So, multiplying the sample’s weight by 100 gives the GSM directly.
Example:
If the sample weighs 1.75 g, then:
GSM = 1.75 × 100 = 175 g/m²
Balance Calibration Guide (Manual Calibration):
Warm-Up – Turn on the balance and let it warm up for 10–15 minutes if required.
Level the Balance – Use the built-in bubble level and adjust leveling feet until the bubble is centered.
Tare the Balance – Press the “TARE” or “ZERO” button to reset the display to 0.000 g.
Enter Calibration Mode – Press the “CAL” or “MODE” button (depends on the model).
– Some balances may require holding the button for a few seconds.
Use Standard Weight – When prompted, place a certified calibration weight (e.g., 100g, 200g) on the pan. – Wait for the display to stabilize.
Confirm Calibration – The balance will beep or show “PASS” once successful. – Remove the weight when done. Recheck Zero – Ensure the display returns to 0.000 g after removing the weight.
Tips:
Use certified weights for accuracy (Class F1 or E2).
Calibrate in a draft-free, vibration-free environment.
Calibrate daily or before critical measurements.
GSM Cutter & Balance
GSM Cutter
Brand: Schroder
Origin: Germany
Capacity: 100 Sq.cm
Supplied with 1 pcs cutting Pad and 04 pcs cutting blade.
Digital Electronics balance
Precision GSM Weight Balance 0.01g to 200g
Model: GSM200
Brand: Schroder
Origin: Germany
Shipping & Delivery
Related products
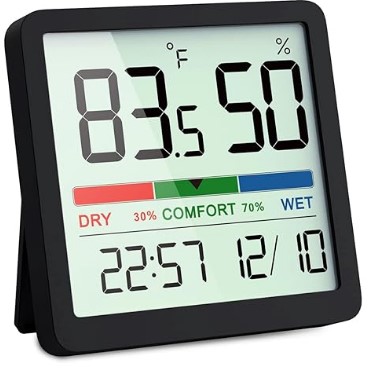
Digital Temperature Humidity Meter
Digital Temperature Humidity Meter
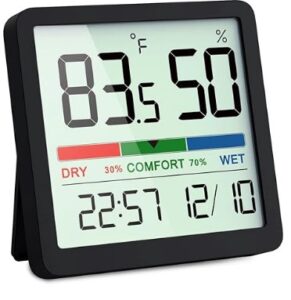
Digital Temperature Humidity Meter

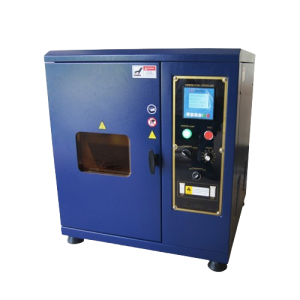
fabric moisture permeability tester
Fabric Moisture Permeability Tester
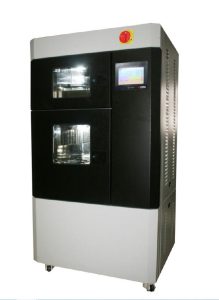
Fabric Moisture Permeability Tester
- Upright Cup Method: The fabric covers a cup containing water, and the assembly is placed upright in a controlled environment. After a set duration, the weight loss is measured to determine the WVTR.
- Inverted Cup Method: The fabric is sealed over a cup, which is then inverted and exposed to a controlled environment. The amount of water vapor absorbed by the fabric is measured over time.
- Sweating Hot Plate Test: Simulates human perspiration by measuring the energy required to maintain a constant temperature on a heated plate covered with the fabric, providing insights into the fabric's breathability.
- Multi-Cup Design - Typically includes 6 or more test cups for simultaneous testing of multiple samples.
- Rotating Turntable - Ensures uniform air exposure and consistent vapor transmission across all samples.
- Precision Weighing System- Accurate measurement of weight loss to calculate water vapor transmission rate (WVTR).
- Temperature & Humidity Control - Maintains stable environmental conditions (e.g., 23°C, 50% RH) for reliable results.
- Digital Display or Software Interface - Displays real-time data and test status; advanced models offer data logging and export.
- Compliance with Standards - Supports ASTM E96, ISO 15496, BS 7209, JIS L1099 testing methods.
- Sealed Test Chambers- Prevents external air interference, improving accuracy.
- Corrosion-Resistant Construction - Durable materials suitable for long-term use in lab environments.
- Easy Sample Mounting - Quick and secure fabric placement on test cups with sealing rings.
- Low Maintenance Design- Simplified components for easy cleaning and upkeep.
- Prepare the Test Solution - Fill each test cup with a set amount of water (e.g., 50 ml), or a desiccant if using inverted method.
- Mount the Fabric - Cut the fabric into circular pieces matching the cup size.
- Weigh the Cups - Record the initial weight of each cup with the fabric mounted.
- Place on Turntable - Position all cups on the rotating tray inside the controlled chamber.
- Set Conditions - Close the chamber and maintain temperature (e.g., 23°C) and relative humidity (e.g., 50%) as per test standard.
- Start the Test - Begin rotation (usually ~2 RPM) and let it run for the specified time (often 24 hours).
- Weigh the Cups Again- After the test duration, reweigh the cups to determine weight loss due to moisture vapor passing through the fabric.
- Calculate WVTR - Use the formula: WVTR = (Weight Loss in grams × 24) / (Test Area in m² × Time in hours) Expressed in g/m²/24h.
- Clean and Store - Clean cups and components for future use.
 Scope of application
It is used to determine the moisture permeability of various fabrics
(including moisture permeable coated fabrics)
and nonwovens such as batting cotton and space cotton.
[Related standards] GB/T12704 ASTM E90 JIS L1099A BS 7209 JIS L1099B (custom) etc.
Instrument characteristics
1. Integrated structure of baking oven and constant temperature and humidity box.
2. Microcomputer control, color touch screen Chinese menu operation.
3. Circulating air velocity 0.2-3m/s digital setting.
4. Imported high-precision temperature and humidity sensor, imported motor drive, ceramic
heating tube heating.
Technical parameters
1.Work mode: Microcomputer control, color touch screen Chinese menu operation, test environment monitoring.
2. Sample box control temperature:15 ~ 40 C, accuracy 0.1 + C, resolution 0.01 C
3. Heat dissipation mode:Air cooling
4. Sample box control humidity:30 ~ 95%, precision + 2%, resolution 0.01%
5. Test chamber humidification:≥300ml/h
6. Accompany oven control temperature: Room temperature to 200 c
7. Test time:1min~999h59min
8. The rate of circulating steam flow:0. 2-3m/s digital setting resolution 0.01m/s
9. Moisture permeability area:2827㎜2(∮60㎜GB)
Optional 3848, 2 (70 70 ASTM)
10. The number of moisture permeable cups.6 (GB) can be replaced by 6 (US standard).
11. Internal dimensions of drying oven:490×400×215mm
12. Power supply:Ac220V 50Hz 6kw
13. Size:930×820×1700mm
14. Weight:350kg
Scope of application
It is used to determine the moisture permeability of various fabrics
(including moisture permeable coated fabrics)
and nonwovens such as batting cotton and space cotton.
[Related standards] GB/T12704 ASTM E90 JIS L1099A BS 7209 JIS L1099B (custom) etc.
Instrument characteristics
1. Integrated structure of baking oven and constant temperature and humidity box.
2. Microcomputer control, color touch screen Chinese menu operation.
3. Circulating air velocity 0.2-3m/s digital setting.
4. Imported high-precision temperature and humidity sensor, imported motor drive, ceramic
heating tube heating.
Technical parameters
1.Work mode: Microcomputer control, color touch screen Chinese menu operation, test environment monitoring.
2. Sample box control temperature:15 ~ 40 C, accuracy 0.1 + C, resolution 0.01 C
3. Heat dissipation mode:Air cooling
4. Sample box control humidity:30 ~ 95%, precision + 2%, resolution 0.01%
5. Test chamber humidification:≥300ml/h
6. Accompany oven control temperature: Room temperature to 200 c
7. Test time:1min~999h59min
8. The rate of circulating steam flow:0. 2-3m/s digital setting resolution 0.01m/s
9. Moisture permeability area:2827㎜2(∮60㎜GB)
Optional 3848, 2 (70 70 ASTM)
10. The number of moisture permeable cups.6 (GB) can be replaced by 6 (US standard).
11. Internal dimensions of drying oven:490×400×215mm
12. Power supply:Ac220V 50Hz 6kw
13. Size:930×820×1700mm
14. Weight:350kg 
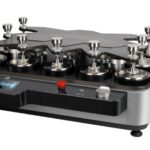
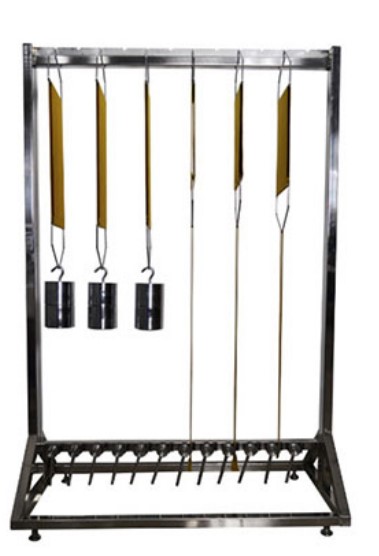
Perspiration Tester
Perspiration Tester
Perspiration Tester
- Fabric samples are treated with synthetic perspiration solution (acidic or alkaline).
- They are sandwiched with adjacent fabric and placed between glass or acrylic plates.
- The assembly is loaded into the tester and pressed under specific pressure.
- it’s then incubated at 37°C (body temperature) for a fixed time (typically 4 or 16 hours).
- Afterward, color change and staining are evaluated using a gray scale.
- Accurate Sweat Simulation - Mimics real-life effects of acidic and alkaline perspiration on fabrics.
- Improves Product Quality - Ensures textiles retain color and don’t bleed or stain when worn.
- Supports Standard Compliance - Follows ISO and AATCC test standards for global market approval.
- Protects Brand Reputation- Reduces customer complaints due to dye transfer or fading.
- Simple and Repeatable- Provides consistent pressure and conditions for reliable results.
- Multi-Sample Testing- Tests multiple specimens at once, saving time in labs.
- Durable and Low Maintenance- Robust frame with minimal moving parts makes it long-lasting and easy to care for.
- Stainless Steel Frame - Corrosion-resistant body for durability and long-term use.
- Multi-Sample Capacity - Can hold up to 20 or more specimens for batch testing.
- Standardized Loading Weight- Applies uniform pressure (usually 12.5 kPa) across all samples.
- Removable Plates - Glass or acrylic plates ensure even contact and easy cleaning.
- Compact Design- Space-saving, bench-top model ideal for lab environments.
- Complies with Test Standards - Meets ISO 105 E04, AATCC 15, and related perspiration fastness standards.
- Ease of Operation - Simple loading, unloading, and incubation process.
- High-Temperature Resistance - Can be used inside incubators at 37°C or ovens as required.
- Prepare the Test Solution - Mix artificial acidic or alkaline perspiration as per standard (ISO or AATCC).
- Cut the Fabric Samples - Cut both the test fabric and adjacent white fabric (usually cotton) to standard size.
- Soak the Samples - Immerse the fabric sandwich (test + adjacent) in the test solution for 30 minutes.
- Remove Excess Liquid - Gently squeeze or blot to remove extra moisture—do not dry.
- Load in the Tester- Place each sandwich between glass or acrylic separator plates in the tester.
- Apply Pressure - Tighten the top plate or place the standard weight on top to apply uniform pressure.
- Incubate - Keep the loaded tester in an oven or incubator at 37°C for 4–16 hours (depending on the method).
- Accurate Sweat Simulation - Mimics real-life effects of acidic and alkaline perspiration on fabrics.
- Improves Product Quality - Ensures textiles retain color and don’t bleed or stain when worn.
- Supports Standard Compliance - Follows ISO and AATCC test standards for global market approval.
- Protects Brand Reputation- Reduces customer complaints due to dye transfer or fading.
- Simple and Repeatable- Provides consistent pressure and conditions for reliable results.
- Multi-Sample Testing- Tests multiple specimens at once, saving time in labs.
- Durable and Low Maintenance- Robust frame with minimal moving parts makes it long-lasting and easy to care for.
- Dry and Evaluate - Remove, air dry the samples, then assess color change and staining using a gray scale.
- Fabric samples are treated with synthetic perspiration solution (acidic or alkaline).
- They are sandwiched with adjacent fabric and placed between glass or acrylic plates.
- The assembly is loaded into the tester and pressed under specific pressure.
- it’s then incubated at 37°C (body temperature) for a fixed time (typically 4 or 16 hours).
- Afterward, color change and staining are evaluated using a gray scale.
Perspiration Tester

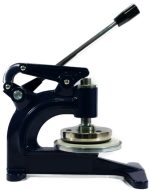
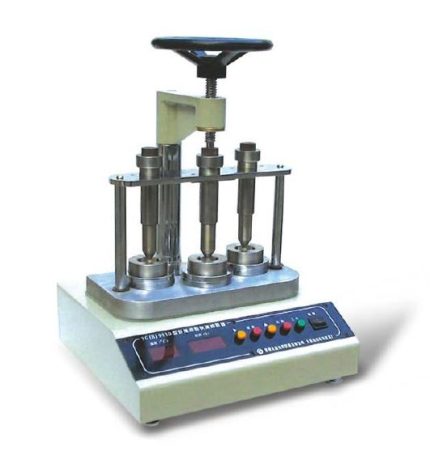
Fabric Stiffness Tester
Fabric Stiffness Tester

Fabric Stiffness Tester
- Accurate Measurement of Flexibility - Provides reliable data on fabric stiffness, essential for quality control and product development.
- Improves Product Comfort - Helps assess how soft or rigid a fabric will feel in clothing or furnishings.
- Supports Material Selection - Aids designers and engineers in choosing the right fabric for specific applications based on stiffness.
- Quality Assurance - Detects fabric inconsistencies or defects that affect handling or drape.
- Standards Compliance - Enables testing as per international standards like ASTM D1388 and ISO 9073-7 for global product approval.
- Quick and Simple Operation - Delivers fast results with minimal operator training or preparation.
- Applicable to Multiple Materials - Suitable for woven, nonwoven, knitted fabrics, paper, and films.
- Enhances R&D Accuracy - Supports consistent material testing during product innovation and textile finishing.
- Graduated Measurement Scale - Precise scale to measure overhang length for accurate stiffness calculation.
- Flat Test Platform - Smooth, level surface ensures consistent and reliable fabric movement.
- Standard Deflection Angle Guide - Built-in 41.5° angle reference for consistent stiffness testing (per ASTM/ISO).
- Manual or Motorized Models - Available in both types for simple or automated operation depending on lab needs.
- Compact Design - Space-saving unit ideal for textile labs and quality control rooms.
- Sample Holder or Clamp - Ensures correct alignment and smooth feeding of fabric strips during testing.
- Durable Construction - Made of corrosion-resistant materials like stainless steel or aluminum for long-term use.
- Compliance with Standards - Supports methods like ASTM D1388, ISO 9073-7 for stiffness testing of fabrics.
- Lightweight and Portable - Easy to move and use in various lab settings.
- Low Maintenance - Simple mechanical parts require minimal servicing.
- Prepare the Sample - Cut the fabric into a rectangular strip (e.g., 25 mm × 200 mm), as per standard.
- Place the Sample - Lay the fabric strip flat on the test platform with one end aligned at the zero mark.
- Slide the Fabric - Gently push the fabric forward so it slowly overhangs the platform.
- Watch for Deflection - Stop sliding when the free end of the fabric bends down to the reference angle (typically 41.5°).
- Read the Bending Length - Measure the overhang distance from the scale. This is the bending length (C).
- Calculate Flexural Rigidity
- Repeat for Accuracy - Test both warp and weft directions and average the results for better accuracy.
 Scope of application
It is used to measure the stiffness of cotton,
wool, silk, linen, chemical fibers and other woven fabrics,
knitted fabrics, general nonwovens, coated fabrics, etc.
It is also suitable for measuring the stiffness of paper,
leather, film and other flexible materials.
Relevant Standards
GB/T 18318, ASTM D 1388, IS09073-7, BS EN22313 etc.
[Instrument Characteristics]
1. Infrared photoelectric invisible inclined plane
detection system replaces the traditional tangible inclined plane,
realizes non-contact detection, and overcomes the problem that
the measurement accuracy is affected by
the sample torsion lifted by the inclined plane.
2. The inclination adjustable mechanism of instrument
measurement to meet different test requirements.
3. Stepping motor drive, accurate measurement, smooth operation;
4. The color touch screen display can show the extended length,
bending length, bending stiffness of the sample, the warp average,
the weft average and the total average of the above values respectively.
5. Printing of Chinese report forms for thermal printers.
Technical parameters
1. Test methods: The two method (A method: Weft test, B method: Forward and backward test)
2. Measurement angle:41.5 degree, 43 degree and 45 degree adjustable
3. Extend the length range:5-220 mm (special requirements can be made at the time of ordering)
4. Length resolution:0.01mm
5. Measurement accuracy:±0.1mm
6. Specimen specifications:250×25mm
7. Work platform specifications:250×50mm
8. Specification of sample pressing plate:250×25mm
9. Pushing speed of press plate:3 mm/s; 4 mm/s; 5 mm/s
10. Display output: Touch screen display
11. Print Output: Chinese Report
12. Data Processing Volume: A total of 15 groups, each group less than 20 trials
13. Printer: Thermal printer
14, power supply:AC220V 50Hz
15. Host volume:570mm×360mm×490mm
16. Host weight:20kg
Scope of application
It is used to measure the stiffness of cotton,
wool, silk, linen, chemical fibers and other woven fabrics,
knitted fabrics, general nonwovens, coated fabrics, etc.
It is also suitable for measuring the stiffness of paper,
leather, film and other flexible materials.
Relevant Standards
GB/T 18318, ASTM D 1388, IS09073-7, BS EN22313 etc.
[Instrument Characteristics]
1. Infrared photoelectric invisible inclined plane
detection system replaces the traditional tangible inclined plane,
realizes non-contact detection, and overcomes the problem that
the measurement accuracy is affected by
the sample torsion lifted by the inclined plane.
2. The inclination adjustable mechanism of instrument
measurement to meet different test requirements.
3. Stepping motor drive, accurate measurement, smooth operation;
4. The color touch screen display can show the extended length,
bending length, bending stiffness of the sample, the warp average,
the weft average and the total average of the above values respectively.
5. Printing of Chinese report forms for thermal printers.
Technical parameters
1. Test methods: The two method (A method: Weft test, B method: Forward and backward test)
2. Measurement angle:41.5 degree, 43 degree and 45 degree adjustable
3. Extend the length range:5-220 mm (special requirements can be made at the time of ordering)
4. Length resolution:0.01mm
5. Measurement accuracy:±0.1mm
6. Specimen specifications:250×25mm
7. Work platform specifications:250×50mm
8. Specification of sample pressing plate:250×25mm
9. Pushing speed of press plate:3 mm/s; 4 mm/s; 5 mm/s
10. Display output: Touch screen display
11. Print Output: Chinese Report
12. Data Processing Volume: A total of 15 groups, each group less than 20 trials
13. Printer: Thermal printer
14, power supply:AC220V 50Hz
15. Host volume:570mm×360mm×490mm
16. Host weight:20kg 
Bursting strength tester
Bursting strength tester

true burst
- Available with automatic test strip feeder Measurements are simple to make with the Mullen type Bursting Strength Tester. Fast automatic measurements Measurement starts automatically once a test piece has been placed in the measuring gap. The clamping foot descends, and a bursting strength measurement is made.
- Bursting pressure can reach up to 1.2MPa 5. The maximum burst and expansion degree can reach 70mm. 6. Strengthen the lighting system on the test surface. 7. The main aerodynamic force helps to clamp the sample system. 8. A variety of test areas are available, and the switching is easy.
- A variety of unit conversions between Chinese and English. 10. Reliable anti-pinch safety protection design. [Technical parameter]: 1. Test range: (0~1)Mpa (the range above 1Mpa needs to be customized) 2. The minimum graduation value: 0.0001Mpa 3. Pressurization mode: direct pressurization, timing pressurization, and expansion degree pressurization.

Laboratory mini stenter Dryer
Laboratory mini stenter Dryer
Automatic fixing Dryer
- Controlled Heating System
- Adjustable Fabric Width
- Variable Speed Conveyor - Allows control over fabric dwell time for drying or heat-setting.
- Compact and Bench-Top Design - Space-saving design ideal for textile labs and R&D units.
- Digital Controls - Easy-to-use digital interface for setting temperature, conveyor speed, and process time.
- Transparent Viewing Window - Allows operators to monitor fabric movement and drying visually.
- Low Energy Consumption - Designed for lab use, consuming less power than industrial models.
- Accurate Simulation of Production - Mimics industrial stenter conditions on a lab scale, ideal for pre-production testing and R&D.
- Cost-Effective Testing - Enables testing and fabric finishing without the high cost or space requirements of full-scale machines.
- Energy Efficient - Consumes less power compared to large stenters, making it economical for small-scale or frequent use.
- Precise Control - Offers accurate control of temperature, speed, and fabric tension, ensuring consistent results.
- Space-Saving Design - Compact and bench-top friendly, perfect for laboratories with limited space.
- Multiple Applications - Useful for drying, heat-setting, shrinkage testing, and evaluating chemical finishes.
- Faster Development Cycles - Speeds up new product development by allowing rapid sample testing and adjustments.
- Improved Fabric Quality - Helps optimize finishing parameters for better dimensional stability, hand feel, and appearance.
- Safe and User-Friendly- Designed with lab safety in mind, including temperature safety controls and easy operation.
- Compact Bench-Top Design - Ideal for laboratory use with limited space requirements.
- Adjustable Temperature Control - Precise heating (usually up to 220–250°C) with digital controllers for accurate processing.
- Variable Conveyor Speed- Allows adjustment of fabric dwell time for different drying or heat-setting needs.
- Width Adjustment Mechanism - Equipped with clips or pins to stretch and fix fabric width-wise, simulating industrial stenter conditions.
- Transparent Viewing Window - Enables visual monitoring of fabric movement and drying inside the chamber.
- Digital Display Panel- Easy-to-use interface for setting and monitoring temperature, speed, and time.
- Stainless Steel Construction- Durable and corrosion-resistant for long-term use at high temperatures.
- Uniform Heat Distribution- Ensures consistent fabric treatment across the width.
- Safety Features- Over-temperature protection and insulated body for operator safety.
- Versatile Applications - Suitable for drying, heat-setting, shrinkage testing, and chemical finish evaluations.

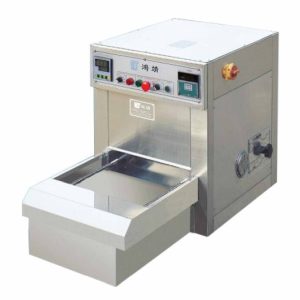
Fiber Oil Fast Extractor
Fiber Oil Fast Extractor

Fiber Oil Fast Extractor
- Sample Preparation: Cut the fabric or fiber into small pieces.
- Solvent Addition: Place the sample into a metal tube and add an appropriate solvent (e.g., petroleum ether, ethyl ether).
- Extraction: Apply weight to the sample to facilitate the dissolution of oils into the solvent.
- Evaporation: The solvent-oil mixture drips onto a heated plate where the solvent evaporates, leaving behind the oil.
- Measurement: Weigh the remaining oil and calculate its percentage relative to the initial sample mass.
- Accurate Oil Content Measurement- Precisely determines oil or finish content in fibers, crucial for quality control.
- Rapid Extraction Process - Delivers fast results, improving lab efficiency and productivity.
- Simultaneous Multi-Sample Testing - Multiple workstations (e.g., 4 at once) reduce testing time for bulk samples.
- Improved Product Quality - Helps maintain consistent oil levels, which affect dyeing, processing, and fabric performance.
- Automatic Operation - Automated pressing and heating reduce manual effort and operator error.
- Digital Monitoring - Built-in timer, temperature control, and oil calculator enhance accuracy and usability.
- Compliance with Standards - Supports industry methods like GB/T 6504-2017, ensuring reliable and standard-compliant results.
- Safe Solvent Handling - Enclosed design minimizes solvent exposure and evaporation loss.
- Multiple Test Stations - Usually equipped with 2 to 4 independent work units for parallel testing.
- Automatic Weight Pressing System - Applies consistent pressure on samples for uniform solvent extraction.
- Microcomputer Temperature Control - Maintains precise heating (typically 90–120°C) with ±1°C accuracy.
- Built-in Timer and Calculator - Allows setting extraction time and calculates oil content directly.
- Solvent Evaporation Plate- Heats and evaporates solvent quickly, leaving only the oil residue.
- Digital Display - Shows time, temperature, and process status for user-friendly operation.
- Compact and Durable Design - Made with corrosion-resistant materials suited for chemical handling.
- Safety Features - Includes overheat protection and enclosed solvent chamber to reduce exposure risk.
- Standard Compliant - Designed to meet GB/T 6504-2017 and similar industry testing standards.
- Prepare the Sample - Cut 5–10 g of fiber or yarn into small pieces and place in the sample tube.
- Add Solvent - Pour a suitable solvent (e.g., petroleum ether) into the tube to cover the sample.
- Apply Weight - Place the extractor's weight or press system onto the sample to aid extraction.
- Start Extraction - Activate the machine. The solvent dissolves the oils and flows to the heating plate.
- Heat for Evaporation - Set the temperature (typically 90–120°C). The solvent evaporates, leaving oil on the plate.
- Measure Oil Content- After drying, weigh the remaining oil. Use the built-in calculator or formula:
- Clean the Unit - After cooling, clean all parts to prepare for the next test.
Fiber Oil Fast Extractor

Color Matching Cabinet-Light Box
Color Matching Cabinet-Light Box
Color Matching Cabinet-Light Box