
 Products
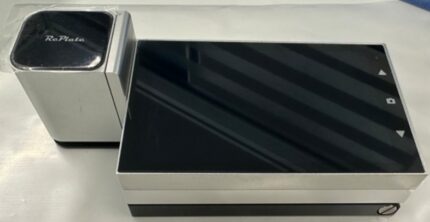
 Martindale abrasion tester Updated

")
.")

0%


Digital Temperature Humidity Meter
$0.00
Digital Temperature Humidity Meter
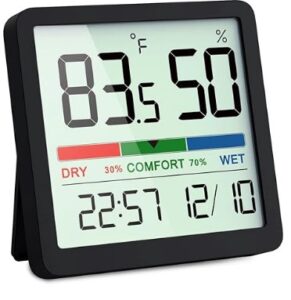
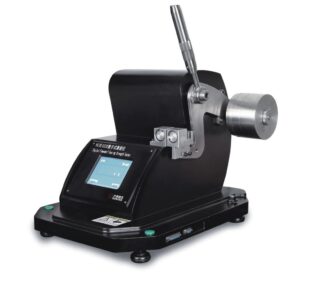
Digital Temperature Humidity Meter
A Digital Temperature Humidity Meter, also known as a digital hygrometer, is an electronic device used to measure and display the relative humidity (RH) of the air, often along with temperature. It’s commonly used in laboratories, industrial settings, storage areas, and homes to monitor moisture levels.
Key Features of Digital Temperature Humidity Meter:
– Digital Display: Shows humidity (in % RH) and often temperature (in °C/°F).
– Sensor-Based Measurement: Uses capacitive or resistive sensors for accurate readings.
– Compact & Portable: Available in handheld or wall-mountable forms.
– Data Logging (in some models): Records humidity levels over time for analysis.
– Min/Max Readings: Displays historical high and low humidity values.
Common Applications of Digital Temperature Humidity Meter:
– Laboratories: Maintaining stable humidity for experiments or sample storage.
– Warehouses: Monitoring conditions for sensitive goods (e.g., electronics, paper, pharmaceuticals).
– HVAC Systems: Ensuring proper climate control.
– Homes: Preventing mold growth or overly dry conditions.
Benefits of Digital Temperature Humidity Meter:
– Accurate and quick readings
– Easy to use and read
– Helps in maintaining comfort, safety, and product integrity
Would you like recommendations for models or guidance on calibration?
Benefits of Digital Humidity meter
Here are the key benefits of using a Digital Humidity Meter:
✅ 1. Accurate Humidity Monitoring
– Provides precise relative humidity (%RH) readings, essential for sensitive environments.
✅ 2. Fast and Real-Time Results
– Displays immediate data, allowing for quick adjustments to environmental conditions.
✅ 3. Dual Measurement
– Many models also measure temperature, offering a more complete picture of ambient conditions.
✅ 4. Easy to Use
– Simple digital interface with clear display, suitable for both professionals and non-technical users.
✅ 5. Compact and Portable
– Lightweight design makes it ideal for field use, indoor monitoring, or mounting on walls.
✅ 6. Prevents Damage
– Helps avoid moisture-related issues like mold, corrosion, static buildup, and product degradation.
✅ 7. Supports Quality Control
– Essential for labs, warehouses, and manufacturing environments to maintain product integrity.
✅ 8. Data Logging (Optional)
How to use Digital Humidity meter
Here are the key features of a Digital Humidity Meter:
1. Digital Display
– Shows real-time humidity (%) and often temperature (°C/°F).
– Some include backlit screens for easy viewing.
2. High Accuracy Sensors
– Uses capacitive or resistive sensors for accurate and stable humidity readings.
3. Min/Max & Hold Functions
– Displays minimum, maximum, and current readings.
– “Hold” function freezes the current reading for review.
4. Data Logging (in advanced models)
– Records humidity data over time for monitoring trends.
5. Portable or Wall-Mountable
– Available as handheld, desktop, or wall-mounted units for different environments.
6. Battery or USB Powered
– Operates on standard batteries or via USB power for flexibility.
7. Optional External Probes
– Some models support external humidity/temperature sensors for remote monitoring.
8. Calibration Option
– Allows manual or automatic calibration to maintain accuracy.
Here’s a quick step-by-step guide on how to use a Digital Temperature Humidity Meter:
✅ 1. Power On the Device
– Insert batteries (if portable) or plug it in (if wall-mounted).
– Press the power button to turn it on.
✅ 2. Place It Properly
– Set the meter in an open, well-ventilated area.
– Avoid placing near windows, vents, or direct heat sources for accurate readings.
✅ 3. Wait for Stabilization
– Allow the device a few seconds to stabilize and show accurate humidity and temperature readings.
✅ 4. Read the Display
– Humidity will be shown as % RH (Relative Humidity).
– Most models also display temperature in °C or °F.
✅ 5. Use Additional Features (if available)
– Press buttons to view Min/Max, Data Log, or switch units.
– Some advanced models may have Bluetooth or USB for data transfer.
✅ 6. Maintain the Device
– Clean sensor area gently if dusty.
– Calibrate periodically if required (check manual).
Description
Shipping & Delivery
Related products

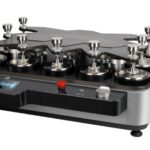
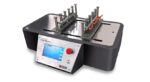
Fiber Oil Fast Extractor
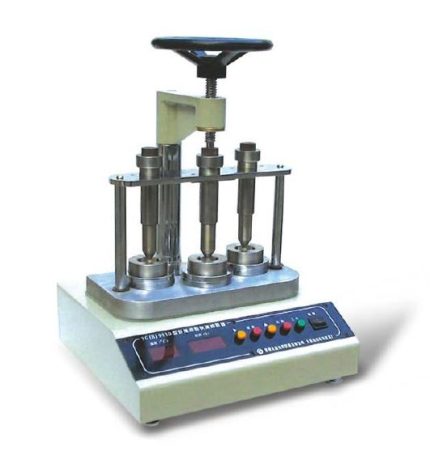
Fiber Oil Fast Extractor

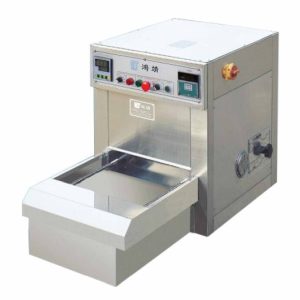
Fiber Oil Fast Extractor
- Sample Preparation: Cut the fabric or fiber into small pieces.
- Solvent Addition: Place the sample into a metal tube and add an appropriate solvent (e.g., petroleum ether, ethyl ether).
- Extraction: Apply weight to the sample to facilitate the dissolution of oils into the solvent.
- Evaporation: The solvent-oil mixture drips onto a heated plate where the solvent evaporates, leaving behind the oil.
- Measurement: Weigh the remaining oil and calculate its percentage relative to the initial sample mass.
- Accurate Oil Content Measurement- Precisely determines oil or finish content in fibers, crucial for quality control.
- Rapid Extraction Process - Delivers fast results, improving lab efficiency and productivity.
- Simultaneous Multi-Sample Testing - Multiple workstations (e.g., 4 at once) reduce testing time for bulk samples.
- Improved Product Quality - Helps maintain consistent oil levels, which affect dyeing, processing, and fabric performance.
- Automatic Operation - Automated pressing and heating reduce manual effort and operator error.
- Digital Monitoring - Built-in timer, temperature control, and oil calculator enhance accuracy and usability.
- Compliance with Standards - Supports industry methods like GB/T 6504-2017, ensuring reliable and standard-compliant results.
- Safe Solvent Handling - Enclosed design minimizes solvent exposure and evaporation loss.
- Multiple Test Stations - Usually equipped with 2 to 4 independent work units for parallel testing.
- Automatic Weight Pressing System - Applies consistent pressure on samples for uniform solvent extraction.
- Microcomputer Temperature Control - Maintains precise heating (typically 90–120°C) with ±1°C accuracy.
- Built-in Timer and Calculator - Allows setting extraction time and calculates oil content directly.
- Solvent Evaporation Plate- Heats and evaporates solvent quickly, leaving only the oil residue.
- Digital Display - Shows time, temperature, and process status for user-friendly operation.
- Compact and Durable Design - Made with corrosion-resistant materials suited for chemical handling.
- Safety Features - Includes overheat protection and enclosed solvent chamber to reduce exposure risk.
- Standard Compliant - Designed to meet GB/T 6504-2017 and similar industry testing standards.
- Prepare the Sample - Cut 5–10 g of fiber or yarn into small pieces and place in the sample tube.
- Add Solvent - Pour a suitable solvent (e.g., petroleum ether) into the tube to cover the sample.
- Apply Weight - Place the extractor's weight or press system onto the sample to aid extraction.
- Start Extraction - Activate the machine. The solvent dissolves the oils and flows to the heating plate.
- Heat for Evaporation - Set the temperature (typically 90–120°C). The solvent evaporates, leaving oil on the plate.
- Measure Oil Content- After drying, weigh the remaining oil. Use the built-in calculator or formula:
- Clean the Unit - After cooling, clean all parts to prepare for the next test.
Fiber Oil Fast Extractor
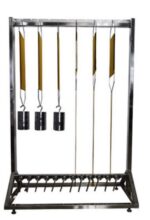
Stretch Recovery Tester Static Method
Stretch Recovery Tester Static Method
Stretch Recovery Tester
- A sample is stretched to a predetermined extension or force.
- The stretch is maintained for a set period.
- After removing the load, the recovery (return to original length) is measured after a fixed time.
- The fabric sample is clamped and stretched to a specific length or force.
- It’s held for a fixed duration (e.g., 1–5 minutes).
- The tension is released, and the sample is allowed to recover.
- The recovered length is measured after a set time.


Stretch Recovery Tester

Gray scale
Gray Scale
Gray Scale
- Gray Scale for Color Change - Compares the original and tested sample to measure color fading or alteration.
- Gray Scale for Staining - Compares a white adjacent fabric (before and after testing) to assess color transfer or staining.
- Standardized Evaluation - Provides a consistent and objective way to assess color change or staining.
- Simple and Quick to Use - Enables rapid visual comparison during fabric testing.
- Widely Accepted - Complies with international standards (ISO, AATCC) for color fastness grading.
- Cost-Effective Tool - Inexpensive yet essential for reliable quality control in textiles.
- Enhances Quality Assurance - Helps detect dyeing or printing issues before bulk production.
- Supports Multiple Tests - Used for evaluating wash fastness, rubbing fastness, perspiration, light exposure, and more.
- Portable and Durable - Easy to carry and long-lasting with proper care.
- Dual Type Availability - Comes in two types: for Color Change and for Staining.
- 5-Point Grading System - Grades from 1 (poor) to 5 (excellent), with half-step intervals like 4–5, 3–4.
- Standardized Grey Chips - Includes contrasting grey color pairs to match fabric changes accurately.
- Compact Design - Small, portable card or booklet format for easy lab and field use.
- Durable Material - Made from stable, fade-resistant plastic or cardboard for long-term use.
- Compliance with Standards - Follows ISO 105-A02 (Color Change) and ISO 105-A03 (Staining) norms.
- Easy Visual Comparison - Designed for quick side-by-side assessment of fabric before and after testing.
- Place the Samples - Lay the untested (original) and tested fabric side by side (for color change)
- Match Against Gray Scale Chips - Visually compare the difference between the samples and find the closest matching gray pair on the scale.
- Assign a Grade
- Record the Result - Note the grade in your test report as per the test method (e.g., ISO 105).
- Store Properly - Keep the gray scale away from light and moisture to avoid fading.
- Features :
- Dual Type Availability - Comes in two types: for Color Change and for Staining.
- 5-Point Grading System - Grades from 1 (poor) to 5 (excellent), with half-step intervals like 4–5, 3–4.
- Standardized Grey Chips - Includes contrasting grey color pairs to match fabric changes accurately.
- Compact Design - Small, portable card or booklet format for easy lab and field use.
- Gray Scale for Color Change - Used to evaluate the degree of color fading or change in a fabric after testing (e.g., washing, light exposure). - Assesses how much the original color has altered.
- Gray Scale for Staining - Used to assess the degree of color transfer from a dyed fabric to an adjacent white fabric during testing (e.g., rubbing, washing).
Gray Scale
Spray Rating Tester
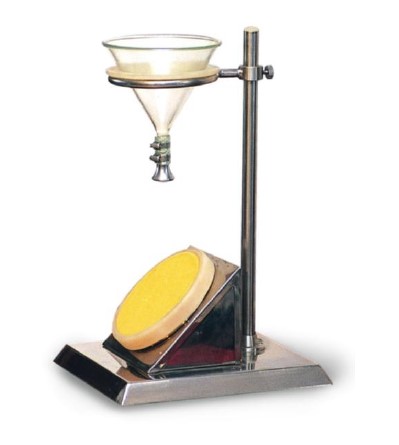
Spray Rating Tester

Spray Rating Tester
- Quick and Simple Evaluation - Offers a fast way to assess fabric water repellency without complex setup.
- Standardized Testing- Complies with AATCC 22 and ISO 4920, ensuring globally accepted results.
- Cost-Effective- Low maintenance and no power requirement make it economical for routine lab use.
- Improves Fabric Performance - Helps manufacturers develop or improve water-resistant textiles.
- Non-Destructive Test - Does not damage the fabric, allowing for additional tests on the same sample.
- Visual Grading- Easy to interpret using a standard spray rating chart (0 to 100 scale).
- Supports Quality Control - Detects finish degradation or variation in water-repellent treatments.
- Portable and Compact- Lightweight design allows easy use in various lab or field settings.
- Standardized Spray Nozzle - Delivers consistent water spray per AATCC and ISO specifications.
- 45° Specimen Mounting Angle - Ensures uniform test setup for accurate and repeatable results.
- Stainless Steel or Aluminum Frame - Corrosion-resistant and durable for long-term use with water exposure.
- Water Reservoir and Funnel System - Provides precise water volume (usually 250 ml) for each test.
- Graduated Spray Stand- Fixed height (150 mm above specimen) for controlled spray impact.
- Detachable Specimen Holder- Easy loading and removal of fabric samples.
- Compact and Lightweight Design - Portable and convenient for both lab and field testing.
- No Electricity Required - Fully manual operation increases reliability and reduces operating costs.
- Prepare the Sample - Cut fabric to standard size (usually 180 × 180 mm). - Condition the sample if required (21°C, 65% RH for 24 hours).
- Mount the Fabric - Place the fabric on the specimen holder at a 45° angle.
- Fill the Reservoir - Pour 250 ml of distilled water into the upper funnel.
- Start the Test - Release the water through the nozzle; it sprays over the fabric for about 25–30 seconds.
- Inspect the Fabric - After spraying, visually assess the water beading or penetration on the surface.
- Rate the Sample - Compare the fabric’s wetting pattern with the standard spray rating chart: - 100 = No sticking/wetting - 90–50 = Partial wetting - 0 = Complete wetting
- Record the Rating - Document the spray rating for quality control or reporting.
 Spray Reting Tester
[Scope of application]:
Used for the determination of moisture resistance (wetting grade) of various fabrics
which have been or have not been treated with water resistance or water repellency.
[related standards]:
GB/T4745 ISO4920 AATCC22 JISL1092 etc.
[technical parameters]:
1. Glass funnel:150 x 150 (capacity 500ml)
2. Specimen placement angle:The level is 45 degrees.
3. Distance from nozzle to sample center:150mm
4. Specimen diameter:Ф150mm
5. Size of water receiving pan:500×400×30mm
6. Matching measuring cups:500ml
7, size 500 x 400 x 500mm
8. Instrument weight:5Kg
Spray Reting Tester
[Scope of application]:
Used for the determination of moisture resistance (wetting grade) of various fabrics
which have been or have not been treated with water resistance or water repellency.
[related standards]:
GB/T4745 ISO4920 AATCC22 JISL1092 etc.
[technical parameters]:
1. Glass funnel:150 x 150 (capacity 500ml)
2. Specimen placement angle:The level is 45 degrees.
3. Distance from nozzle to sample center:150mm
4. Specimen diameter:Ф150mm
5. Size of water receiving pan:500×400×30mm
6. Matching measuring cups:500ml
7, size 500 x 400 x 500mm
8. Instrument weight:5Kg 
Fabric drape tester
Fabric Drape Tester
Fabric Drape Tester
- Quantifies Fabric Flow - Measures drape behavior accurately, crucial for garments and furnishings.
- Supports Design Decisions - Helps designers select fabrics that match the intended look and movement of a product.
- Improves Garment Fit and Comfort - Ensures fabrics behave naturally on the body, enhancing wear ability.
- Enhances Product Aesthetics - Prevents stiff or limp fabric choices in fashion, interior, or technical textiles.
- Standardized Evaluation - Enables comparison across fabrics using drape coefficient, based on standards (e.g., BS 5058).
- Supports R&D - Useful in developing new fabrics or finishes to improve drape quality.
- Non-Destructive Testing - Tests fabric without damaging it, allowing for further analysis.
- Boosts Quality Control - Identifies batch inconsistencies or performance issues early in production.
- Rotating Support Disc - Holds the fabric sample over a smaller disc to create natural drape.
- Standard Sample Size Support - Designed for circular fabric samples, usually 30 cm in diameter.
- Light Projection System - Projects the draped fabric’s shadow onto a screen or recording surface.
- Drape Coefficient Calculation - Measures the shadow area to compute the drape coefficient (percentage of unsupported area covered by the shadow).
- Digital or Manual Options - Available in models with digital image processing or manual plan meter tracing.
- Stable Base and Structure - Ensures consistent and vibration-free testing conditions.
- Sample Templates Provided - For cutting precise, standard-sized fabric specimens.
- User-Friendly Interface - Simple controls for rotation and light alignment.
- Compact and Lab-Ready Design - Fits easily on lab benches and in testing environments.
- Compliance with Testing Standards - Supports BS 5058 and other relevant drape measurement methods.
- Prepare the Fabric Sample - Cut a circular fabric sample, typically 30 cm in diameter, using the provided template.
- Place the Fabric - Center the fabric sample over the smaller support disc (usually 18 cm diameter) on the tester.
- Turn on the Light Source - Illuminate the fabric from above so it casts a shadow onto the recording surface or paper below.
- Capture the Shadow Outline - Trace the shadow manually on paper or capture it digitally, depending on the model.
- Measure the Shadow Area - Use a plan meter (manual) or software (digital) to determine the shadow’s area.
- Calculate Drape Coefficient (DC) - Use the formula:
- Record the Result - Log the drape coefficient to evaluate how stiff or flexible the fabric is.
- Repeat for Accuracy - Test multiple samples and average the results for consistency.
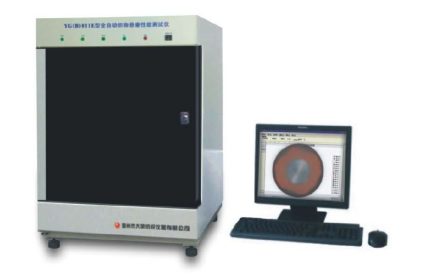
 It is used for testing dynamic and static drape properties
(drape coefficient, shape change rate, surface ripple and drape uniformity, etc.)
of various fabrics.
Related standards GB/T23329 FZ/01045 BS5058 etc.
Instrument characteristics
1. CCD imaging, dynamic and static image processing.
2. A variety of charts and data statistics, analysis, storage, output
3. No need to replace background color, can test all kinds of color samples.
4. Work mode:Microcomputer control, CCD imaging, automatic processing of images and data automatically.
Technical parameters
1. Communication interface: RS232, USB
2. Image sensor: CCD sensor.
3. Static (dynamic) state draping coefficient: 0 ~ 100% + 2
4. Drapability uniformity: 0 ~ 100% + 2
5. The rate of morphological change is 0 to 100% + 2.
6. Surface waviness error: + 1
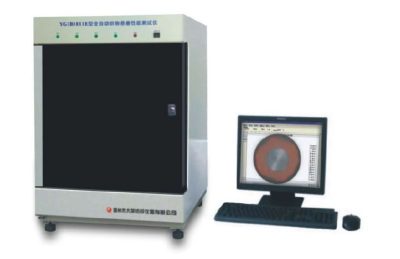
It is used for testing dynamic and static drape properties
(drape coefficient, shape change rate, surface ripple and drape uniformity, etc.)
of various fabrics.
Related standards GB/T23329 FZ/01045 BS5058 etc.
Instrument characteristics
1. CCD imaging, dynamic and static image processing.
2. A variety of charts and data statistics, analysis, storage, output
3. No need to replace background color, can test all kinds of color samples.
4. Work mode:Microcomputer control, CCD imaging, automatic processing of images and data automatically.
Technical parameters
1. Communication interface: RS232, USB
2. Image sensor: CCD sensor.
3. Static (dynamic) state draping coefficient: 0 ~ 100% + 2
4. Drapability uniformity: 0 ~ 100% + 2
5. The rate of morphological change is 0 to 100% + 2.
6. Surface waviness error: + 1 
Digital Elmendorf tearing tester
Digital Elmendorf Tearing Tester
Digital Elmendorf Tearing Tester
- Accurate Tear Strength Measurement - Provides precise data on tear resistance, critical for quality control and product performance.
- Digital Readout - Easy-to-read display gives instant, reliable results without manual calculations.
- High Reproducibility - Ensures consistent test outcomes due to controlled tearing angle and speed.
- Fast Testing Process - Simple loading and quick test cycle increase lab efficiency.
- Suitable for Various Materials - Tests a wide range of flexible materials like textiles, paper, plastic, and packaging.
- Customizable Range - Use of optional weights extends the test range for low to high tear strength materials.
- Low Sample Waste - Requires small fabric or material samples, reducing waste during testing.
- Standards Compliance - Meets international testing standards (e.g., ASTM D1424, ISO 13937) for credibility and uniformity.
- Precision Sample Clamp - Securely holds samples in place to ensure accurate tear initiation.
- Pre-Cutting Blade - Integrated knife creates a precise initial slit in the sample before tearing.
- User-Friendly Interface - Simple buttons and screen navigation for ease of operation.
- Standard Test Compliance - Compatible with ASTM D1424, ISO 1974, ISO 13937, and other tear strength standards.
- Sturdy Construction - Made with durable materials for long-lasting performance and stable operation.
- Compact Design - Space-efficient footprint ideal for laboratory environments.
- Data Output Options- Some models offer USB or printer connectivity for result documentation.
- Prepare the Sample - Cut the material (fabric, paper, film, etc.) to standard size (typically 100 × 63 mm for textiles) and slit it with the pre-cutter as required.
- Select Pendulum Weight - Choose the appropriate pendulum or add counterweights based on expected tear strength.
- Calibrate the Machine - Set the pendulum to its starting position and zero the display.
- Clamp the Sample - Fix one half of the sample in the stationary clamp and the other in the moving clamp.
- Cut the Initial Slit - Use the integrated blade to make a precise cut at the marked slit area (usually 20 mm).
- Release the Pendulum - Trigger the pendulum to swing and tear the sample through the pre-slit.
- Read the Result - The digital display will show the tearing force automatically (in g, mN, or cN).
- Record or Export Data - Save or print the result if your model supports USB or printer connection.
- Reset for Next Test - Reposition the pendulum and prepare a new sample for the next cycle.
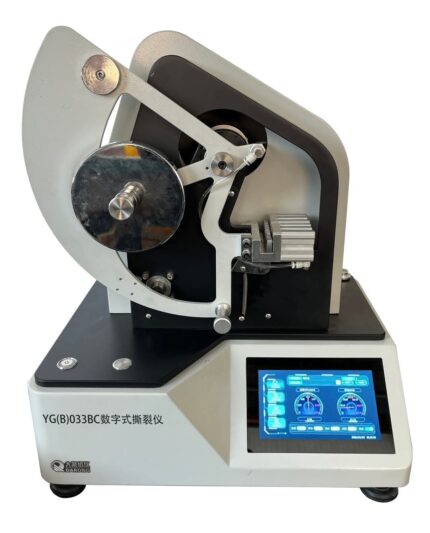
 Scope of application
It is used for the determination of the tear resistance of various woven
fabrics (Elmendorf method), and it can also be used for the determination
of the tear resistance of thick paper, plastic sheeting, electrical tape, etc.
Related standards
GB/T 3917.1 FZ/T60006 FZ/T75001 ISO1974/9290 ASTM D1424/5734
etc.
Instrument characteristics
1. Maximum 300N test range
2. Microcomputer control, digital decoding, support online
communication
3. Color touch screen control, Chinese and English menu operation
interface
4. Pneumatic clamping, automatic cutting
5. A variety of measurement units (cN, gf) selection
6. Fully automatic operation with safe operation protection.
7. Automatically increase potential energy
[Technical parameter]:
1. Test range: first gear: (0~16)N second gear: (0~32)N third gear: (0~
64)N fourth gear: (0~128)N fifth gear: (0~300)N
2. Test accuracy: ≤±0.2%F·S
3. Tearing length: 43mm (non-standard 30-60mm can be set)
4. Automatic incision length: (20±0.2)mm
5. Sample size: (100×63)mm
6. Specimen clamping: pneumatic way
7. Sample test: Up to 10 sets per group on the device side, and 30 sets
of data can be selected to be saved
8. Power supply: AC220V±10% 50Hz 100W
9. Dimensions: (650×660×680)mm
10. Weight: 50kg
[Sample of control interface]:(English version is also available.)
Scope of application
It is used for the determination of the tear resistance of various woven
fabrics (Elmendorf method), and it can also be used for the determination
of the tear resistance of thick paper, plastic sheeting, electrical tape, etc.
Related standards
GB/T 3917.1 FZ/T60006 FZ/T75001 ISO1974/9290 ASTM D1424/5734
etc.
Instrument characteristics
1. Maximum 300N test range
2. Microcomputer control, digital decoding, support online
communication
3. Color touch screen control, Chinese and English menu operation
interface
4. Pneumatic clamping, automatic cutting
5. A variety of measurement units (cN, gf) selection
6. Fully automatic operation with safe operation protection.
7. Automatically increase potential energy
[Technical parameter]:
1. Test range: first gear: (0~16)N second gear: (0~32)N third gear: (0~
64)N fourth gear: (0~128)N fifth gear: (0~300)N
2. Test accuracy: ≤±0.2%F·S
3. Tearing length: 43mm (non-standard 30-60mm can be set)
4. Automatic incision length: (20±0.2)mm
5. Sample size: (100×63)mm
6. Specimen clamping: pneumatic way
7. Sample test: Up to 10 sets per group on the device side, and 30 sets
of data can be selected to be saved
8. Power supply: AC220V±10% 50Hz 100W
9. Dimensions: (650×660×680)mm
10. Weight: 50kg
[Sample of control interface]:(English version is also available.) 
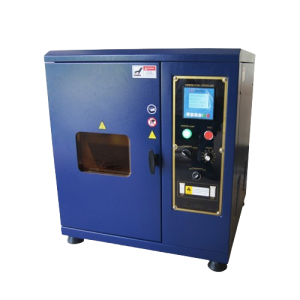
Laboratory mini stenter Dryer
Laboratory mini stenter Dryer
Automatic fixing Dryer
- Controlled Heating System
- Adjustable Fabric Width
- Variable Speed Conveyor - Allows control over fabric dwell time for drying or heat-setting.
- Compact and Bench-Top Design - Space-saving design ideal for textile labs and R&D units.
- Digital Controls - Easy-to-use digital interface for setting temperature, conveyor speed, and process time.
- Transparent Viewing Window - Allows operators to monitor fabric movement and drying visually.
- Low Energy Consumption - Designed for lab use, consuming less power than industrial models.
- Accurate Simulation of Production - Mimics industrial stenter conditions on a lab scale, ideal for pre-production testing and R&D.
- Cost-Effective Testing - Enables testing and fabric finishing without the high cost or space requirements of full-scale machines.
- Energy Efficient - Consumes less power compared to large stenters, making it economical for small-scale or frequent use.
- Precise Control - Offers accurate control of temperature, speed, and fabric tension, ensuring consistent results.
- Space-Saving Design - Compact and bench-top friendly, perfect for laboratories with limited space.
- Multiple Applications - Useful for drying, heat-setting, shrinkage testing, and evaluating chemical finishes.
- Faster Development Cycles - Speeds up new product development by allowing rapid sample testing and adjustments.
- Improved Fabric Quality - Helps optimize finishing parameters for better dimensional stability, hand feel, and appearance.
- Safe and User-Friendly- Designed with lab safety in mind, including temperature safety controls and easy operation.
- Compact Bench-Top Design - Ideal for laboratory use with limited space requirements.
- Adjustable Temperature Control - Precise heating (usually up to 220–250°C) with digital controllers for accurate processing.
- Variable Conveyor Speed- Allows adjustment of fabric dwell time for different drying or heat-setting needs.
- Width Adjustment Mechanism - Equipped with clips or pins to stretch and fix fabric width-wise, simulating industrial stenter conditions.
- Transparent Viewing Window - Enables visual monitoring of fabric movement and drying inside the chamber.
- Digital Display Panel- Easy-to-use interface for setting and monitoring temperature, speed, and time.
- Stainless Steel Construction- Durable and corrosion-resistant for long-term use at high temperatures.
- Uniform Heat Distribution- Ensures consistent fabric treatment across the width.
- Safety Features- Over-temperature protection and insulated body for operator safety.
- Versatile Applications - Suitable for drying, heat-setting, shrinkage testing, and chemical finish evaluations.