
 Products
 Martindale abrasion tester Updated


0%

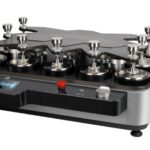
Fiber Oil Fast Extractor
$0.00
Fiber Oil Fast Extractor

Fiber Oil Fast Extractor
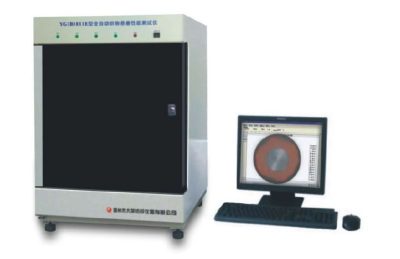
A Fiber Oil Fast Extractor is a laboratory instrument designed to determine the oil or finish content in fibers, yarns, or fabrics, particularly wool and synthetic materials. It operates on the principle of solvent extraction followed by evaporation.
Working Principle of Fiber Oil Fast Extractor:
- Sample Preparation: Cut the fabric or fiber into small pieces.
- Solvent Addition: Place the sample into a metal tube and add an appropriate solvent (e.g., petroleum ether, ethyl ether).
- Extraction: Apply weight to the sample to facilitate the dissolution of oils into the solvent.
- Evaporation: The solvent-oil mixture drips onto a heated plate where the solvent evaporates, leaving behind the oil.
- Measurement: Weigh the remaining oil and calculate its percentage relative to the initial sample mass.
Key Features of Fiber Oil Fast Extractor:
– Multiple Workstations: Models like the Quick Extra offer four independent stations for simultaneous testing.- Automatic Weight Pressurization: Eliminates manual pressure application, ensuring consistent results.- Microcomputer Temperature Control: Maintains uniform heating (typically 90°C–120°C) with ±1°C precision.
– Digital Interface: Features timers and oil calculators for efficient operation.
– Data Connectivity: Some models can connect to systems like Smart Tex Lab for real-time monitoring and data management.
Applications of Fiber Oil Fast Extractor:
– Textile Industry: Assessing oil content in fibers to ensure quality and compliance with standards like GB/T 6504-2017. – Research and Development: Studying the effects of oils and finishes on fiber properties. – Quality Control: Ensuring consistency in fiber treatment processes.
Benefits of Fiber Oil Fast Extractor:
- Accurate Oil Content Measurement- Precisely determines oil or finish content in fibers, crucial for quality control.
- Rapid Extraction Process – Delivers fast results, improving lab efficiency and productivity.
- Simultaneous Multi-Sample Testing – Multiple workstations (e.g., 4 at once) reduce testing time for bulk samples.
- Improved Product Quality – Helps maintain consistent oil levels, which affect dyeing, processing, and fabric performance.
- Automatic Operation – Automated pressing and heating reduce manual effort and operator error.
- Digital Monitoring – Built-in timer, temperature control, and oil calculator enhance accuracy and usability.
- Compliance with Standards – Supports industry methods like GB/T 6504-2017, ensuring reliable and standard-compliant results.
- Safe Solvent Handling – Enclosed design minimizes solvent exposure and evaporation loss.
Features of Fiber Oil Fast Extractor:
- Multiple Test Stations – Usually equipped with 2 to 4 independent work units for parallel testing.
- Automatic Weight Pressing System – Applies consistent pressure on samples for uniform solvent extraction.
- Microcomputer Temperature Control – Maintains precise heating (typically 90–120°C) with ±1°C accuracy.
- Built-in Timer and Calculator – Allows setting extraction time and calculates oil content directly.
- Solvent Evaporation Plate- Heats and evaporates solvent quickly, leaving only the oil residue.
- Digital Display – Shows time, temperature, and process status for user-friendly operation.
- Compact and Durable Design – Made with corrosion-resistant materials suited for chemical handling.
- Safety Features – Includes overheat protection and enclosed solvent chamber to reduce exposure risk.
- Standard Compliant – Designed to meet GB/T 6504-2017 and similar industry testing standards.
How to Use Fiber Oil Fast Extractor:
- Prepare the Sample – Cut 5–10 g of fiber or yarn into small pieces and place in the sample tube.
- Add Solvent – Pour a suitable solvent (e.g., petroleum ether) into the tube to cover the sample.
- Apply Weight – Place the extractor’s weight or press system onto the sample to aid extraction.
- Start Extraction – Activate the machine. The solvent dissolves the oils and flows to the heating plate.
- Heat for Evaporation – Set the temperature (typically 90–120°C). The solvent evaporates, leaving oil on the plate.
- Measure Oil Content- After drying, weigh the remaining oil. Use the built-in calculator or formula:
Oil % = (Oil weight / Original sample weight) × 100
- Clean the Unit – After cooling, clean all parts to prepare for the next test.
Fiber Oil Fast Extractor
Description
Shipping & Delivery
Related products


Fabric drape tester
Fabric Drape Tester
Fabric Drape Tester
- Quantifies Fabric Flow - Measures drape behavior accurately, crucial for garments and furnishings.
- Supports Design Decisions - Helps designers select fabrics that match the intended look and movement of a product.
- Improves Garment Fit and Comfort - Ensures fabrics behave naturally on the body, enhancing wear ability.
- Enhances Product Aesthetics - Prevents stiff or limp fabric choices in fashion, interior, or technical textiles.
- Standardized Evaluation - Enables comparison across fabrics using drape coefficient, based on standards (e.g., BS 5058).
- Supports R&D - Useful in developing new fabrics or finishes to improve drape quality.
- Non-Destructive Testing - Tests fabric without damaging it, allowing for further analysis.
- Boosts Quality Control - Identifies batch inconsistencies or performance issues early in production.
- Rotating Support Disc - Holds the fabric sample over a smaller disc to create natural drape.
- Standard Sample Size Support - Designed for circular fabric samples, usually 30 cm in diameter.
- Light Projection System - Projects the draped fabric’s shadow onto a screen or recording surface.
- Drape Coefficient Calculation - Measures the shadow area to compute the drape coefficient (percentage of unsupported area covered by the shadow).
- Digital or Manual Options - Available in models with digital image processing or manual plan meter tracing.
- Stable Base and Structure - Ensures consistent and vibration-free testing conditions.
- Sample Templates Provided - For cutting precise, standard-sized fabric specimens.
- User-Friendly Interface - Simple controls for rotation and light alignment.
- Compact and Lab-Ready Design - Fits easily on lab benches and in testing environments.
- Compliance with Testing Standards - Supports BS 5058 and other relevant drape measurement methods.
- Prepare the Fabric Sample - Cut a circular fabric sample, typically 30 cm in diameter, using the provided template.
- Place the Fabric - Center the fabric sample over the smaller support disc (usually 18 cm diameter) on the tester.
- Turn on the Light Source - Illuminate the fabric from above so it casts a shadow onto the recording surface or paper below.
- Capture the Shadow Outline - Trace the shadow manually on paper or capture it digitally, depending on the model.
- Measure the Shadow Area - Use a plan meter (manual) or software (digital) to determine the shadow’s area.
- Calculate Drape Coefficient (DC) - Use the formula:
- Record the Result - Log the drape coefficient to evaluate how stiff or flexible the fabric is.
- Repeat for Accuracy - Test multiple samples and average the results for consistency.
 It is used for testing dynamic and static drape properties
(drape coefficient, shape change rate, surface ripple and drape uniformity, etc.)
of various fabrics.
Related standards GB/T23329 FZ/01045 BS5058 etc.
Instrument characteristics
1. CCD imaging, dynamic and static image processing.
2. A variety of charts and data statistics, analysis, storage, output
3. No need to replace background color, can test all kinds of color samples.
4. Work mode:Microcomputer control, CCD imaging, automatic processing of images and data automatically.
Technical parameters
1. Communication interface: RS232, USB
2. Image sensor: CCD sensor.
3. Static (dynamic) state draping coefficient: 0 ~ 100% + 2
4. Drapability uniformity: 0 ~ 100% + 2
5. The rate of morphological change is 0 to 100% + 2.
6. Surface waviness error: + 1
It is used for testing dynamic and static drape properties
(drape coefficient, shape change rate, surface ripple and drape uniformity, etc.)
of various fabrics.
Related standards GB/T23329 FZ/01045 BS5058 etc.
Instrument characteristics
1. CCD imaging, dynamic and static image processing.
2. A variety of charts and data statistics, analysis, storage, output
3. No need to replace background color, can test all kinds of color samples.
4. Work mode:Microcomputer control, CCD imaging, automatic processing of images and data automatically.
Technical parameters
1. Communication interface: RS232, USB
2. Image sensor: CCD sensor.
3. Static (dynamic) state draping coefficient: 0 ~ 100% + 2
4. Drapability uniformity: 0 ~ 100% + 2
5. The rate of morphological change is 0 to 100% + 2.
6. Surface waviness error: + 1 
Stretch Recovery Tester Static Method
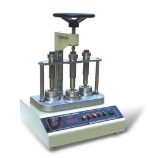
Stretch Recovery Tester Static Method
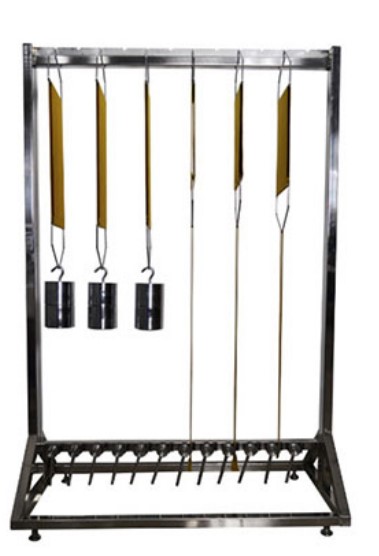
Stretch Recovery Tester
- A sample is stretched to a predetermined extension or force.
- The stretch is maintained for a set period.
- After removing the load, the recovery (return to original length) is measured after a fixed time.
- The fabric sample is clamped and stretched to a specific length or force.
- It’s held for a fixed duration (e.g., 1–5 minutes).
- The tension is released, and the sample is allowed to recover.
- The recovered length is measured after a set time.


Stretch Recovery Tester

Counting Balance-Weighing Scale
Counting Balance-Weighing Scale
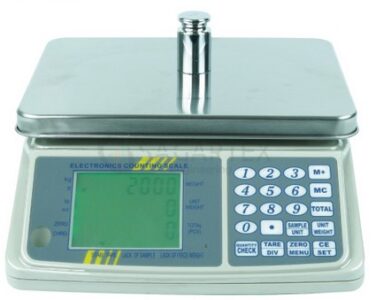
Counting Balance-Weighing Scale
Counting Balance-Weighing Scale

Hydraulic GSM Cutter
Hydraulic GSM Cutter
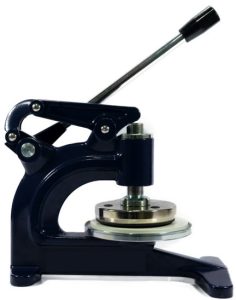
Hydraulic GSM Cutter
- High Cutting Precision - Ensures consistent and accurate fabric sample size for reliable GSM results.
- Effortless Operation- Hydraulic action reduces manual effort and operator fatigue.
- Ideal for Thick or Multi-Layer Fabrics - Cuts through dense or multiple fabric layers cleanly.
- Time-Saving - Speeds up the sample preparation process, especially for high-volume testing.
- Improves Test Accuracy - Uniform samples help eliminate errors in GSM calculation.
- Durable and Long-Lasting - Robust construction ensures stability and extended service life.
- Safety Enhancement - Reduces risk of injury compared to manual rotary cutters.
- Consistent Pressure Application - Hydraulic mechanism maintains steady force for each cut.
- Hydraulic Press Mechanism - Applies consistent and strong pressure for clean, even cuts.
- Standard Cutting Die (100 cm²) - Produces fabric samples suitable for GSM testing with standard area.
- Heavy-Duty Construction - Built with robust metal frame for long-term lab or industrial use.
- Sharp Stainless Steel Blades - Durable and replaceable blades ensure smooth, precise cuts.
- Cutting Pad Included - Comes with a rubber or nylon base to protect blades and ensure clean edges.
- Simple Lever or Button Operation - Easy to use with minimal training required.
- Non-slip Base - Provides stability during operation for safe, accurate cutting.
- Supports Various Fabric Types
- Place the Cutting Pad - Lay the rubber or nylon cutting pad on a flat surface.
- Position the Fabric - Place the fabric sample flat and smooth on the cutting pad.
- Align the Cutter - Position the GSM cutter die over the desired area of the fabric.
- Activate Hydraulic Press - Pull the lever or press the button to apply hydraulic pressure and cut the sample.
- Remove the Sample - Lift the cutter and carefully take out the circular fabric piece (usually 100 cm²).
- Weigh the Sample - Place the cut sample on a precision balance or GSM scale to determine weight.
- Calculate GSM - Multiply the sample weight (in grams) by 100 to get GSM.
Hydraulic GSM Cutter

Fabric flame retardant tester
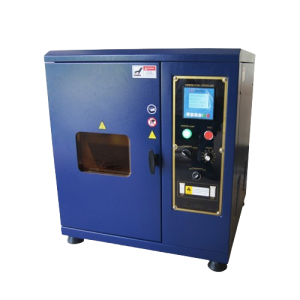
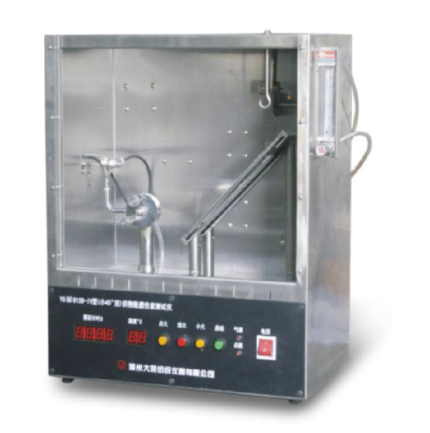
Fabric Flame Retardant Tester

Fabric Flame Retardant Tester
- Sample Preparation: A fabric specimen is cut to specified dimensions and conditioned as per standard requirements.
- Mounting: The sample is mounted vertically or at a specified angle in the testing chamber.
- Ignition: A controlled flame is applied to the fabric for a predetermined time.
- Observation: The tester records ignition time, flame spread, after-flame time, and afterglow time.
- Evaluation: Results are compared against standard criteria to determine compliance.
- Prepare the Sample
- Mount the Sample
- Set Up the Burner Position the burner at the required angle (usually 90° for vertical tests).
- Ignite the Flame - Apply the flame to the bottom edge of the fabric for 12 seconds.
- Observe and Measure - Start timing when flame is applied.
- Record the Results
- Compare with Standards
 burning of flammable textile materials after ignition.
(specific ignition nozzles and sample holders can be customized to meet multiple criteria).
Related standards
GB/T14644 ASTM D1230 CFR1610 etc.
Technical parameters
1. The spread of time:0 ~ 999.9S resolution 0.1S
2. The temperature inside the box shows:Room temperature -99 degrees C resolution 1 c
3. Igniting time:1S
4. Type of igniter:4 1/2 syringe
5. Sample clip size:Outer frame:204mm * 78mm inner frame:152mm×38mm
6. Distance from the top of the igniter to the sample surface:8mm
7. Studio size and outline size
Studio size:370mm×220mm×350mm
Outline size:375mm×245mm×478mm
8. Power supply:AC220V 50Hz 20W
9. Weight:18Kg
burning of flammable textile materials after ignition.
(specific ignition nozzles and sample holders can be customized to meet multiple criteria).
Related standards
GB/T14644 ASTM D1230 CFR1610 etc.
Technical parameters
1. The spread of time:0 ~ 999.9S resolution 0.1S
2. The temperature inside the box shows:Room temperature -99 degrees C resolution 1 c
3. Igniting time:1S
4. Type of igniter:4 1/2 syringe
5. Sample clip size:Outer frame:204mm * 78mm inner frame:152mm×38mm
6. Distance from the top of the igniter to the sample surface:8mm
7. Studio size and outline size
Studio size:370mm×220mm×350mm
Outline size:375mm×245mm×478mm
8. Power supply:AC220V 50Hz 20W
9. Weight:18Kg

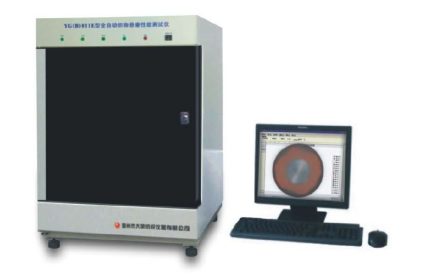
Digital Elmendorf tearing tester
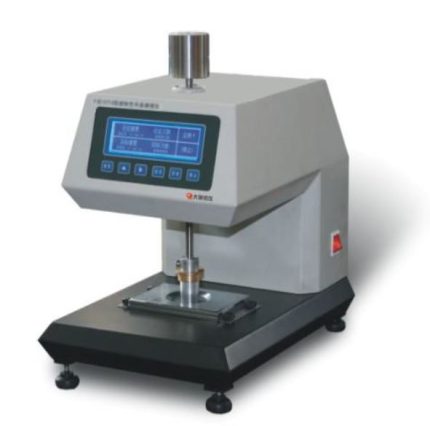
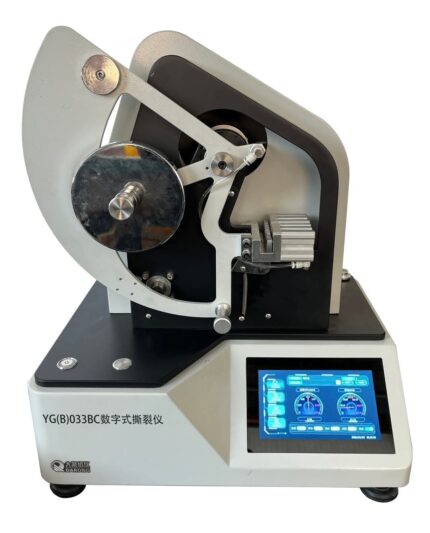
Digital Elmendorf Tearing Tester
Digital Elmendorf Tearing Tester
- Accurate Tear Strength Measurement - Provides precise data on tear resistance, critical for quality control and product performance.
- Digital Readout - Easy-to-read display gives instant, reliable results without manual calculations.
- High Reproducibility - Ensures consistent test outcomes due to controlled tearing angle and speed.
- Fast Testing Process - Simple loading and quick test cycle increase lab efficiency.
- Suitable for Various Materials - Tests a wide range of flexible materials like textiles, paper, plastic, and packaging.
- Customizable Range - Use of optional weights extends the test range for low to high tear strength materials.
- Low Sample Waste - Requires small fabric or material samples, reducing waste during testing.
- Standards Compliance - Meets international testing standards (e.g., ASTM D1424, ISO 13937) for credibility and uniformity.
- Precision Sample Clamp - Securely holds samples in place to ensure accurate tear initiation.
- Pre-Cutting Blade - Integrated knife creates a precise initial slit in the sample before tearing.
- User-Friendly Interface - Simple buttons and screen navigation for ease of operation.
- Standard Test Compliance - Compatible with ASTM D1424, ISO 1974, ISO 13937, and other tear strength standards.
- Sturdy Construction - Made with durable materials for long-lasting performance and stable operation.
- Compact Design - Space-efficient footprint ideal for laboratory environments.
- Data Output Options- Some models offer USB or printer connectivity for result documentation.
- Prepare the Sample - Cut the material (fabric, paper, film, etc.) to standard size (typically 100 × 63 mm for textiles) and slit it with the pre-cutter as required.
- Select Pendulum Weight - Choose the appropriate pendulum or add counterweights based on expected tear strength.
- Calibrate the Machine - Set the pendulum to its starting position and zero the display.
- Clamp the Sample - Fix one half of the sample in the stationary clamp and the other in the moving clamp.
- Cut the Initial Slit - Use the integrated blade to make a precise cut at the marked slit area (usually 20 mm).
- Release the Pendulum - Trigger the pendulum to swing and tear the sample through the pre-slit.
- Read the Result - The digital display will show the tearing force automatically (in g, mN, or cN).
- Record or Export Data - Save or print the result if your model supports USB or printer connection.
- Reset for Next Test - Reposition the pendulum and prepare a new sample for the next cycle.
 Scope of application
It is used for the determination of the tear resistance of various woven
fabrics (Elmendorf method), and it can also be used for the determination
of the tear resistance of thick paper, plastic sheeting, electrical tape, etc.
Related standards
GB/T 3917.1 FZ/T60006 FZ/T75001 ISO1974/9290 ASTM D1424/5734
etc.
Instrument characteristics
1. Maximum 300N test range
2. Microcomputer control, digital decoding, support online
communication
3. Color touch screen control, Chinese and English menu operation
interface
4. Pneumatic clamping, automatic cutting
5. A variety of measurement units (cN, gf) selection
6. Fully automatic operation with safe operation protection.
7. Automatically increase potential energy
[Technical parameter]:
1. Test range: first gear: (0~16)N second gear: (0~32)N third gear: (0~
64)N fourth gear: (0~128)N fifth gear: (0~300)N
2. Test accuracy: ≤±0.2%F·S
3. Tearing length: 43mm (non-standard 30-60mm can be set)
4. Automatic incision length: (20±0.2)mm
5. Sample size: (100×63)mm
6. Specimen clamping: pneumatic way
7. Sample test: Up to 10 sets per group on the device side, and 30 sets
of data can be selected to be saved
8. Power supply: AC220V±10% 50Hz 100W
9. Dimensions: (650×660×680)mm
10. Weight: 50kg
[Sample of control interface]:(English version is also available.)
Scope of application
It is used for the determination of the tear resistance of various woven
fabrics (Elmendorf method), and it can also be used for the determination
of the tear resistance of thick paper, plastic sheeting, electrical tape, etc.
Related standards
GB/T 3917.1 FZ/T60006 FZ/T75001 ISO1974/9290 ASTM D1424/5734
etc.
Instrument characteristics
1. Maximum 300N test range
2. Microcomputer control, digital decoding, support online
communication
3. Color touch screen control, Chinese and English menu operation
interface
4. Pneumatic clamping, automatic cutting
5. A variety of measurement units (cN, gf) selection
6. Fully automatic operation with safe operation protection.
7. Automatically increase potential energy
[Technical parameter]:
1. Test range: first gear: (0~16)N second gear: (0~32)N third gear: (0~
64)N fourth gear: (0~128)N fifth gear: (0~300)N
2. Test accuracy: ≤±0.2%F·S
3. Tearing length: 43mm (non-standard 30-60mm can be set)
4. Automatic incision length: (20±0.2)mm
5. Sample size: (100×63)mm
6. Specimen clamping: pneumatic way
7. Sample test: Up to 10 sets per group on the device side, and 30 sets
of data can be selected to be saved
8. Power supply: AC220V±10% 50Hz 100W
9. Dimensions: (650×660×680)mm
10. Weight: 50kg
[Sample of control interface]:(English version is also available.)