
 Products
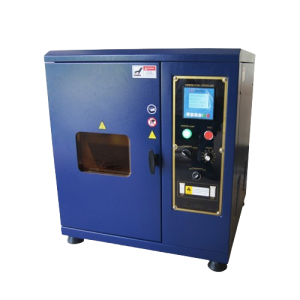
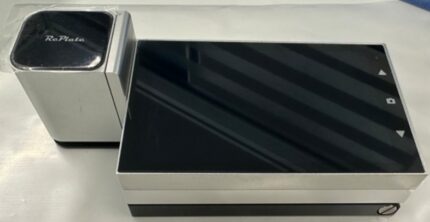
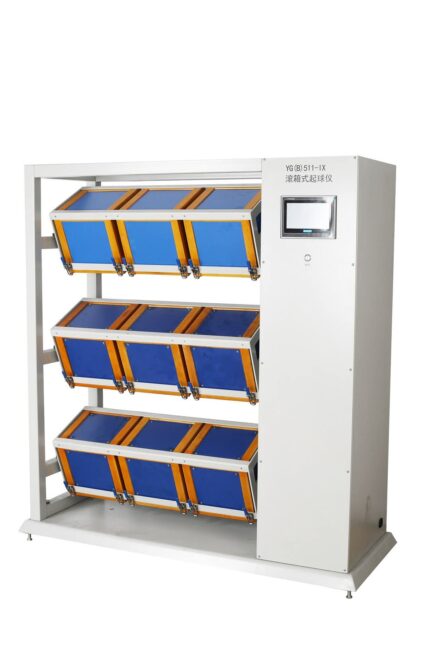
 Martindale abrasion tester Updated

")
.")

0%


Digital Temperature Humidity Meter
$0.00
Digital Temperature Humidity Meter
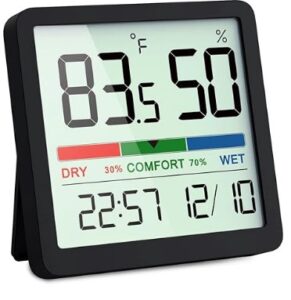
Digital Temperature Humidity Meter
A Digital Temperature Humidity Meter, also known as a digital hygrometer, is an electronic device used to measure and display the relative humidity (RH) of the air, often along with temperature. It’s commonly used in laboratories, industrial settings, storage areas, and homes to monitor moisture levels.
Key Features of Digital Temperature Humidity Meter:
– Digital Display: Shows humidity (in % RH) and often temperature (in °C/°F).
– Sensor-Based Measurement: Uses capacitive or resistive sensors for accurate readings.
– Compact & Portable: Available in handheld or wall-mountable forms.
– Data Logging (in some models): Records humidity levels over time for analysis.
– Min/Max Readings: Displays historical high and low humidity values.
Common Applications of Digital Temperature Humidity Meter:
– Laboratories: Maintaining stable humidity for experiments or sample storage.
– Warehouses: Monitoring conditions for sensitive goods (e.g., electronics, paper, pharmaceuticals).
– HVAC Systems: Ensuring proper climate control.
– Homes: Preventing mold growth or overly dry conditions.
Benefits of Digital Temperature Humidity Meter:
– Accurate and quick readings
– Easy to use and read
– Helps in maintaining comfort, safety, and product integrity
Would you like recommendations for models or guidance on calibration?
Benefits of Digital Humidity meter
Here are the key benefits of using a Digital Humidity Meter:
✅ 1. Accurate Humidity Monitoring
– Provides precise relative humidity (%RH) readings, essential for sensitive environments.
✅ 2. Fast and Real-Time Results
– Displays immediate data, allowing for quick adjustments to environmental conditions.
✅ 3. Dual Measurement
– Many models also measure temperature, offering a more complete picture of ambient conditions.
✅ 4. Easy to Use
– Simple digital interface with clear display, suitable for both professionals and non-technical users.
✅ 5. Compact and Portable
– Lightweight design makes it ideal for field use, indoor monitoring, or mounting on walls.
✅ 6. Prevents Damage
– Helps avoid moisture-related issues like mold, corrosion, static buildup, and product degradation.
✅ 7. Supports Quality Control
– Essential for labs, warehouses, and manufacturing environments to maintain product integrity.
✅ 8. Data Logging (Optional)
How to use Digital Humidity meter
Here are the key features of a Digital Humidity Meter:
1. Digital Display
– Shows real-time humidity (%) and often temperature (°C/°F).
– Some include backlit screens for easy viewing.
2. High Accuracy Sensors
– Uses capacitive or resistive sensors for accurate and stable humidity readings.
3. Min/Max & Hold Functions
– Displays minimum, maximum, and current readings.
– “Hold” function freezes the current reading for review.
4. Data Logging (in advanced models)
– Records humidity data over time for monitoring trends.
5. Portable or Wall-Mountable
– Available as handheld, desktop, or wall-mounted units for different environments.
6. Battery or USB Powered
– Operates on standard batteries or via USB power for flexibility.
7. Optional External Probes
– Some models support external humidity/temperature sensors for remote monitoring.
8. Calibration Option
– Allows manual or automatic calibration to maintain accuracy.
Here’s a quick step-by-step guide on how to use a Digital Temperature Humidity Meter:
✅ 1. Power On the Device
– Insert batteries (if portable) or plug it in (if wall-mounted).
– Press the power button to turn it on.
✅ 2. Place It Properly
– Set the meter in an open, well-ventilated area.
– Avoid placing near windows, vents, or direct heat sources for accurate readings.
✅ 3. Wait for Stabilization
– Allow the device a few seconds to stabilize and show accurate humidity and temperature readings.
✅ 4. Read the Display
– Humidity will be shown as % RH (Relative Humidity).
– Most models also display temperature in °C or °F.
✅ 5. Use Additional Features (if available)
– Press buttons to view Min/Max, Data Log, or switch units.
– Some advanced models may have Bluetooth or USB for data transfer.
✅ 6. Maintain the Device
– Clean sensor area gently if dusty.
– Calibrate periodically if required (check manual).
Description
Shipping & Delivery
Related products

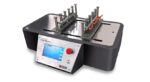
Fabric Stiffness Tester
Fabric Stiffness Tester

Fabric Stiffness Tester
- Accurate Measurement of Flexibility - Provides reliable data on fabric stiffness, essential for quality control and product development.
- Improves Product Comfort - Helps assess how soft or rigid a fabric will feel in clothing or furnishings.
- Supports Material Selection - Aids designers and engineers in choosing the right fabric for specific applications based on stiffness.
- Quality Assurance - Detects fabric inconsistencies or defects that affect handling or drape.
- Standards Compliance - Enables testing as per international standards like ASTM D1388 and ISO 9073-7 for global product approval.
- Quick and Simple Operation - Delivers fast results with minimal operator training or preparation.
- Applicable to Multiple Materials - Suitable for woven, nonwoven, knitted fabrics, paper, and films.
- Enhances R&D Accuracy - Supports consistent material testing during product innovation and textile finishing.
- Graduated Measurement Scale - Precise scale to measure overhang length for accurate stiffness calculation.
- Flat Test Platform - Smooth, level surface ensures consistent and reliable fabric movement.
- Standard Deflection Angle Guide - Built-in 41.5° angle reference for consistent stiffness testing (per ASTM/ISO).
- Manual or Motorized Models - Available in both types for simple or automated operation depending on lab needs.
- Compact Design - Space-saving unit ideal for textile labs and quality control rooms.
- Sample Holder or Clamp - Ensures correct alignment and smooth feeding of fabric strips during testing.
- Durable Construction - Made of corrosion-resistant materials like stainless steel or aluminum for long-term use.
- Compliance with Standards - Supports methods like ASTM D1388, ISO 9073-7 for stiffness testing of fabrics.
- Lightweight and Portable - Easy to move and use in various lab settings.
- Low Maintenance - Simple mechanical parts require minimal servicing.
- Prepare the Sample - Cut the fabric into a rectangular strip (e.g., 25 mm × 200 mm), as per standard.
- Place the Sample - Lay the fabric strip flat on the test platform with one end aligned at the zero mark.
- Slide the Fabric - Gently push the fabric forward so it slowly overhangs the platform.
- Watch for Deflection - Stop sliding when the free end of the fabric bends down to the reference angle (typically 41.5°).
- Read the Bending Length - Measure the overhang distance from the scale. This is the bending length (C).
- Calculate Flexural Rigidity
- Repeat for Accuracy - Test both warp and weft directions and average the results for better accuracy.
 Scope of application
It is used to measure the stiffness of cotton,
wool, silk, linen, chemical fibers and other woven fabrics,
knitted fabrics, general nonwovens, coated fabrics, etc.
It is also suitable for measuring the stiffness of paper,
leather, film and other flexible materials.
Relevant Standards
GB/T 18318, ASTM D 1388, IS09073-7, BS EN22313 etc.
[Instrument Characteristics]
1. Infrared photoelectric invisible inclined plane
detection system replaces the traditional tangible inclined plane,
realizes non-contact detection, and overcomes the problem that
the measurement accuracy is affected by
the sample torsion lifted by the inclined plane.
2. The inclination adjustable mechanism of instrument
measurement to meet different test requirements.
3. Stepping motor drive, accurate measurement, smooth operation;
4. The color touch screen display can show the extended length,
bending length, bending stiffness of the sample, the warp average,
the weft average and the total average of the above values respectively.
5. Printing of Chinese report forms for thermal printers.
Technical parameters
1. Test methods: The two method (A method: Weft test, B method: Forward and backward test)
2. Measurement angle:41.5 degree, 43 degree and 45 degree adjustable
3. Extend the length range:5-220 mm (special requirements can be made at the time of ordering)
4. Length resolution:0.01mm
5. Measurement accuracy:±0.1mm
6. Specimen specifications:250×25mm
7. Work platform specifications:250×50mm
8. Specification of sample pressing plate:250×25mm
9. Pushing speed of press plate:3 mm/s; 4 mm/s; 5 mm/s
10. Display output: Touch screen display
11. Print Output: Chinese Report
12. Data Processing Volume: A total of 15 groups, each group less than 20 trials
13. Printer: Thermal printer
14, power supply:AC220V 50Hz
15. Host volume:570mm×360mm×490mm
16. Host weight:20kg
Scope of application
It is used to measure the stiffness of cotton,
wool, silk, linen, chemical fibers and other woven fabrics,
knitted fabrics, general nonwovens, coated fabrics, etc.
It is also suitable for measuring the stiffness of paper,
leather, film and other flexible materials.
Relevant Standards
GB/T 18318, ASTM D 1388, IS09073-7, BS EN22313 etc.
[Instrument Characteristics]
1. Infrared photoelectric invisible inclined plane
detection system replaces the traditional tangible inclined plane,
realizes non-contact detection, and overcomes the problem that
the measurement accuracy is affected by
the sample torsion lifted by the inclined plane.
2. The inclination adjustable mechanism of instrument
measurement to meet different test requirements.
3. Stepping motor drive, accurate measurement, smooth operation;
4. The color touch screen display can show the extended length,
bending length, bending stiffness of the sample, the warp average,
the weft average and the total average of the above values respectively.
5. Printing of Chinese report forms for thermal printers.
Technical parameters
1. Test methods: The two method (A method: Weft test, B method: Forward and backward test)
2. Measurement angle:41.5 degree, 43 degree and 45 degree adjustable
3. Extend the length range:5-220 mm (special requirements can be made at the time of ordering)
4. Length resolution:0.01mm
5. Measurement accuracy:±0.1mm
6. Specimen specifications:250×25mm
7. Work platform specifications:250×50mm
8. Specification of sample pressing plate:250×25mm
9. Pushing speed of press plate:3 mm/s; 4 mm/s; 5 mm/s
10. Display output: Touch screen display
11. Print Output: Chinese Report
12. Data Processing Volume: A total of 15 groups, each group less than 20 trials
13. Printer: Thermal printer
14, power supply:AC220V 50Hz
15. Host volume:570mm×360mm×490mm
16. Host weight:20kg 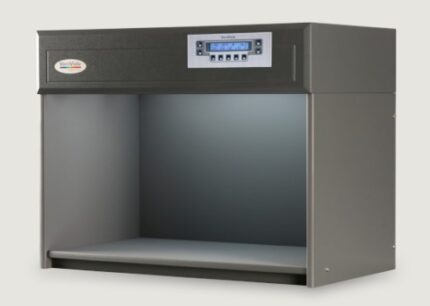

VeriVide Colour Assessment Cabinets
VeriVide Colour Assessment Cabinets
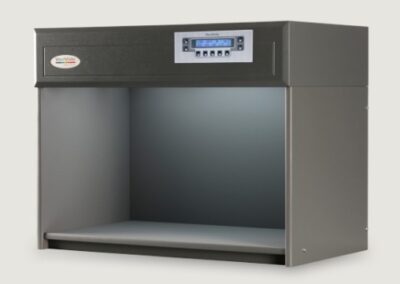 VeriVide offers high-quality Colour Assessment Cabinets (CACs) such as the CAC 60-4, CAC 60-5, and CAC 120-4&5. These cabinets, originating from the UK, are reliable tools for visual evaluation in quality assurance, meeting national, international, and retailer standards. They effectively mitigate issues related to color assessment.VeriVide Colour Assessment Cabinets
High-quality visual evaluation tool for quality assurance. Adhering to national, international and retailer standards.Colour Assessment Cabinet's (CACs) reduce problems associated with assessing products or samples in different environments,be though geological or seasonal, offering a cost-effective method to ensure visual accuracy and product quality.
Color Light Box Enhance color precision with VeriVide's cutting-edge Colour Assessment
Cabinets. These cabinets are meticulously designed to ensure accurate color evaluation in various industries. Invest in VeriVide Colour Assessment Cabinets to elevate your color assessment process.
Enhance Color Precision with VeriVide's Cutting-Edge Assessment Cabinets, which meet or surpass ISO 3664 and BS 950 Part 1 international standards. The cabinets are adaptable to user requirements, with lamp options to choose different light sources. Available in 60, 120, and 150cm widths, VeriVide Colour Assessment Cabinets provide a flexible solution for accurate color assessment.
Incorporate user-friendly features like servicing indicator, auto sequence, warm-up, power save and data storage.4 or 5 light source options Versions available for colour fastness testing and particulate testing both adhering to global standardsEnsure that you are using the best equipment available as they provide the best fluorescent D65 daylight simulator, with the highest Colour
Rendering Index (CRI), available. VeriVide Colour Assessment Cabinets products are known as light boxes, viewing booths, colour cabinets and others, depending on which industry or country they are serving in. They are used within a wide array of industry sectors throughout the world including textile and apparel, graphics, automotive, ceramics, cosmetics, pharmacology (CAC Particulate),
food, footwear, packaging and printing.Download the Datasheet below for more information or click 'VeriVide CAC Datasheet Here' to get in touch with colour experts.
VeriVide CAC Datasheet Here Features of VeriVide Colour Assessment Cabinets
• CAC 60, CAC 120 and CAC 150 accommodate 60, 120 and 150cm tubes respectively
VeriVide offers high-quality Colour Assessment Cabinets (CACs) such as the CAC 60-4, CAC 60-5, and CAC 120-4&5. These cabinets, originating from the UK, are reliable tools for visual evaluation in quality assurance, meeting national, international, and retailer standards. They effectively mitigate issues related to color assessment.VeriVide Colour Assessment Cabinets
High-quality visual evaluation tool for quality assurance. Adhering to national, international and retailer standards.Colour Assessment Cabinet's (CACs) reduce problems associated with assessing products or samples in different environments,be though geological or seasonal, offering a cost-effective method to ensure visual accuracy and product quality.
Color Light Box Enhance color precision with VeriVide's cutting-edge Colour Assessment
Cabinets. These cabinets are meticulously designed to ensure accurate color evaluation in various industries. Invest in VeriVide Colour Assessment Cabinets to elevate your color assessment process.
Enhance Color Precision with VeriVide's Cutting-Edge Assessment Cabinets, which meet or surpass ISO 3664 and BS 950 Part 1 international standards. The cabinets are adaptable to user requirements, with lamp options to choose different light sources. Available in 60, 120, and 150cm widths, VeriVide Colour Assessment Cabinets provide a flexible solution for accurate color assessment.
Incorporate user-friendly features like servicing indicator, auto sequence, warm-up, power save and data storage.4 or 5 light source options Versions available for colour fastness testing and particulate testing both adhering to global standardsEnsure that you are using the best equipment available as they provide the best fluorescent D65 daylight simulator, with the highest Colour
Rendering Index (CRI), available. VeriVide Colour Assessment Cabinets products are known as light boxes, viewing booths, colour cabinets and others, depending on which industry or country they are serving in. They are used within a wide array of industry sectors throughout the world including textile and apparel, graphics, automotive, ceramics, cosmetics, pharmacology (CAC Particulate),
food, footwear, packaging and printing.Download the Datasheet below for more information or click 'VeriVide CAC Datasheet Here' to get in touch with colour experts.
VeriVide CAC Datasheet Here Features of VeriVide Colour Assessment Cabinets
• CAC 60, CAC 120 and CAC 150 accommodate 60, 120 and 150cm tubes respectively
- Either 4 or 5 light sources available for each model including D65, D50, 840P15, F and UV - see Lamp Options.• Internal finishes in Munsell N5, Munsell N7 or Grey 5574 • Diffuser and/or dimmer options available Dimensions of VeriVide Colour Assessment Cabinets CAC 60-4 Dimensions (mm) Width Height Depth Overall 710 545 420


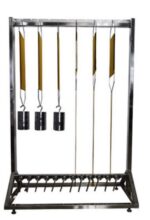
Fatigue tester for Elastic fabric
Fatigue Tester for Elastic Fabric

Fatigue tester for Elastic fabric
- Adjustable Stretch Range - Allows setting stretch levels (e.g., 0–100%) to simulate real-life fabric use.
- High-Cycle Capability - Supports up to millions of stretch-relax cycles for long-term fatigue analysis.
- Touch Screen Control - 7-inch color display for easy setup, monitoring, and data entry.
- Servo Motor Driven - Ensures precise and smooth linear motion during testing.
- Customizable Speed - Adjustable test speed (e.g., up to 40 cycles per minute) based on test requirements.
- Multi-Sample Testing - Some models allow testing multiple specimens simultaneously.
- Cycle Counter with Alarm - Built-in counter with programmable stop after preset cycles and auto-alert feature.
- Durable Construction - Robust metal frame suitable for continuous testing in lab environments.
- Standard Compliance - Designed to follow standards like GB/T 37635 for elastic fabric testing.
- Prepare the Sample
- Mount the Sample - Secure both ends of the fabric in the upper and lower clamps.
- Set Test Parameters
- Start the Test - Press start on the touch screen interface. - The machine will cyclically stretch and release the sample.
- Monitor Progress - Observe operation or let it run automatically.
- Remove and inspect - Take out the fabric and measure elongation, recovery, or visual defects.
- Record and Compare Results - Compare with initial measurements or standard performance criteria.
Fatigue tester for Elastic fabric
Stretch Recovery Tester Static Method
Stretch Recovery Tester Static Method
Stretch Recovery Tester
- A sample is stretched to a predetermined extension or force.
- The stretch is maintained for a set period.
- After removing the load, the recovery (return to original length) is measured after a fixed time.
- The fabric sample is clamped and stretched to a specific length or force.
- It’s held for a fixed duration (e.g., 1–5 minutes).
- The tension is released, and the sample is allowed to recover.
- The recovered length is measured after a set time.


Stretch Recovery Tester

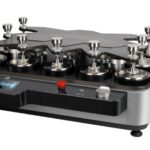
Counting Balance-Weighing Scale
Counting Balance-Weighing Scale
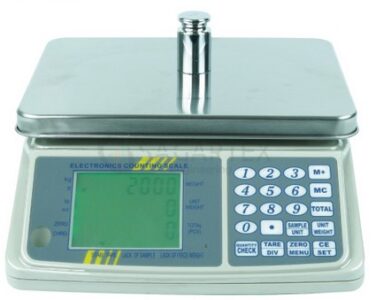
Counting Balance-Weighing Scale
Counting Balance-Weighing Scale

Perspiration Tester
Perspiration Tester
Perspiration Tester
- Fabric samples are treated with synthetic perspiration solution (acidic or alkaline).
- They are sandwiched with adjacent fabric and placed between glass or acrylic plates.
- The assembly is loaded into the tester and pressed under specific pressure.
- it’s then incubated at 37°C (body temperature) for a fixed time (typically 4 or 16 hours).
- Afterward, color change and staining are evaluated using a gray scale.
- Accurate Sweat Simulation - Mimics real-life effects of acidic and alkaline perspiration on fabrics.
- Improves Product Quality - Ensures textiles retain color and don’t bleed or stain when worn.
- Supports Standard Compliance - Follows ISO and AATCC test standards for global market approval.
- Protects Brand Reputation- Reduces customer complaints due to dye transfer or fading.
- Simple and Repeatable- Provides consistent pressure and conditions for reliable results.
- Multi-Sample Testing- Tests multiple specimens at once, saving time in labs.
- Durable and Low Maintenance- Robust frame with minimal moving parts makes it long-lasting and easy to care for.
- Stainless Steel Frame - Corrosion-resistant body for durability and long-term use.
- Multi-Sample Capacity - Can hold up to 20 or more specimens for batch testing.
- Standardized Loading Weight- Applies uniform pressure (usually 12.5 kPa) across all samples.
- Removable Plates - Glass or acrylic plates ensure even contact and easy cleaning.
- Compact Design- Space-saving, bench-top model ideal for lab environments.
- Complies with Test Standards - Meets ISO 105 E04, AATCC 15, and related perspiration fastness standards.
- Ease of Operation - Simple loading, unloading, and incubation process.
- High-Temperature Resistance - Can be used inside incubators at 37°C or ovens as required.
- Prepare the Test Solution - Mix artificial acidic or alkaline perspiration as per standard (ISO or AATCC).
- Cut the Fabric Samples - Cut both the test fabric and adjacent white fabric (usually cotton) to standard size.
- Soak the Samples - Immerse the fabric sandwich (test + adjacent) in the test solution for 30 minutes.
- Remove Excess Liquid - Gently squeeze or blot to remove extra moisture—do not dry.
- Load in the Tester- Place each sandwich between glass or acrylic separator plates in the tester.
- Apply Pressure - Tighten the top plate or place the standard weight on top to apply uniform pressure.
- Incubate - Keep the loaded tester in an oven or incubator at 37°C for 4–16 hours (depending on the method).
- Accurate Sweat Simulation - Mimics real-life effects of acidic and alkaline perspiration on fabrics.
- Improves Product Quality - Ensures textiles retain color and don’t bleed or stain when worn.
- Supports Standard Compliance - Follows ISO and AATCC test standards for global market approval.
- Protects Brand Reputation- Reduces customer complaints due to dye transfer or fading.
- Simple and Repeatable- Provides consistent pressure and conditions for reliable results.
- Multi-Sample Testing- Tests multiple specimens at once, saving time in labs.
- Durable and Low Maintenance- Robust frame with minimal moving parts makes it long-lasting and easy to care for.
- Dry and Evaluate - Remove, air dry the samples, then assess color change and staining using a gray scale.
- Fabric samples are treated with synthetic perspiration solution (acidic or alkaline).
- They are sandwiched with adjacent fabric and placed between glass or acrylic plates.
- The assembly is loaded into the tester and pressed under specific pressure.
- it’s then incubated at 37°C (body temperature) for a fixed time (typically 4 or 16 hours).
- Afterward, color change and staining are evaluated using a gray scale.
Perspiration Tester

Hydraulic GSM Cutter
Hydraulic GSM Cutter
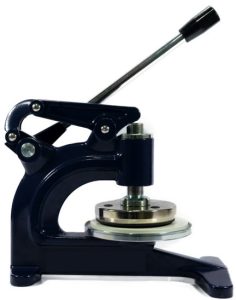
Hydraulic GSM Cutter
- High Cutting Precision - Ensures consistent and accurate fabric sample size for reliable GSM results.
- Effortless Operation- Hydraulic action reduces manual effort and operator fatigue.
- Ideal for Thick or Multi-Layer Fabrics - Cuts through dense or multiple fabric layers cleanly.
- Time-Saving - Speeds up the sample preparation process, especially for high-volume testing.
- Improves Test Accuracy - Uniform samples help eliminate errors in GSM calculation.
- Durable and Long-Lasting - Robust construction ensures stability and extended service life.
- Safety Enhancement - Reduces risk of injury compared to manual rotary cutters.
- Consistent Pressure Application - Hydraulic mechanism maintains steady force for each cut.
- Hydraulic Press Mechanism - Applies consistent and strong pressure for clean, even cuts.
- Standard Cutting Die (100 cm²) - Produces fabric samples suitable for GSM testing with standard area.
- Heavy-Duty Construction - Built with robust metal frame for long-term lab or industrial use.
- Sharp Stainless Steel Blades - Durable and replaceable blades ensure smooth, precise cuts.
- Cutting Pad Included - Comes with a rubber or nylon base to protect blades and ensure clean edges.
- Simple Lever or Button Operation - Easy to use with minimal training required.
- Non-slip Base - Provides stability during operation for safe, accurate cutting.
- Supports Various Fabric Types
- Place the Cutting Pad - Lay the rubber or nylon cutting pad on a flat surface.
- Position the Fabric - Place the fabric sample flat and smooth on the cutting pad.
- Align the Cutter - Position the GSM cutter die over the desired area of the fabric.
- Activate Hydraulic Press - Pull the lever or press the button to apply hydraulic pressure and cut the sample.
- Remove the Sample - Lift the cutter and carefully take out the circular fabric piece (usually 100 cm²).
- Weigh the Sample - Place the cut sample on a precision balance or GSM scale to determine weight.
- Calculate GSM - Multiply the sample weight (in grams) by 100 to get GSM.
Hydraulic GSM Cutter