About us
Select category
  • Select category
  • Dyeing Lab Machine
  • Lab Equipment & Instrument
  • Physical Testing & Fabric Testing
  • Yarn Dyeing Machine & Equipment
2 items $0.00
Menu
About us
2 items $0.00
  • Home
  • Products
    • Dyeing Lab Machine
      • Products
        • IR Dyeing Machine Dunlin IR Dyeing Machine Dunlin
        • Digital Ph meter
        • Color fastness to washing machine
        • Rainin Digital Pipette
        • HTHP Glycerin bath dyeing machine
        • Laboratory mini stenter Dryer
        • Laboratory tenter
        • Laboretory hydro Extractor
        • Laboretory Padder
        • Oscillation type Dyeing Machine
        • Orbital Shaker Machine
        • Steam Soaping machine

      IR Dyeing Machine Dunlin

      View More
    • Physical Testing & Fabric Testing Machine
      • Products
        • Tensile Strength tester
        • Martindale abrasion tester
        • Martindale abrasion tester updated Martindale abrasion tester Updated
        • Digital Elmendorf tearing tester
        • Bursting strength tester
        • ICI pilling & Snagging test machine
        • Fabric Stiffness Tester
        • Color Fastness to washing machine
        • Fabric air permeability tester
        • Fabric drape tester
        • Fabric flame retardant tester
        • fabric moisture permeability tester
      • Products
        • Stretch Recovery Tester Static Method
        • Xenon Arc Light Fastness Tester
        • Fastness rotary friction tester
        • Fiber oil fast extractor
        • Fabric flame retardant tester
        • Random Tumble Pilling Tester
        • Spray Rating Tester
        • Fatigue tester for Elastic fabric
    • Lab Equipment & Instrument
      • Products
        • Counting Balance /Weighing Scale
        • controller for Ir Dyeing Machine
        • Analog Thickness gauge
        • color matching cabinet/Light box
        • VeriVide Colour Assessment Cabinets
        • Digital hotplate magnetic stirrer
        • Digital Temperature Humidity meter
        • Digital Ink Rubbing Tester
        • Digital paper dot meter Densitometer
        • Digital Bench top PH Meter
        • Digital precision balance
        • Digital thickness gauge
      • Products
        • Pantone book
        • Hydraulic GSM Cutter
        • Gray scale
        • GSM Cutter & Balance
        • Hand needle detector
      • Products
        • Perspiration Tester
        • Textile moisture meter tem aqua boy
        • VeriVide D65 Tube Light
        • Yarn Tension Meter
    • Wet & Dry Process Instrument
      • Products
        • Bosch tumble dryer
        • Bosch-Washing-Machine-WAJ2018SGC-4
        • Capillary effect tester
        • Color fastness to wash
        • Color fastness to sublimation & heating
        • Durawash print Durability tester
        • Formaldehyde tester for textiles
        • Ozone Exposure chamber
        • Pilling assessment viewer
        • Whirlpool washer & Dryer
      Textile Machinery Supplier in Bangladesh

      MAAM TEX

      Lab Machine Supplier in Bangladesh, Testing machine supplier in Bangladesh, Dyeing Machine supplier in Bangladesh, Lab Machine Supplier in Dhaka, yarn Dyeing machine supplier in Bangladesh, Lab Dispensing Machine supplier in Bangladesh, soft winding machine supplier in Bangladesh, Hard winding machine supplier in Bangladesh, IR Dyeing machine supplier in Bangladesh, Lab machine Price in Bangladesh, 

    • Yarn Dyeing Machine-Equipment
      • Products
        • Cone yarn Dyeing machine
        • Automatic Bobbin Hydroextractor
        • Card winding machine for yarn
        • Sample Cone Yarn Dyeing machine
        • Digital yarn twist Tester
        • Electronic wrap reel
        • Fully Automatic Radio Frequency Dryer
        • Thread Cone Winding Machine
        • High speed hard winding machine
        • High speed Soft cone winding machine
        • Yarn evenness tester
      • Products
        • Yarn evenness tester
    • Washing-Drying Machine
      • Products
        • Automatic washing project
  • About us
  • Contact us
“Digital Temperature Humidity Meter” has been added to your cart. View cart
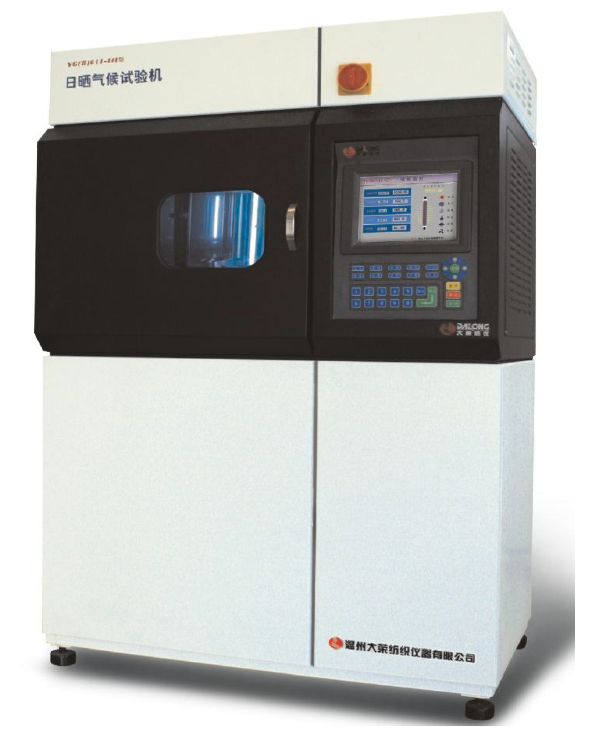
Xenon Arc Light Fastness Tester
360 product view
    0%
    Click to enlarge
    Xenon Arc Light Fastness Tester
    Xenon Arc Light Fastness Tester
    Home Physical Testing & Fabric Testing Xenon Arc Light Fastness Tester
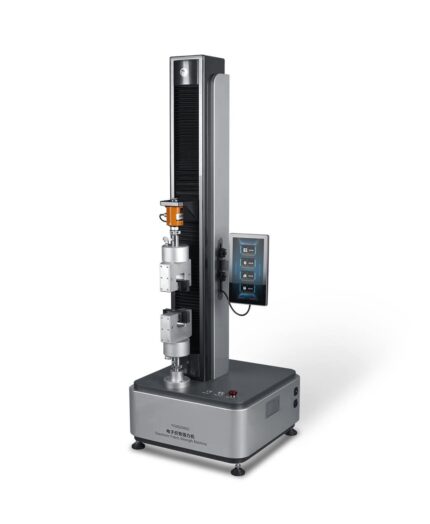
    Tensile Strength Tester
    Tensile Strength tester $0.00
    Back to products
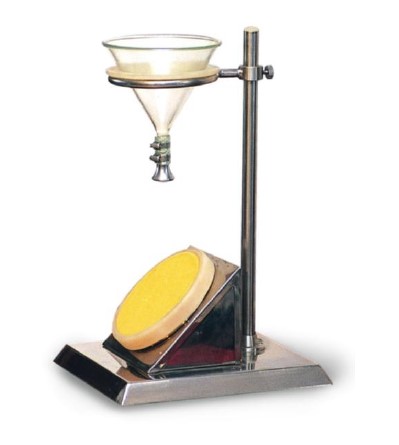
    Spray Rating Tester
    Spray Rating Tester $0.00

    Xenon Arc Light Fastness Tester

    $0.00

    Category: Physical Testing & Fabric Testing Tags: Lab Xenon Arc Light Fastness Tester, Laboratory Xenon Arc Light Fastness Tester, Xenon Arc Light Fastness Tester, Xenon Arc Light Fastness Tester price in Bangladesh Brand: DARONG
    Share:
    • Description
    • Shipping & Delivery
    Description

    Xenon Arc Light Fastness Tester

    Xenon Arc Light Fastness Tester

    Xenon Arc Light Fastness Tester


    Xenon Arc Light Fastness Tester is a laboratory instrument used to evaluate the color fastness of textiles and materials when exposed to sunlight or artificial light. It simulates full-spectrum sunlight using a xenon arc lamp, making it ideal for assessing how materials resist fading over time.


    Purpose of Xenon Arc Light Fastness Tester:

    To determine how well a fabric or material maintains its color and integrity under prolonged light exposure, especially for outdoor or light-sensitive applications.


    Working Principle of Xenon Arc Light Fastness Tester :

    A xenon arc lamp emits light similar to natural sunlight. Fabric samples are exposed under controlled temperature, humidity, and light intensity. The degree of fading is compared to standard blue wool scales to assign a light fastness rating.


    Main Components Xenon Arc Light Fastness Tester :

    – Xenon Arc Lamp: Simulates sunlight (UV, visible, and infrared).

    – Sample Holder: Rotates samples for uniform exposure.

    – Environmental Controls: Maintains specific temperature and humidity.

    – Control Panel/Software: Sets test parameters (light, time, humidity, etc.).

    – Filters: Control the light spectrum (e.g., daylight, window glass).


    Applications:

    – Textiles

    – Automotive interiors

    – Plastics, paints, and coatings

    – Outdoor fabrics and furnishings


    Benefits of Xenon Arc Light Fastness Tester:

    1. Realistic Sunlight Simulation – Accurately mimics full-spectrum natural sunlight, including UV, for reliable light fastness testing.
    2. Standard Compliance – Meets international standards like ISO 105-B02, AATCC TM16, and ASTM G155, ensuring globally accepted results.
    3. Improves Product Durability – Helps manufacturers assess and improve resistance to color fading, cracking, or degradation from light exposure.


    1. Versatile Applications – Suitable for testing textiles, plastics, paints, leather, and coatings.
    2. Controlled Test Conditions – Offers precise control over temperature, humidity, and light intensity, improving test consistency and repeatability.
    3. Supports Quality Assurance – Detects early failures in colorfastness, enabling better product design and material selection.


    1. Automated Operation – Programmable tests and automatic monitoring reduce operator involvement and errors.
    2. Accelerated Testing – Speeds up evaluation by simulating months or years of sun exposure in a few days or weeks.


    Features of Xenon Arc Light Fastness Tester:

    1. Xenon Arc Lamp – Provides full-spectrum light (UV, visible, IR) to simulate natural sunlight accurately.
    2. Programmable Control System – Digital or touchscreen interface for setting test parameters like exposure time, temperature, humidity, and irradiance.


    1. Humidity and Temperature Control – Maintains precise environmental conditions inside the test chamber.
    2. Rotating Sample Carousel – Ensures uniform light exposure on all test specimens.
    3. Light Spectrum Filters- Adjustable filters simulate different light conditions (e.g., daylight, window glass, outdoor).


    1. Standards Compliance- Meets ISO, AATCC, ASTM, and other global test methods for light fastness.
    2. Automatic Irradiance Control – Maintains constant light intensity throughout testing, improving accuracy.
    3. Safety Features – Includes overheating protection, door interlock, and lamp monitoring system.


    1. Data Logging and Export – Some models offer USB or software integration for saving and analyzing test data.
    2. Durable and Insulated Chamber – Built with high-quality materials for stable testing and long-term use.


    How to Use Xenon Arc Light Fastness Tester:

    1. Prepare the Samples

    – Cut fabric or material into standard-size specimens.

    – Label and condition samples (usually 24 hrs at 21°C, 65% RH).

    1. Mount the Samples – Attach samples onto holders or clips, placing them evenly on the rotating drum or carousel.


    1. Insert Blue Wool Standards- Include standard blue wool reference fabrics to compare light fastness.
    2. Set Test Parameters

    – Use the control panel to set:

    – Irradiance (e.g., 0.35 W/m² at 420 nm)

    – Temperature and humidity

    – Test duration (e.g., 24–72 hrs or more)

    1. Start the Test – Close the chamber door and begin the exposure cycle.
    2. Monitor Progress- System auto-adjusts irradiance and logs test conditions. Periodically check if needed.


    1. End and Remove Samples – After completion, stop the test and remove the samples and blue wool references.
    2. Evaluate Results – Compare the sample fading to the blue wool scale to assign a light fastness rating (1–8 scale).


    Xenon Arc Light Fastness Tester
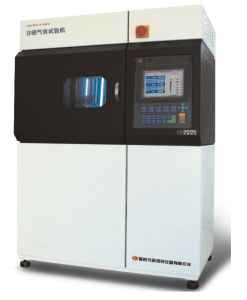
    [Scope of application]

    It is used for the light fastness and weather fastness test in the color fastness test. It
    can also be used for the light fastness test and light fastness test of paints,
    pigments, coatings, rubber, plastics, wood floors, paper and other materials. Aging
    test.
    Related Standards of Xenon Arc Light Fastness Tester

    GB/T8427 (China National Standard Drafting Unit)
    GB/T15102-2006 GB/T14576 GB/T15104-2006 GB/T8430 AATCC TM16 ISO105-B04
    ISO105-B02 etc.

    Instrument characteristics of Xenon Arc Light Fastness Tester

    1. Digital setting of light intensity, real-time monitoring, and automatic adjustment
    to meet the stability requirements of different standards for test light sources
    (420nm can be switched; 300-800nm or 300-400nm band monitoring);
    2. Standard Blackboard Thermometer (BST) and Blackboard Thermometer (BPT)
    can be selected for use, and are tested at the same station (equal distance) as the
    sample, which truly reflects the tested condition of the sample;

    3. The measured data is processed by the CPU and displayed on the color screen in
    the form of numbers, graphs, curves, etc., without stopping for observation;
    4. Microchip’s 32-bit intelligent CPU, high-efficiency real-time control, to ensure
    accurate reproduction of the same test environment;

    5. 7-inch color screen display and control, multiple test monitoring modes
    (animation, numbers, charts), convenient control, intuitive and clear;
    6. All sample holders can be timed separately, and different samples can be tested
    on the same machine, which is convenient for test monitoring and reduces
    operating costs;
    7. Rated 1500W long arc xenon lamp technology, high efficiency and energy saving,
    real simulation of sunlight spectrum;
    8. Industrial temperature control (refrigeration) system, rapid and stable
    temperature adjustment in the test chamber;

    9. Built-in self-circulation system and air filtration system, greatly reducing
    environmental requirements;
    10. European traceable spectrum analyzer, multi-measurement calibration;
    11. Built-in network communication module, can customize the remote monitoring
    function of mobile phone APP;
    12. The instrument can be optionally equipped with thermal printout or data
    export of test environment parameters;
    13. The quality assurance that one test can run continuously for 1000 hours

    [Technical Parameters]1. Temperature control range of test chamber: (20~50)℃; accuracy: ±2℃
    2. Test chamber humidity control range: (15~95)%RH, accuracy: ±5%RH
    3. Test time control range: 0~9999:59 (h:min); accuracy: ±1min

    4. Irradiance control range:
    (0.80~1.60)W/m2/420nm Accuracy: ±0.02W/m2/420nm
    (25-60)W/m2/300-400nm Accuracy: ±2W/m2/420nm
    (300-650)W/m2/300-800nm Accuracy: ±10W/m2/420nm
    Digital setting, automatic compensation
    Xenon light source:
    a. Rated power of xenon arc lamp: 1.5kW;
    b. Color temperature: 5500K~6500K;

    6. Sample:
    a. Rotation speed of sample holder: 5rpm
    b. Diameter of sample holder distribution: 286mm
    c. The size and number of sample holders that can be installed:
    GB standards AATCC(Optional)
    Specimen clamp size

    203mm×
    48mm
    220mm×92mm
    Maximum sample size
    135mm×
    45mm
    150mm×90mm
    Maximum exposure area
    118mm×
    33mm
    130mm×50mm
    Maximum number of
    pieces
    13
    6
    d. Timing of each sample holder separately: range: 0~9999:59 (h: min); accuracy: ±
    1min
    e. Sample thickness: ≤3mm

    7. Standard Blackboard Thermometer (BST) range:
    (20~75)℃; Resolution: 0.1℃, Accuracy: ±2℃
    Or optional blackboard temperature (BPT) range:
    (25~80)℃, resolution: 0.1℃, accuracy: ±2℃
    8.7 inch touch screen operation
    9. Stand-alone with thermal printer (optional)

    10. Power supply: AC220V±10% 50Hz 3.5kW
    11. Dimensions: 1130mm×760mm×1895mm
    12.Weight: about 380kg
    (Note: The equipment test conforms to the standard based on the above basic
    configuration and parameters. If it involves other standards and the test exceeds
    the above technical content, please contact our company for special
    customization)


    (Note: The equipment test conforms to the standard based on the above basic
    configuration and parameters. If it involves other standards and the test exceeds
    the above technical content, please contact our company for special
    customization)


      Shipping & Delivery

      Related products

      ICI Pilling & Snagging Test Machine

      Physical Testing & Fabric Testing
      $0.00
      ICI Pilling & Snagging Test Machine An ICI Pilling & Snagging Test Machine is a specialized laboratory instrument designed to
      Add to cart
      Quick view
      GSM Cutter with Balance
      GSM Cutter with Balance

      GSM Cutter with Balance

      Physical Testing & Fabric Testing
      $0.00
      GSM Cutter with Balance
      GSM Cutter with Balance

      GSM Cutter with Balance

        A GSM Cutter with Balance is a lab toolset used to determine the GSM (Grams per Square Meter) of fabrics, which indicates the fabric's weight and density. The kit includes a GSM round cutter and a precision weighing balance.   Purpose GSM Cutter with Balance: To accurately measure the weight per unit area of textile, paper, or nonwoven samples for quality control and product classification.   How It Works: GSM Cutter: - A circular blade cuts a fixed area (usually 100 cm²) from the fabric. Weighing Balance: - The cut piece is weighed, and the result is multiplied by 100 to get GSM. GSM = Weight (in grams) × 100   Applications of GSM Cutter with Balance: Textile and garment industry Nonwovens and paper manufacturing QC labs and R&D   Benefits of GSM Cutter with Balance: Accurate GSM Measurement - Ensures precise fabric weight analysis for quality control. Quick and Simple Operation - Allows fast sampling and GSM calculation in minutes. No Need for Area Calculation - Cutter gives a fixed area (usually 100 cm²), simplifying the formula. Improves Product Consistency - Helps maintain uniform fabric weight across batches.   Portable and User-Friendly - Compact design makes it ideal for labs and production floors. Cost-Effective Tool - Offers high accuracy without the need for expensive equipment. Versatile Use - Suitable for fabrics, paper, leather, films, and more.   Features of GSM Cutter with Balance: Rotary Blade Cutter - Stainless steel blades for clean and accurate circular cuts. Fixed Sample Area - Typically 100 cm², eliminating the need for area measurement. Precision Digital Balance   - Measures in grams with high resolution (0.01 g or better).   Rubber Cutting Pad - Protects blade and provides a smooth surface for cutting. Safety Lock - Prevents accidental blade exposure. Compact & Durable Design- Long-lasting, lab-friendly construction.   How to Use GSM Cutter with Balance: Prepare the Fabric Sample- Place the fabric on the rubber cutting pad. Cut the Sample - Hold the GSM cutter firmly and rotate it to cut a 100 cm² circular sample. Turn on the Balance - Power up the digital weighing scale and tare it to zero.   Weigh the Sample - Place the cut fabric piece on the balance and note the weight in grams. Calculate GSM - Multiply the weight by 100 to get GSM.  - GSM = Sample weight (g) × 100 Record the Result- Log the GSM value for quality control or analysis. Clean and Store - Wipe the cutter and balance, and store them safely after use.   GSM Calculation Formula: GSM (g/m²) = (Weight of Sample in grams) × 100 When using a GSM cutter (100 cm²): The cutter gives a fixed area of 100 cm², which is 1/100th of a square meter. So, multiplying the sample's weight by 100 gives the GSM directly. Example: If the sample weighs 1.75 g, then: GSM = 1.75 × 100 = 175 g/m²   Balance Calibration Guide (Manual Calibration): Warm-Up   - Turn on the balance and let it warm up for 10–15 minutes if required. Level the Balance   - Use the built-in bubble level and adjust leveling feet until the bubble is centered. Tare the Balance   - Press the “TARE” or “ZERO” button to reset the display to 0.000 g.   Enter Calibration Mode   - Press the “CAL” or “MODE” button (depends on the model). - Some balances may require holding the button for a few seconds. Use Standard Weight   - When prompted, place a certified calibration weight (e.g., 100g, 200g) on the pan.   - Wait for the display to stabilize.   Confirm Calibration   - The balance will beep or show “PASS” once successful.   - Remove the weight when done. Recheck Zero  - Ensure the display returns to 0.000 g after removing the weight.   Tips: Use certified weights for accuracy (Class F1 or E2). Calibrate in a draft-free, vibration-free environment. Calibrate daily or before critical measurements.     GSM Cutter  & Balance GSM Cutter Brand: Schroder Origin: Germany Capacity: 100 Sq.cm Supplied with 1 pcs cutting Pad and 04 pcs cutting blade. Digital Electronics balance Precision GSM Weight Balance 0.01g to 200g Model: GSM200 Brand: Schroder Origin: Germany
      Add to cart
      Quick view
      Fastness Rotary Friction Tester

      Fastness Rotary Friction Tester

      Physical Testing & Fabric Testing
      $0.00

      Fastness Rotary Friction Tester

      Fastness Rotary Friction Tester

      Fastness Rotary Friction Tester

        A Fastness Rotary Friction Tester, also known as a Rotary Crock meter, is a specialized instrument used to evaluate the color fastness of textiles and materials when subjected to rotational rubbing. This test simulates the wear and friction that fabrics experience during use, helping manufacturers assess the durability of dyes and finishes. Purpose of Fastness Rotary Friction Tester The primary function of the Fastness Rotary Friction Tester is to determine how well a fabric's color withstands rubbing, both in dry and wet conditions. This is crucial for ensuring the longevity and appearance of textiles in real-world applications, such as clothing, upholstery, and footwear.   Working Principle of Fastness Rotary Friction Tester The tester operates by applying a specified pressure to a fabric sample using a standardized rubbing finger covered with a test cloth. The rubbing finger performs a set number of rotational movements (typically 1.125 turns clockwise followed by 1.125 turns counterclockwise) over the fabric surface. After the test, the degree of color transfer to the test cloth and any changes in the fabric's appearance are evaluated against standardized gray scales.   Common Testing Standards - AATCC 116: Colorfastness to Crocking: Rotary Vertical Crock meter Method. ISO 105 X16: Textiles—Tests for color fastness—Part X16: Color fastness to rubbing—small areas. - SATRA TM8: Color fastness to rubbing.   Key Specifications of Fastness Rotary Friction Tester - Rubbing Head Diameter: Typically 16 mm. - Applied Pressure: Approximately 1134 grams (11.1 N). - Rotation: 1.125 turns clockwise followed by 1.125 turns counterclockwise. - Sample Size: Commonly 60 mm × 60 mm. - Test Cloth: Standardized white cotton cloth, either dry or wetted depending on the test condition.   Benefits of Fastness Rotary Friction Tester - Realistic Simulation: Mimics the actual wear and friction fabrics undergo during use. - Versatility: Applicable to a wide range of materials, including textiles, leather, and printed fabrics. - Quality Assurance: Ensures products meet industry standards for color durability. - Standard Compliance: Aligns with international testing standards, facilitating global trade and quality benchmarks.   Applications Fastness Rotary Friction Tester - Textile Industry: Assessing the color durability of garments, upholstery, and other fabric products. - Footwear Manufacturing: Testing the colorfastness of shoe uppers and linings. - Automotive Interiors: Evaluating the wear resistance of seat covers and other interior fabrics. Quality Control Laboratories: Routine testing to ensure product consistency and compliance with standards.   Benefits of Fastness Rotary Friction Tester:
      1. Accurate Colorfastness Evaluation- Provides precise assessment of how well fabric resists color loss and staining from rubbing.
      2. Simulates Real-World Wear - Recreates rotational friction found in actual use (e.g., seat covers, apparel wear points).
      3. Supports Wet & Dry Testing - Can test under both dry and wet conditions for comprehensive results.
       
      1. Standardized Testing - Complies with global standards (AATCC 116, ISO 105 X16), ensuring reliable and comparable results.
      2. Time-Saving & Efficient - Quick to set up and run, allowing for high-throughput testing in labs.
      3. Versatile Use- Suitable for textiles, leather, coated fabrics, and printed surfaces.
       
      1. Improves Quality Control - Identifies potential durability issues early in the production process.
      2. Enhances Product Performance - Helps in developing fabrics with better resistance to rubbing and abrasion.
        Features of Fastness Rotary Friction Tester:
      1. Rotary Rubbing Mechanism - Simulates 1.125 clockwise and 1.125 counterclockwise turns for realistic friction.
      2. Standardized Rubbing Head - Fixed diameter (typically 16 mm) with specified pressure (≈1134 g) for consistent results.
      3. Dry and Wet Testing Capability - Can perform tests using dry or wet rubbing cloths.
       
      1. Sample Holder- Secure and easy-to-use fixture for holding fabric samples in place.
      2. Test Cloth Mounting Arm- Quick attachment for standardized white rubbing cloths.
      3. Simple Operation - Manual or motorized operation depending on model; easy to handle for lab technicians.
      4. Compliance with Standards - Follows AATCC 116, ISO 105 X16, and SATRA TM8 protocols.
        How to Use Fastness Rotary Friction Tester:
      1. Prepare the Sample - Cut a fabric piece (typically 60 × 60 mm) and condition it per standard requirements.
      2. Mount the Fabric - Secure the fabric sample on the sample holder or base plate of the tester.
      3. Attach Rubbing Cloth - Place a standard white test cloth (dry or wetted as required) over the rubbing head.
       
      1. Apply Pressure - Lower the rubbing head onto the fabric. Standard weight is about 1134 g.
      2. Start the Test - Operate the tester: the head performs 1.125 turns clockwise, then 1.125 turns counterclockwise.- Number of cycles (typically 10 or 20) is set based on the test standard.
       
      1. Remove and Inspect - After testing, remove the rubbing cloth and assess any color transfer using a gray scale.
      2. Evaluate Fabric Surface - Check the fabric for visible changes, fading, or wear.
       
      1. Record Results - Grade both staining and fabric change per standard gray scale ratings.
          Fastness rotary friction tester [Scope of application] It is used to change the color fastness of the textile, printing and dyeing, printing and other products after a specific track friction. [Related standards] GB / T29865 AATCC116 ISO105-X16, etc. [Instrument characteristics]: 1.Single-chip control, speed can be set freely 2.Imported motor, linear guide, low noise, suitable for long time work 3. Liquid crystal display, film panel 4. Freely set the number of friction, can count up and down, and automatically stop the alarm when the set value is reached [Technical Parameters]: 1. Friction head diameter: 16mm 25mm 2. Vertical pressure: 11.1N 3. Working mode: 405 ° clockwise and 405 ° counterclockwise 4. Speed range: constant 60 rpm, LCD display, thin mold panel 5. Counting range: 0-99999 times 6. Power supply: AC 220V 50Hz 80W 7. Weight: 20KG 8. Volume: L420mm × W260mm × H430mm
      Add to cart
      Quick view
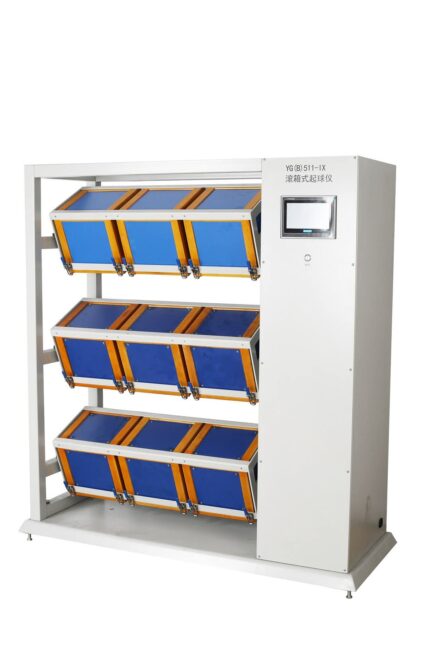
      Random Tumble Pilling Tester

      Random Tumble Pilling Tester

      Physical Testing & Fabric Testing
      $0.00

      Random Tumble Pilling Tester

      Random Tumble Pilling Tester

      Random Tumble Pilling Tester

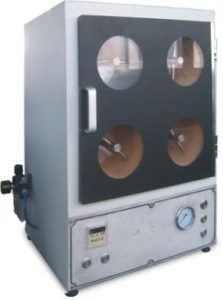
        The Random Tumble Pilling Tester is a specialized instrument designed to assess the pilling resistance of textile fabrics. Pilling refers to the formation of small, fuzzy balls (pills) on the fabric surface due to wear and friction. This tester simulates the wear conditions that fabrics experience during actual use, providing valuable data on their durability and appearance retention.   Purpose of Random Tumble Pilling Tester The primary function of the Random Tumble Pilling Tester is to evaluate how fabrics resist pilling, fuzzing, and matting. This assessment is crucial for manufacturers aiming to ensure the longevity and aesthetic quality of their textile products.   Working Principle of Random Tumble Pilling Tester The tester operates by placing fabric specimens into cylindrical test chambers lined with cork. Inside each chamber, a stainless steel impeller rotates at a high speed (typically around 1200 revolutions per minute), causing the fabric samples to tumble randomly. Compressed air is injected to enhance the tumbling action. This process simulates the friction and wear that fabrics undergo during regular use. After a predetermined duration, the samples are removed and visually assessed for pilling using standardized rating scales.   Key Specifications of Random Tumble Pilling Tester Test Chambers: Available in configurations of 2 or 4 chambers to accommodate multiple samples simultaneously. - Rotation Speed: Approximately 1200 revolutions per minute. - Chamber Dimensions: Typically around 146 mm in diameter and 152 mm in length. - Impeller Size: Standard impellers measuring about 121 mm. - Compressed Air Pressure: Adjustable, commonly between 14–21 kPa (2–3 psi). - Timer: Digital timer allowing precise control over test duration. - Power Supply: Generally operates on 220V, 50Hz power sources.   Applicable Standards of Random Tumble Pilling Tester The Random Tumble Pilling Tester complies with several international testing standards, ensuring its suitability for global applications:- ASTM D3512- ISO 12945-3- DIN 53867- JIS L 1076- GB/T 4802.4   Benefits of Random Tumble Pilling Tester - Realistic Simulation: Accurately replicates the wear and friction conditions fabrics face during actual use.- Standardized Testing: Adheres to international standards, facilitating consistent and comparable results.- Efficient Evaluation: Allows simultaneous testing of multiple samples, increasing laboratory throughput.- Quality Assurance: Provides manufacturers with critical data to improve fabric formulations and production processes. User-Friendly Operation: Features intuitive controls and clear viewing windows for easy monitoring.   Applications of Random Tumble Pilling Tester The Random Tumble Pilling Tester is widely used in various sectors of the textile industry: - Apparel Manufacturing: Assessing the durability of clothing fabrics. - Home Textiles: Evaluating materials used in upholstery, curtains, and bedding. - Quality Control Laboratories: Routine testing to ensure product consistency and compliance with standards.- Research and Development: Developing new fabrics with enhanced resistance to pilling.     Features of Random Tumble Pilling Tester:
      1. Multiple Test Chambers - Typically comes with 2 or 4 cork-lined chambers for simultaneous testing of multiple fabric samples.
      2. High-Speed Rotating Impellers - Impellers rotate at around 1200 rpm to create intense, random tumbling motion.
       
      1. Compressed Air System - Ensures continuous fabric movement and realistic simulation of wear.
      2. Digital Timer- Allows precise setting of test duration with easy-to-read display.
      3. Viewing Windows- Transparent chamber doors for monitoring fabric movement during testing.
      4. Standard Compliant Design- Meets ASTM D3512, ISO 12945-3, GB/T 4802.4 and other major standards.
       
      1. Robust Construction- Durable materials and components designed for long-term laboratory use.
      2. Easy Sample Handling - Quick-open chamber lids and simple sample placement process.
      3. Compact Footprint- Saves space in laboratory environments.
        How to Use Random Tumble Pilling Tester:
      1. Prepare Samples- Cut fabric into standard-sized specimens (usually circular or rectangular per ASTM/ISO specs)- Condition samples as per the standard (usually 24 hrs at 21°C, 65% RH).
      2. Load the Chambers - Place each sample into a cork-lined test chamber. - Add a small piece of gray cotton backing fabric if required by the method.
       
      1. Set Parameters - Adjust compressed air pressure (typically 14–21 kPa or 2–3 psi).
      - Set the test time (e.g., 30–60 minutes) using the digital timer.
      1. Start the Test- Close the chamber doors and press start. - Impellers rotate, tumbling the samples randomly with air flow.
       
      1. Stop and Unload - Once the timer ends, remove the samples carefully.
      2. Evaluate Pilling - Compare the tested samples to standard pilling rating photographs or scales.
      - Assign a rating from 1 (severe pilling) to 5 (no pilling).
      1. Record Results - Document the pilling grades and any observations.
          Random Tumble Pilling Tester [Scope of application]: It is used to test the fuzzing and pilling performance of the fabric under the condition of free rolling and friction in the drum. [Related standards]: GB/T4802.4 (Standard Drafting Unit) ISO12945.3, ASTM D3512, ASTM D1375, DIN 53867, ISO 12945-3, JIS L1076, etc. [Technical parameter]: 1. Number of boxes: 4 2. Roller specifications: diameter (146±1.0) mm, depth (152.4±1.0) mm; 3. Lining material: polychloroprene lining thickness (3.2±0.4) mm. , Hardness (60~70) IRHD; 4. Impeller specifications: φ12.7 mm×120.6 mm; 5. Plastic blade specifications: 10 mm×65 mm; 6. Rotation speed: 1~2400 rpm can be set freely 7. Working pressure: 14kPa~21kPa; 8. Time counting: (1~999) min. 9. Power supply: AC220V±10% 50Hz 80W 10. Appearance: (480×400×680)mm 11. Weight: 40kg [Standard accessories] Items and specifications Qty. Note Fuse 2 3A Main machine 1 Power cable 1 Air tube 1 Φ8mm Grey cotton sliver 4 Cork lining 4 Rating sample photo 1 White glue 1    
      Add to cart
      Quick view
      Fabric Flame Retardant Tester

      Fabric flame retardant tester

      Dyeing Lab Machine, Physical Testing & Fabric Testing
      $0.00
      Fabric Flame Retardant Tester
      Fabric Flame Retardant Tester

      Fabric Flame Retardant Tester

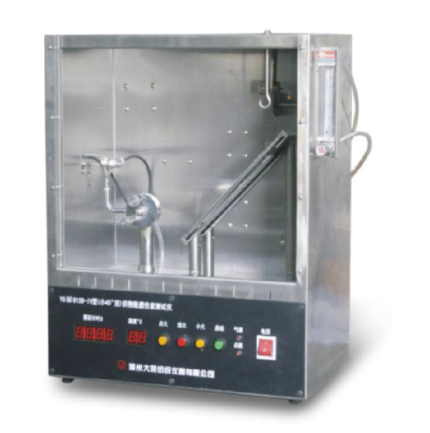
        A Fabric Flame Retardant Tester is a specialized laboratory instrument designed to evaluate the flammability characteristics of textiles. It assesses how fabrics react to direct flame exposure, measuring parameters such as ignition time, flame spread rate, after-flame duration, and afterglow time. This testing is crucial for ensuring that textiles meet safety standards for various applications, including apparel, home furnishings, and industrial uses.   Purpose and Applications The primary purpose of a Fabric Flame Retardant Tester is to determine the flame resistance of textile materials. This is essential for:- Apparel Safety: Ensuring garments, especially children's sleepwear and industrial work wear, meet flammability standards. - Home Textiles: Testing curtains, drapes, upholstery, and bedding for fire safety compliance. - Technical Textiles: Evaluating materials used in tents, protective clothing, and automotive interiors.   ⚙️ Key Features Modern Fabric Flame Retardant Testers incorporate several features to ensure accurate and reliable testing:- Adjustable Burner Angles: Allowing tests at various orientations (e.g., 0°, 45°, 90°) to simulate different real-world scenarios. Automated Ignition Systems: Providing consistent flame application and reducing operator variability. - Digital Timing Mechanisms: Accurately recording ignition time, flame spread, after-flame, and afterglow durations.   - Transparent Observation Windows: Enabling safe monitoring of the test without exposure to hazards. - Compliance with International Standards: Meeting protocols such as ASTM D6413, ISO 6941, and EN ISO 15025 for standardized testing procedures.   Testing Standards Fabric Flame Retardant Testers are designed to comply with various international standards, including: - ASTM D6413: Standard Test Method for Flame Resistance of Textiles (Vertical Test). - ISO 6941: Textiles — burning behavior — Measurement of flame spread properties of vertically oriented specimens. - EN ISO 15025: Protective clothing — Protection against heat and flame — Method of test for limited flame spread.   ️ How It Works
      1. Sample Preparation: A fabric specimen is cut to specified dimensions and conditioned as per standard requirements.
      2. Mounting: The sample is mounted vertically or at a specified angle in the testing chamber.
      3. Ignition: A controlled flame is applied to the fabric for a predetermined time.
      4. Observation: The tester records ignition time, flame spread, after-flame time, and afterglow time.
      5. Evaluation: Results are compared against standard criteria to determine compliance.
          ✅ Benefits - Safety Assurance: Ensures textiles meet fire safety regulations, reducing risk in end-use applications. - Quality Control: Identifies flammability issues during the manufacturing process. - Regulatory Compliance: Helps manufacturers meet legal requirements for flammability. - Product Development: Assists in developing flame-retardant materials for specialized applications.   For more detailed information on specific models and their features, you can refer to manufacturers like SDL Atlas's Auto Flam Flammability Tester [1], TESTEX's Vertical Flammability Chamber TF312   How to Use a Fabric Flame Retardant Tester (Vertical Flammability Test Method):
      1. Prepare the Sample
      - Cut the fabric to standard dimensions (usually 300 × 75 mm). - Condition the fabric for 24 hours at 21°C and 65% relative humidity.  
      1. Mount the Sample
      - Place the fabric vertically in the frame inside the test chamber. - Ensure it's held securely with no folds or slack.  
      1. Set Up the Burner Position the burner at the required angle (usually 90° for vertical tests).
      - Adjust flame size according to the standard (about 38 mm for ASTM D6413).
      1. Ignite the Flame - Apply the flame to the bottom edge of the fabric for 12 seconds.
       
      1. Observe and Measure - Start timing when flame is applied.
      - Measure: - After-flame time (how long it burns after flame removal) - After-glow time (how long it glows after burning stops) - Char length (distance burned vertically)  
      1. Record the Results
      - Repeat the test on multiple samples (usually 5) and calculate averages.  
      1. Compare with Standards
      - Evaluate whether the results meet the required flame resistance limits.     fabric flame retardant tester IV type (small 450 method) Scope of application It is used for testing the intensity and speed of burning of flammable textile materials after ignition. (specific ignition nozzles and sample holders can be customized to meet multiple criteria). Related standards GB/T14644 ASTM D1230 CFR1610 etc. Technical parameters 1. The spread of time:0 ~ 999.9S resolution 0.1S 2. The temperature inside the box shows:Room temperature -99 degrees C resolution 1 c 3. Igniting time:1S 4. Type of igniter:4 1/2 syringe 5. Sample clip size:Outer frame:204mm * 78mm inner frame:152mm×38mm 6. Distance from the top of the igniter to the sample surface:8mm 7. Studio size and outline size Studio size:370mm×220mm×350mm Outline size:375mm×245mm×478mm 8. Power supply:AC220V 50Hz 20W 9. Weight:18Kg  
      Add to cart
      Quick view
      Pneumatic bursting tester

      Bursting strength tester

      Dyeing Lab Machine, Physical Testing & Fabric Testing
      $0.00
      Bursting strength tester

      Pneumatic bursting strength tester

      true burst

      Pneumatic bursting tester China national patent:ZL201210486480.8 ZL201220628425.3 Pneumatic bursting strength tester China national patent:ZL201210486480.8 ZL201220628425.3 [Scope of application]: It is used to measure the burst strength and burst expansion degree of various fabrics, including knitted fabrics, woven fabrics, non-woven fabrics, laminated fabrics and other fabrics made by other processes, under standard conditions or wet conditions. This method is employed to assess the burst strength and degree of burst expansion of various types of fabrics, such as knitted, woven, non-woven, laminated, and others produced through different processes, under both standard and wet conditions. This technique is utilized to evaluate the burst strength and extent of burst expansion in various fabric types, including knitted, woven, non-woven, laminated, and others produced through diverse manufacturing processes, under both standard and wet conditions. Benefits of Bursting strength tester: Fast testing cycle for fast feedback to the production • Auto-start, a photocell detects the presence of a sample and automatically initiates a measurement sequence, thus allowing hands-free operation • Auto-cycling function permits the continuous cycling of the upper pressure foot to facilitate representative and continuous measurements
      • Available with automatic test strip feeder Measurements are simple to make with the Mullen type Bursting Strength Tester. Fast automatic measurements Measurement starts automatically once a test piece has been placed in the measuring gap. The clamping foot descends, and a bursting strength measurement is made.
      The sample is then quickly released and is ready for the next measurement at a new position. To maximize the sample measurement rate, the tester uses a minimum of time between the bursts, so that a series of 10 measurements can be done in less than 45 seconds. The actual measuring time depends of course on the type of paper or paper board being tested. Three Different test results can be reported after a single measurement; bursting strength standard, bursting strength compensated, and bursting energy absorption (BEA).Bursting strength tester can be compensated for the stiffness of the diaphragm For low bursting strength levels, the stiffness of the diaphragm can account for a large portion of the bursting strength value. If desired, the device can also measure, calculate, and report effective bursting strength compensated from the effects of the diaphragm. Measurement of Bursting Energy Absorption (BEA) is used to determine the energy absorption capability of a material. Strong, flexible paper has higher energy absorption values, while brittle, stiff paper has lower values. Bursting Strength Tester calculates and reports BEA according to the SCAN P 24 standard Related standards of Bursting strength tester: GB/T7742.2 (the first drafting unit of national standards) ISO13938-2, etc. [Instrument characteristics]: 1. Microcomputer control, automatic burst test, automatic correction, automatic data processing, and output results in the form of experimental report. 2. Aerodynamics, high cleanliness. 3. Color touch screen interface, Chinese and English menu operation, support online communication.
      1. Bursting pressure can reach up to 1.2MPa 5. The maximum burst and expansion degree can reach 70mm. 6. Strengthen the lighting system on the test surface. 7. The main aerodynamic force helps to clamp the sample system. 8. A variety of test areas are available, and the switching is easy.
      2. A variety of unit conversions between Chinese and English. 10. Reliable anti-pinch safety protection design. [Technical parameter]: 1. Test range: (0~1)Mpa (the range above 1Mpa needs to be customized) 2. The minimum graduation value: 0.0001Mpa 3. Pressurization mode: direct pressurization, timing pressurization, and expansion degree pressurization.
      4. Test accuracy: ≤±0.2%F·S 5. Thickness of elastic diaphragm: ≤2mm 6. Testing area: cm²) 100 50 10 7.3 Dia.φ(mm) φ112.8 φ79.8 φ35.7 φ30.5 7. Air pressure rate: non-linear segmented pressurization (0.1~0.5) L/min 8. Safety cover: high-transparent plexiglass 9. Power supply: AC220V±10% 50Hz 800W 10. Dimensions: (470×490×780)mm (host L×W×H)
      Add to cart
      Quick view
      Color Matching Cabinet -light Box

      Color Matching Cabinet-Light Box

      Physical Testing & Fabric Testing, Dyeing Lab Machine, Lab Equipment & Instrument
      $0.00

      Color Matching Cabinet-Light Box

      Color Matching Cabinet-Light Box x

      Color Matching Cabinet-Light Box

      Color Matching Cabinet -light Box A Color Matching Cabinet-Light box (also known as a Light Box) is a standardized visual assessment tool used to evaluate the color consistency of materials like fabric, paint, plastic, paper, and leather under different lighting conditions. Purpose of Color Matching Cabinet-Light Box : To detect color variations and metamerism (color changes under different lights). Ensures accurate color matching across production batches and materials.   How Color Matching Cabinet-Light Box Works: The cabinet is equipped with multiple standardized light sources (e.g., D65, TL84, UV, CWF, A). Samples are placed inside, and their colors are observed under each light to check for consistency.   Common Light Sources of Color Matching Cabinet-Light Box: D65 – Daylight (standard) TL84 – Store lighting (fluorescent) CWF – Cool white fluorescent UV – Ultraviolet (for fluorescent content) A – Incandescent (home light) U30/U35 – Warm white for showroom lighting     Applications of Color Matching Cabinet-Light Box: Textile and garment inspection Paint and coating industry Plastics and packaging Printing and graphic design   Benefits of Color Matching Cabinet-Light Box: Accurate Color Assessment - Ensures color consistency across products by simulating different lighting conditions. Detects Metamerism - Identifies if colors appear differently under various lights, preventing mismatches. Improves Quality Control - Enhances visual inspection processes in textiles, printing, and packaging.   Standardized Viewing Conditions - Provides consistent light sources for reliable and repeatable evaluations. Reduces Rework and Returns - Helps detect color defects early, saving time and production costs. Supports Industry Standards - Meets international color evaluation standards like ASTM D1729, ISO 3664.   Easy to Use of Color Matching Cabinet -Light Box  - Simple controls with clearly labeled light source buttons. Multiple Light Source Options   - Enables testing under conditions matching retail, daylight, home, and UV lighting. Features of Color Matching Cabinet-Light Box: Multiple Standard Light Sources   - Includes D65 (daylight), TL84 (store light), CWF, UV, A (home light), and optional U30/U35. Digital Hour Meter   - Tracks usage time for each light source to schedule timely replacements. Uniform Light Distribution   - Diffused lighting ensures consistent and shadow-free viewing.   Push Button Control Panel- Easy switching between different light sources. No Warm-Up Time - Instant-on lighting allows immediate use. Sturdy Metal Body - Durable and well-coated to reduce light reflection and distortion. Viewing Area Markings - Guides for proper sample placement and comparison. Optional Dimming Function - Adjustable light intensity (in advanced models) for fine-tuned observation.   Standardized Viewing Angles  - Ensures observer views samples under consistent angles for accurate color judgment.   Description of Color Matching Cabinet-Light Box Color Matching TILO 2 Feet 5/6 Option Light Box Cabinet (P60-5/6) TILO 2 Feet 5/6 Option Light Box Cabinet (P60-5/6) is equipped with 5 light sources. The consistency of the light sources in all Tilo Color Assessment Cabinets gives excellent viewing conditions for reliable color critical decisions under consistent lighting. TILO 2 Feet 5 Option Light Box Cabinet (P60-5) can be applied to the industries that need to perform color difference testing as follows: as the premiere designer and manufacturer of color matching instrument products for the Graphic arts, Photographic, Textile, Dyeing, Packaging, Printing, Leather, Inks, Knitwear, Plastic, Automotive and Ceramics industries. TILO 2 Feet 5 Option Light Box Cabinet (P60-5) offers an exact and dependable way to survey colors beneath different lighting conditions. This apparatus is planned to offer assistance experts in the material, paint, and plastic businesses to coordinate and assess colors with exactness. This high-quality item in Bangladesh at the best cost. The color Cabinet box permits for an ideal seeing environment for color inspection. Features of TILO 2 Feet 5 Option Light Box Cabinet (P60-5) Multiple Light Sources of Color Matching Cabinet-Light Box The lTILO 2 Feet 5 Option Light Box Cabinet (P60-5) incorporates a assortment of light sources. These sources can reenact common sunshine, tungsten, and other counterfeit lighting conditions. By changing light sources, clients can compare colors in diverse situations, guaranteeing precise results. Adjustable Light Intensity of Color Matching Cabinet-Light Box The color coordinating light box highlights flexible light concentrated. You can control the brightness to coordinate distinctive real-world conditions. It guarantees a more point by point investigation of how colors alter beneath different lighting intensities. Compact and Solid Design This color appraisal cabinet comes in a compact plan, making it simple to put in any workspace. Its strong structure guarantees long-term utilize, indeed in requesting environments. Precise Color Evaluation The light box gives a controlled environment that makes a difference clients assess colors in a steady way. This highlight is particularly valuable in businesses where correct color coordinating is basic, such as in materials or paints. Energy Efficient The color cabinet is outlined to be energy-efficient. It employments Driven lights that devour less control whereas still advertising dependable and precise color assessment. Simple Client Interface The user-friendly interface of the color coordinating cabinet makes it simple for anybody to work. The controls are straightforward, and clients can alter settings effortlessly. Portable Design The color coordinating light box is lightweight, making it simple to move from one area to another. This movability is particularly valuable when you require to take the cabinet to diverse parts of the generation floor or to different client locations. Ideal for Different Industries Whether you work in materials, car, or fabricating, the color appraisal cabinet offers the exactness and unwavering quality required for color coordinating. It ensures consistency over distinctive materials and generation lines. FEATURES Certified by ASTM D1729, ISO3664, DIN, ANSI and BSI. Automatic changeable into another light source by switching. Usage time display, name of lamp, total number of switches for each. Violated time sensor for tracking lamp service or replacement. Large display & individual switch, easy to operate each light source. No warm-up time, just plug and play. The energy-saving device which generates lower heat & high efficiency. The name of the light source can be changed. SPECIFICATION OF TILO 2 FEET 5 OPTION LIGHT_BOX CABINET (P60-5) Name Details Model P60(5) Brand TILO Origin Hong Kong Dimensions (WxDxH) (710 x 405 x 570)mm Standards ASTM D1729, ISO3664, DIN, ANSI and BSI Light source Five light source. Power Source Electric. Voltage 220 ~ 240V Body Material Fiber-reinforce Warranty One year free service LIGHT SOURCE OF TILO 2 FEET 5 OPTION LIGHT_BOX CABINET (P60-5) Light Source Color viewing applications / Uses of Light Color Temp. (K) Power (W) Brand Info Quantity D65 International standard Artificial Daylight / Natural Daylight 6500 18 PHILIPS; TL-D/18-965 2 Pieces TL84 Applied to stores in Europe, Japan and China 4000 18 PHILIPS; TL-D/18-840 2 Pieces F “Sun-setting Light Yellow” incandescent light source 2700 40 PHILIPS 4 Pieces UV ultraviolet light to detect and evaluate optical brighteners or fluorescent pigments Wave length: 365nm 20 PHILIPS 18W BLB 1 Pieces CWF (Cool White Fluorescent) American Standard 4150 18 PHILIPS; TL-D/18-640 2 Pieces      
      Add to cart
      Quick view
      Counting Balance-Weighing Scale
      Counting Balance-Weighing Scale

      Counting Balance-Weighing Scale

      Lab Equipment & Instrument, Dyeing Lab Machine, Physical Testing & Fabric Testing
      $0.00

      Counting Balance-Weighing Scale

      Counting Balance-Weighing Scale

      Counting Balance-Weighing Scale

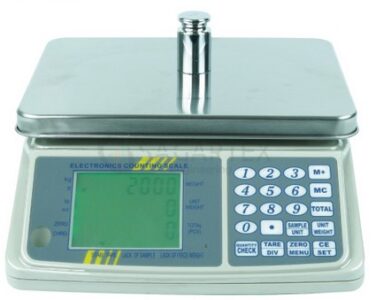
        A Counting Balance-Weighing Scale (or Counting Weighing Scale) is a precision electronic scale designed to weigh items and simultaneously count them based on individual piece weight. It’s commonly used in industries for inventory management, packaging, and quality control.   Purpose of Counting Balance-Weighing Scale: To quickly and accurately count small items like buttons, beads, screws, or pills by weight. Eliminates manual counting, especially for large quantities.   Working Principle of Counting Balance-Weighing Scale: Weigh a sample quantity of items to determine the average weight of one piece. Place a bulk quantity on the scale. The scale divides the total weight by the unit weight to calculate the total item count.     Applications of Counting Balance-Weighing Scale: Textile accessories (buttons, rivets) Hardware (nuts, bolts, washers) Electronics (resistors, chips) Pharmaceuticals (tablets, capsules) Benefits of Counting Balance-Weighing Scale:   Fast and Accurate Counting - Saves time by quickly counting large quantities of small items. Reduces Human Error- Eliminates mistakes common in manual counting. Improves Productivity - Speeds up packing, inventory, and quality control processes. Versatile Use - Suitable for various industries: textiles, hardware, pharmaceuticals, electronics.   Cost-Efficient- Reduces labor costs and improves operational efficiency. Compact and Portable - Easy to move and use in different workstations. Dual Functionality - Can be used for both counting and standard weighing. Memory and Tare Functions - Stores unit weights and allows container weight deduction.   Features of Counting Balance-Weighing Scale: High Precision Sensors- Ensures accurate weight and count, even for tiny components. Digital Display- Separate displays for total weight, unit weight, and piece count. Tare Function - Allows deduction of container weight for net measurements. Memory Function - Stores frequently used unit weights for fast recall.   Multiple Units Support- Measures in grams, kilograms, pounds, etc. Sample Size Selection- Users can set sample sizes (e.g., 10, 20, 50 pcs) to calculate piece weight. Overload Protection- Prevents damage from excessive weight. Auto Calibration - Maintains long-term accuracy with internal or external calibration options. Sturdy Platform- Stainless steel pan with anti-slip design for stable weighing. Battery and AC Operation- Can run on rechargeable batteries or power adapter.   How to Use Counting Balance-Weighing Scale: Turn On the Scale - Power it on and wait for the display to stabilize at zero. Tare the Container - Place an empty container on the pan and press the "TARE" button to zero out its weight. Set Sample Size - Place a known quantity (e.g., 10 or 20 pcs) of identical items on the scale. - Enter the sample quantity using the keypad. Confirm Unit Weight - The scale calculates and stores the average unit weight automatically. Add Bulk Items - Add the rest of the items into the container. - The display will show the total count based on the stored unit weight. Record Results   - Note down the total piece count and remove the items. Turn Off After Use - Power off the scale to save battery or electricity.     Counting Balance /Weighing Scale Model : DS610C Brand : DIGISCALE Origin : Germany Capacity : 3 kg Division : 0.1g Min Weight : 0.5g Grade : Class 3 Platter : 280 × 215mm Battery : Rechargeable Battery with AC Adaptor Display : Double Large LCD Display Warranty : One Year Service Warranty SPECIFICATION Build With 5 Measuring Units: kg, g, lb, oz, PCS Count Platter : 280 × 215mm Quality : Heavy Duty Premium Quality Product Net / Gross Weight : 3080g / 3130g Battery : Rechargeable Battery with AC Adaptor Battery Capacity: 6V 4.5Ah / 20 HR Adaptor Power Input : AC 220V-240V / 50Hz Adaptor Power Output : 10V DC/ 500mA Display : Double Large LCD Display Color : White-Gray Keyboard : 20 Members Key Operating Temperature : 0-40°C (32-104°F) FEATURES Auto Zero Tracking Automatic Overload Display Grade Class 3 Auto Backlight Double LCD Display Low Battery Indication Rechargeable Battery with Adaptor Save Electricity Advantage Piece Counting Functionality: The DS603C Counting Weighing Scale is prepared with an precise piece checking highlight, perfect for stock administration, generation lines, and quality control assignments. This guarantees you can tally things like screws, jolts, or other little components efficiently. High-Precision Digital Scale Display: The advanced scale show gives clear and precise readings, making it simple to screen weight and amount. Its shinning and natural interface guarantees ease of use in diverse lighting conditions. Digital Scale Calibration: To keep up exactness, the DS610C weighing scale calibration prepare is direct, guaranteeing the scale remains dependable over time. Normal weight scale calibration ensures reliable execution, indeed with overwhelming use. Durable and Reliable Build: The DS610C advanced weight scale is created with strong materials to withstand visit utilize in requesting situations, such as stockrooms and fabricating facilities. Versatility: As a weighing and tallying scale, it combines the benefits of weight estimation and piece tallying in one gadget. This makes it appropriate for a wide extend of applications, from retail to mechanical uses. Categories: Digital Scale and Balance, Piece Counting Scale, Table Top Scale
      Counting Balance-Weighing Scale

      Counting Balance-Weighing Scale

       
      Add to cart
      Quick view
      • Address
        • House 05, Road 3/A, Sector 09, Uttara, Dhaka.
      • Phone
        • 01713741546, 01974741546, 01714634452, 01838488804
      • Email
        • maamtexbd@gmail.com, info.maamtex@gmail.com, mamun@maamtexbd.com, info@maamtexbd.com
      • USEFUL LINKS
        • Privacy Policy
        • Terms & Conditions
      • USEFUL LINKS
        • Home
        • Contact Us
        • About Us

      SOCIAL MEDIA:

      Copyright Reserved by Maamtexbd 2024 | Developed by Systemeye.net.
      • Menu
      • Categories
      • Electronics
      • Lab Scientific Item
      • Home
      • Products
        • Dyeing Lab Machine
        • Physical Testing & Fabric Testing Machine
        • Lab Equipment & Instrument
        • Wet & Dry Process Instrument
        • Yarn Dyeing Machine-Equipment
        • Washing-Drying Machine
      • About us
      • Contact us
      Shopping cart
      Close
      Chat Now