
 Products
 Martindale abrasion tester Updated

0%
Digital Ink Rubbing Tester
$0.00
Digital Ink Rubbing Tester

Digital Ink Rubbing Tester
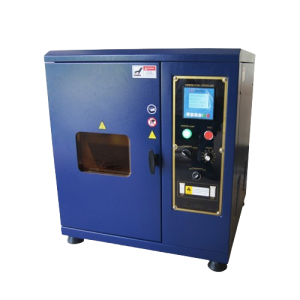
A Digital Ink Rubbing Tester is a laboratory device used to evaluate the abrasion resistance and print durability of printed materials such as paper, packaging, labels, and printed films. It simulates the rubbing action between printed surfaces to test how well ink or coating adheres under friction.
Purpose of Digital Ink Rubbing Tester:
– Measures how much ink or print wears off when rubbed against another surface.
– Helps assess print quality, especially for packaging, labels, and publications.
⚙️ Key Features of Digital Ink Rubbing Tester:
– Digital Control Panel: For setting rubbing speed, stroke length, and number of cycles.
– Adjustable Load: Pressure can be adjusted to simulate real-use friction.
– Counter Display: Shows the number of rubbing cycles completed.
– Sample Holders: Secure the test samples and rubbing medium in place.
– Automatic Stop: Machine stops automatically after the set number of cycles.
Applications of Digital Ink Rubbing Tester:
– Used in printing, packaging, and paper industries.
– Commonly tests materials like labels, corrugated boxes, printed cartons, and laminates.
✅ Benefits of Digital Ink Rubbing Tester:
– Ensures print durability under handling or shipping.
– Supports quality control in production.
– Helps in selecting better ink or coating formulations.
✅ 1. Ensures Print Durability
– Tests how well ink or coating resists wear from friction, ensuring quality under real-world handling and shipping.
✅ 2. Improves Quality Control
– Detects weak adhesion or poor ink quality early in the production process, reducing rework and returns.
✅ 3. Precise and Repeatable Testing
– Digital settings allow accurate control of speed, pressure, and cycle count for consistent test conditions.
✅ 4. Saves Time and Labor
– Automates the rubbing process with pre-set cycles, reducing manual effort and improving efficiency.
✅ 5. Versatile Application
– Suitable for a wide range of printed materials: labels, packaging, paper, film, and coated surfaces.
✅ 6. Supports Product Development
– Helps in testing and selecting the best inks, coatings, and substrates for specific use cases.
✅ 7. Meets Industry Standards
– Often compatible with standards like ASTM D5264, ensuring credibility in test results.
key features of a Digital Ink Rubbing Tester:
⚙️ 1. Digital Control Panel
– Allows precise setting of rubbing speed, stroke length, and cycle count.
2. LCD/LED Display
– Shows real-time data like number of cycles, test duration, and operational status.
3. Adjustable Load
– Enables setting different pressure levels to simulate various handling conditions.
4. Automatic Cycle Operation
– Runs pre-set rubbing cycles and stops automatically after completion.
5. Sample Holders/Fixtures
– Securely holds test specimens and rubbing surfaces for accurate testing.
️ 6. User-Friendly Interface
– Intuitive buttons and digital readouts for easy operation and test setup.
7. Compatible with Industry Standards
– Supports test methods like ASTM D5264 and TAPPI T830.
8. Compact & Durable Design
– Small footprint with a sturdy build for long-term use in lab environments.
Here’s a simple step-by-step guide to using a Digital Ink Rubbing Tester:
✅ 1. Prepare the Samples
– Cut the printed material to fit the sample holder.
– Cut a rub surface (usually plain or standardized paper) for rubbing contact.
✅ 2. Mount the Samples
– Place the printed sample on the base platform.
– Secure the rubbing medium in the moving head or upper fixture.
✅ 3. Set Test Parameters
– Use the digital control panel to input:
– Number of cycles
– Rubbing speed
– Stroke length
– Load/pressure (if adjustable)
✅ 4. Start the Test
– Press the Start button.
– The machine will perform rubbing action based on your settings.
✅ 5. Observe the Results
– After completion, inspect the printed surface for ink wear, smudging, or fading.
– Record results manually or digitally if the tester supports logging.
✅ 6. Clean and Reset
– Remove samples, clean the fixtures, and turn off the device after use.
Digital Ink Rubbing Tester
Shipping & Delivery
Related products
Digital thickness gauge
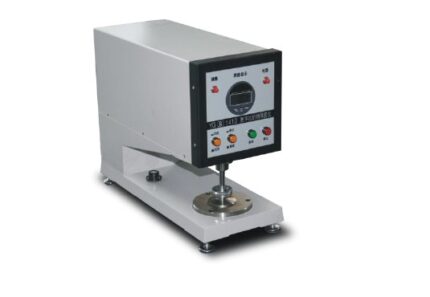
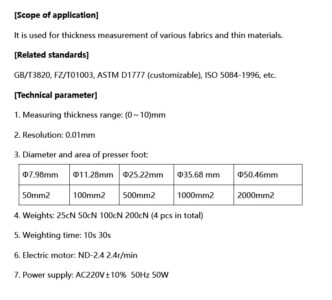
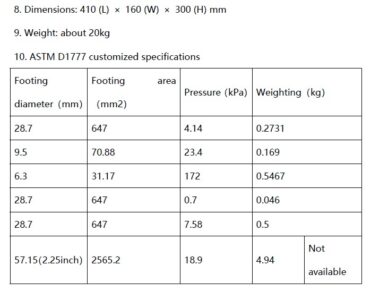
Digital Thickness Gauge

Digital Thickness Gauge
- High Accuracy - Offers precise measurements, often up to ±0.01 mm, reducing human error.
- Quick Readout - Instant digital display of results speeds up testing and data collection.
- Easy to Use - Simple operation with one-button zeroing and unit conversion.
- Consistent Pressure Application - Spring-loaded foot ensures uniform pressure for repeatable results.
- Multi-Material Testing - Suitable for textiles, paper, film, rubber, leather, and nonwovens.
- Portable and Lightweight- Ideal for both lab and field use with battery-powered operation.
- Data Hold Function - Locks the measurement on-screen for easy recording.
- Improves Quality Control - Helps manufacturers maintain product thickness standards.
- Digital LCD Display - Provides clear, instant thickness readings in mm or inches.
- High Resolution & Accuracy - Typically measures with 0.01 mm precision.
- Spring-Loaded Presser Foot - Applies consistent pressure on samples for reliable results.
- Zero Setting Function- Allows quick reset before each measurement.
- Unit Conversion Button - Easily switch between metric (mm) and imperial (inch) units.
- Data Hold Function - Freezes the displayed value for easy recording.
- Portable Design - Compact and battery-operated for on-site or lab use.
- Durable Construction - Made from stainless steel or hardened materials for long life.
- Auto Power-Off - Saves battery by shutting off when idle.
- Variety of Anvil & Foot Sizes - Customizable based on testing standards or material types.
- Power On the Device - Press the power button to turn on the gauge.
- Zero the Gauge - Close the anvil and presser foot fully. Press the "ZERO" button to reset the display to 0.00 mm.
- Select Unit (if needed) - Use the unit button to toggle between mm and inches.
- Place the Sample - Open the presser foot and insert the material between the foot and anvil.
- Apply Pressure - Gently release the presser foot to let it rest on the sample using its spring force.
- Read the Measurement- Read the thickness displayed on the LCD screen.
- Hold or Record the Data - Use the "HOLD" button (if available) to lock the reading for recording.
- Remove the Sample- Lift the presser foot and take out the material.
- Power Off - Turn off the device or let it auto shut-off.
- Features of Digital Thickness Gauge:
- Digital LCD Display - Provides clear, instant thickness readings in mm or inches.
- High Resolution & Accuracy - Typically measures with 0.01 mm precision.
- Spring-Loaded Presser Foot - Applies consistent pressure on samples for reliable results.
- Zero Setting Function- Allows quick reset before each measurement.
- Unit Conversion Button - Easily switch between metric (mm) and imperial (inch) units.
- Data Hold Function - Freezes the displayed value for easy recording.
- Portable Design - Compact and battery-operated for on-site or lab use.
- Durable Construction - Made from stainless steel or hardened materials for long life.
Pantone book
Pantone Book

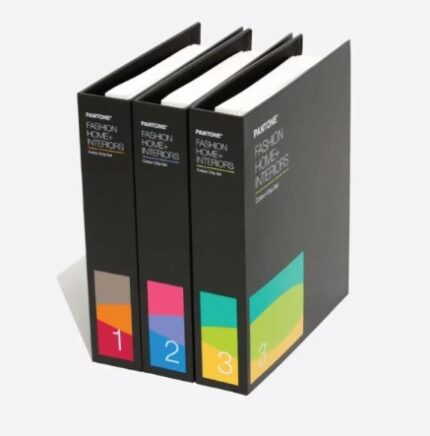
Pantone Book
- Formula Guide (Solid Coated & Uncoated) – For spot color printing.
- Color Bridge – Shows Pantone spot colors alongside CMYK equivalents.
- Pantone Fashion, Home + Interiors (FHI) – For textiles, soft goods, and home decor.
- Pantone CMYK and Pastels & Neons Guides – For process printing and special effect colors.
- Formula Guide (Solid Coated & Uncoated)
- Color Bridge Guide (Coated & Uncoated)
- CMYK Guide (Coated & Uncoated)
- Pastels & Neons Guide
- Metallics Guide
- FHI Color Guide (TPG – Paper)
- FHI Cotton Passport & Cotton Planner (TCX – Textile)
- FHI Polyester Swatch Book
- Pantone SkinTone Guide
- Pantone Plastic Standard Chips

Pantone Book

Color Matching Cabinet-Light Box
Color Matching Cabinet-Light Box
Color Matching Cabinet-Light Box
Digital precision balance
digital precision balance
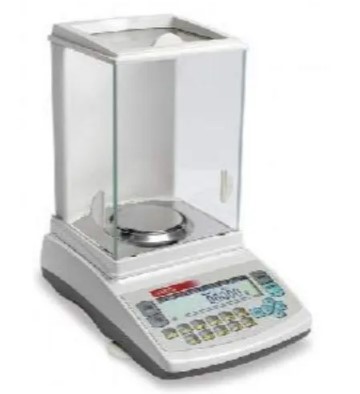
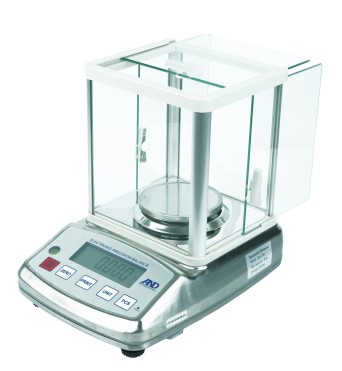
2/3/4/5 Digit Digital precision Balance
digital precision balance is a weight balance machine. It’s used to Low capacity balance. digital precision balance play an important role to accurate measurement. Digital precision balance is used to check weight paper, jewelry etc. It shows accurate result. We have the best collection of digital precision balance. MAAM TEX IS the best supplier of Precision Balance in Bangladesh
A Digital Precision Balance is a high-accuracy electronic weighing device used in laboratories, industries, and educational institutions for measuring mass with a high degree of precision. It is essential for tasks that require meticulous weight measurements, such as chemical analysis, formulation, and quality control. Key Features:- High Accuracy & Precision: - Typically offers readability from 0.1 g to 0.001 g (or even finer). - Ideal for weighing small amounts of material where accuracy is crucial.
- Digital Display: - Large, backlit LCD or LED display for easy reading. - Some models include touch screen interfaces.
- Tarring Function: - Allows you to subtract the weight of a container or packaging to get the net weight.
- Calibration: - Internal or external calibration to maintain accuracy over time. - Some advanced models have auto-calibration features.
- Weighing Units: - Supports multiple units like grams (g), milligrams (mg), carats (ct), and ounces (oz). Stable Platform: - Includes a draft shield to protect against air currents and vibrations, which can affect measurement accuracy.
- High Accuracy and Precision- Delivers extremely accurate weight measurements, often down to 0.001 g or better.- Crucial for experiments and applications where even slight variations can affect outcomes.
- User-Friendly Interface- Digital display makes readings easy to read and interpret.- Most models include intuitive controls for functions like tarring, unit conversion, and calibration.3. Speed and Efficiency- Provides instant, stable readings, saving time compared to manual or mechanical balances.- Streamlines lab workflows and enhances productivity.
- Versatile Applications- Suitable for various fields including chemistry, biology, pharmacology, food testing, and gemology.- Can handle diverse weighing tasks from solids to liquids and powders.
- Advanced Features- Tare Function: Subtracts the weight of containers automatically.- Multiple Weighing Units: Supports various measurement units.- Data Connectivity: Many models allow connection to computers or printers for data logging.
- Portability and Space Efficiency- Compact design fits easily in most laboratory setups.- Lightweight models are easy to move and store.
- Enhanced Safety and Reliability- Stable platform and draft shields reduce environmental interference.- Built-in calibration ensures ongoing accuracy.


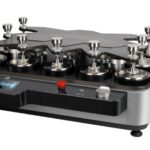
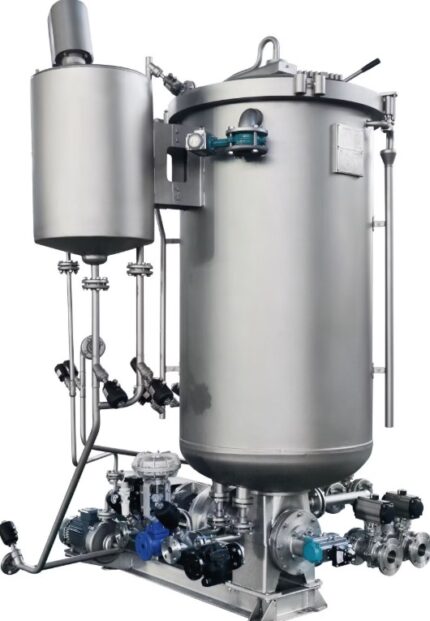
IR Dyeing Machine Dunlin
IR Dyeing Machine Dunlin
IR Dyeing machine Dunlin is Safe, high efficiency, environment friendly, energy saving, optimum for new dyeing small sample machines
0 - 3.5 ℃ / min Cooling rate 0.2 - 5 ℃ / min Cooling method Air-cooled Rotation speed 0 - 60 rpm Liquor ratio 1:5 -1:100 Power supply 1∮AC 220V 50/60HZ Dimensions( L x W x H) 670×670×780mm 860×680×780mm Weight 100kg 120kg Standard Accessories Cups 1set
Put the test sample. Cups stand 1set Place where to put cups. Protective glove 1set To avoid to be hurt by HT cups. Model: IF-24SCapacity: 24 pots Brad: DUNLIN Origin: China
Color dyeing tests for various dyestuffs of IR Dyeing machine Dunlin- Step dyeing tests. C. Dispersing, levelling and impregnating test. D. High or low liquor ratio exhausting tests. E. Fabric steak and staining tests. F. Concentration tests and others. Protection and Safety gates to protect. Temperature control accuracy +/- 0.2degree

IR Dyeing machine

Hydraulic GSM Cutter
Hydraulic GSM Cutter
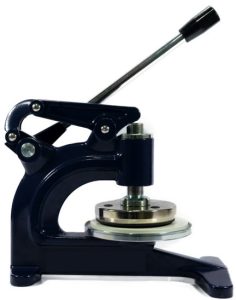
Hydraulic GSM Cutter
- High Cutting Precision - Ensures consistent and accurate fabric sample size for reliable GSM results.
- Effortless Operation- Hydraulic action reduces manual effort and operator fatigue.
- Ideal for Thick or Multi-Layer Fabrics - Cuts through dense or multiple fabric layers cleanly.
- Time-Saving - Speeds up the sample preparation process, especially for high-volume testing.
- Improves Test Accuracy - Uniform samples help eliminate errors in GSM calculation.
- Durable and Long-Lasting - Robust construction ensures stability and extended service life.
- Safety Enhancement - Reduces risk of injury compared to manual rotary cutters.
- Consistent Pressure Application - Hydraulic mechanism maintains steady force for each cut.
- Hydraulic Press Mechanism - Applies consistent and strong pressure for clean, even cuts.
- Standard Cutting Die (100 cm²) - Produces fabric samples suitable for GSM testing with standard area.
- Heavy-Duty Construction - Built with robust metal frame for long-term lab or industrial use.
- Sharp Stainless Steel Blades - Durable and replaceable blades ensure smooth, precise cuts.
- Cutting Pad Included - Comes with a rubber or nylon base to protect blades and ensure clean edges.
- Simple Lever or Button Operation - Easy to use with minimal training required.
- Non-slip Base - Provides stability during operation for safe, accurate cutting.
- Supports Various Fabric Types
- Place the Cutting Pad - Lay the rubber or nylon cutting pad on a flat surface.
- Position the Fabric - Place the fabric sample flat and smooth on the cutting pad.
- Align the Cutter - Position the GSM cutter die over the desired area of the fabric.
- Activate Hydraulic Press - Pull the lever or press the button to apply hydraulic pressure and cut the sample.
- Remove the Sample - Lift the cutter and carefully take out the circular fabric piece (usually 100 cm²).
- Weigh the Sample - Place the cut sample on a precision balance or GSM scale to determine weight.
- Calculate GSM - Multiply the sample weight (in grams) by 100 to get GSM.
Hydraulic GSM Cutter
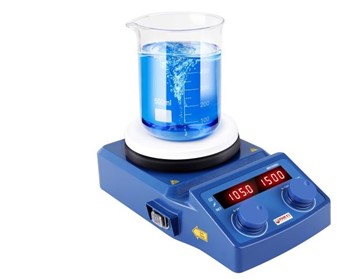
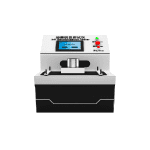
Digital hot plate-magnetic stirrer
Digital hot plate-magnetic stirrer
Digital hot plate-magnetic stirrer
- Magnetic Stirrer:
- Digital Display and Controls:
- Temperature Sensors: - Built-in or external probes (like a PT100 or thermocouple) for accurate temperature control.
- Precision and Control- Digital Interface: Allows accurate setting and monitoring of temperature and stirring speed.- Consistent Results: Ensures reproducibility in experiments and solution preparations.
- Efficient Mixing and Heating- Uniform Mixing: Magnetic stirring eliminates hotspots and ensures even distribution of solutes.- Simultaneous Operation: Ability to heat and stir at the same time improves efficiency.
- Safety Features- Overheat Protection: Prevents accidents by automatically shutting off at unsafe temperatures.- Sealed Surface: Reduces risk of contamination and easy to clean.
- Versatility
- Compact and User-Friendly- Takes up minimal bench space.- Simple to operate with user-friendly controls and displays.
- Durability- High-quality materials like ceramic or stainless steel tops resist corrosion and wear.
- Time-Saving Speeds up preparation of solutions and reactions compared to manual stirring and separate heating. Would you like these benefits presented in a slide format or for a product brochure?

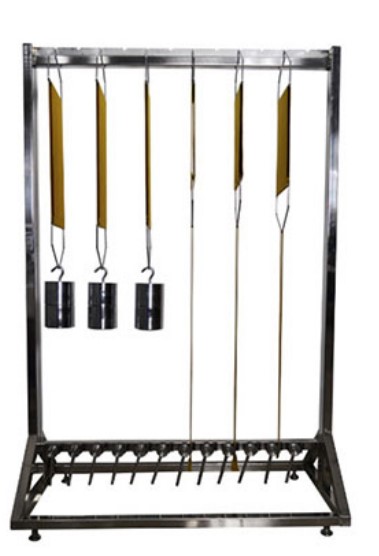
Perspiration Tester
Perspiration Tester
Perspiration Tester
- Fabric samples are treated with synthetic perspiration solution (acidic or alkaline).
- They are sandwiched with adjacent fabric and placed between glass or acrylic plates.
- The assembly is loaded into the tester and pressed under specific pressure.
- it’s then incubated at 37°C (body temperature) for a fixed time (typically 4 or 16 hours).
- Afterward, color change and staining are evaluated using a gray scale.
- Accurate Sweat Simulation - Mimics real-life effects of acidic and alkaline perspiration on fabrics.
- Improves Product Quality - Ensures textiles retain color and don’t bleed or stain when worn.
- Supports Standard Compliance - Follows ISO and AATCC test standards for global market approval.
- Protects Brand Reputation- Reduces customer complaints due to dye transfer or fading.
- Simple and Repeatable- Provides consistent pressure and conditions for reliable results.
- Multi-Sample Testing- Tests multiple specimens at once, saving time in labs.
- Durable and Low Maintenance- Robust frame with minimal moving parts makes it long-lasting and easy to care for.
- Stainless Steel Frame - Corrosion-resistant body for durability and long-term use.
- Multi-Sample Capacity - Can hold up to 20 or more specimens for batch testing.
- Standardized Loading Weight- Applies uniform pressure (usually 12.5 kPa) across all samples.
- Removable Plates - Glass or acrylic plates ensure even contact and easy cleaning.
- Compact Design- Space-saving, bench-top model ideal for lab environments.
- Complies with Test Standards - Meets ISO 105 E04, AATCC 15, and related perspiration fastness standards.
- Ease of Operation - Simple loading, unloading, and incubation process.
- High-Temperature Resistance - Can be used inside incubators at 37°C or ovens as required.
- Prepare the Test Solution - Mix artificial acidic or alkaline perspiration as per standard (ISO or AATCC).
- Cut the Fabric Samples - Cut both the test fabric and adjacent white fabric (usually cotton) to standard size.
- Soak the Samples - Immerse the fabric sandwich (test + adjacent) in the test solution for 30 minutes.
- Remove Excess Liquid - Gently squeeze or blot to remove extra moisture—do not dry.
- Load in the Tester- Place each sandwich between glass or acrylic separator plates in the tester.
- Apply Pressure - Tighten the top plate or place the standard weight on top to apply uniform pressure.
- Incubate - Keep the loaded tester in an oven or incubator at 37°C for 4–16 hours (depending on the method).
- Accurate Sweat Simulation - Mimics real-life effects of acidic and alkaline perspiration on fabrics.
- Improves Product Quality - Ensures textiles retain color and don’t bleed or stain when worn.
- Supports Standard Compliance - Follows ISO and AATCC test standards for global market approval.
- Protects Brand Reputation- Reduces customer complaints due to dye transfer or fading.
- Simple and Repeatable- Provides consistent pressure and conditions for reliable results.
- Multi-Sample Testing- Tests multiple specimens at once, saving time in labs.
- Durable and Low Maintenance- Robust frame with minimal moving parts makes it long-lasting and easy to care for.
- Dry and Evaluate - Remove, air dry the samples, then assess color change and staining using a gray scale.
- Fabric samples are treated with synthetic perspiration solution (acidic or alkaline).
- They are sandwiched with adjacent fabric and placed between glass or acrylic plates.
- The assembly is loaded into the tester and pressed under specific pressure.
- it’s then incubated at 37°C (body temperature) for a fixed time (typically 4 or 16 hours).
- Afterward, color change and staining are evaluated using a gray scale.
Perspiration Tester